Make These Rainbow Crayon Hair Bows | Diy Hair Bows
- Posted on 14 September, 2021
- 6D Hair Extensions
- By Anonymous
If there was a perfect back-to-school craft, it would be this one. Today, Karen makes faux leather rainbow hair bows that make for a perfect addition to all your school fits.
Find the bow pattern here: https://hg.tv/3k78wh4
Check out more of our favorite back-to-school DIYs:
https://www.youtube.com/watch?v=DVyA6d...
https://www.youtube.com/watch?v=Gg3XOI...
Subscribe and follow HGTV Handmade for more crafty inspiration:
▶️ SUBSCRIBE: http://www.youtube.com/subscription_ce...
INSTAGRAM: https://www.instagram.com/hgtvhandmade...
SNAPCHAT: https://www.snapchat.com/discover/Hand...
️ FACEBOOK: https://www.facebook.com/hgtvhandmade
⏰ TIKTOK: https://www.tiktok.com/@hgtvhandmade
ON HGTV: https://www.hgtv.com/hgtvhandmade
For more HGTV around the web, check out:
HGTV YouTube Channel: http://www.youtube.com/hgtv
HGTV on Twitter: http://www.twitter.com/hgtv
HGTV on Facebook: http://www.facebook.com/HGTV
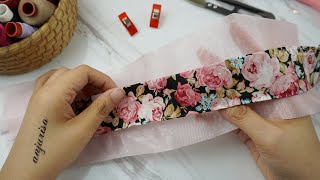
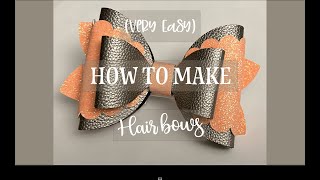
Hi everybody, so it is that time of year again time for back to school. Today, i'm going to show you how to make the cutest back to school project. I'Ve ever seen we're going to make hair bows that look like crayons, so it's easier than you think. Let'S get into it all right, so you're going to need this pattern, which you can download and print out onto cardstock you're, also going to need some faux leather, which i bought online. It comes in all kinds of colors, honestly, the most difficult part of this whole thing is just deciding which color i want to make. First, let's go with blue. I think that'll be really pretty so. Keep your color and a piece of black faux leather in front of you and then go ahead and cut out the pattern. Once you have all of those cut out, we're going to trace and cut out the white shapes from the colored fabric and the black shapes from the black fabric. Okay, so once those are all cut out, they're, looking great we're gon na take these three pieces and put them to the side. We'Re just gon na work with these for the moment, grab your blue fabric once again and flip it over and we're going to glue. This piece onto the back just like that, because we want the bottom layer of our bow to be a little more sturdy. So we want two layers of fabric rather than just one, so you can use any glue that you have i'm going to use tacky glue that i'm applying with a paintbrush. Then we're going to take these black little squiggly pieces and those we're going to glue right here at the top and the bottom all right. That'S looking great! So we're just going to set that aside until the glue dries and if you want to speed it up. I like using a hair dryer which helps the glue dry a little faster, so once the glue is dry, we're just going to cut that out once again and look how cute that is. So that is the base of our hair bow finished. Now i just want to add a quick safety tip if you're going to be giving this to a really young kid. You might want to add a few stitches to keep these small black pieces in place just to reinforce the glue, because we don't want any small hands pulling these off now. You'Ll want to bring back the other three pieces and warm up a hot glue gun. So if you've ever made a hair bow before you'll know exactly what we're doing, basically we're just going to fold both sides into the center. Just like that all right. So now we have all of the pieces of our hair bow and you can see that when we stack these on top of each other, it is going to look so cute. So the last thing that you're going to need is a hair clip one of these that has the flat top and then it just opens on the back. So you're just going to put down a little bit of glue right in the middle here and press larger bow right on top, and you can see that the edges of the bow should line up with these black squiggly pieces that we put on before. So put down another dot of glue and then put the smaller bow right on top of that, so here's what that looks like you, can see it from the side there. Everything is like pinched, together right in the middle, so now flip it over and we're going to glue on the hair clip, and you want to make sure that the hinged side is towards the front of the bow. So it opens like this. So once that's staying in place, this is the only slightly tricky part, but i promise you can do it we're going to take this long rectangle of the black fabric and put a little bit of glue right here on the end, then you're going to slide that Through the hair clip so that it's basically anchoring the hair clip in place - and i like using a toothpick to help kind of push that down in place because it's hard to get your fingers under there all right. So now we're going to flip that over and we're just gon na put a little bit of glue right in the middle once again and wrap that around it, making sure that it's really tight and it looks really clean and once that's staying in place. So once again, we're gon na add a little bit of glue right here, so we're not going all the way to the end. It'S really just um kind of in the middle there and then feed that through the hair clip once again, pull it through and line it up and use your toothpick to kind of push it down into place. All right. So now we're just going to carefully cut off the extra fabric just like that, and it should look really neat and clean here on the back. So i'm just going to show you a close-up. You can see that this black rectangle is wrapping around the hair. Clip twice and then all the way around the bow, but the top of the hair clip still opens so that it's still a functional hair clip. So now that i've finished my first bow, let's make more in every color of the rainbow. So how cute did these turn out? I am definitely going to have to find a friend who has kids that i can give them to because they are just way too cute not to be seen in a classroom. So i would love to know if you are going back to school this year and if you are, what are you making anything fun? Let us know in the comments, don't forget to like this video and subscribe, and i will see you all in the next one. You
Comments
Theresa Hartman: Nice! I wonder if you could make a cloth one as a clip-on boys’ tie. I’ll bet it would look cute at a kindergarten graduation!
Joyce Gayden: These bows are sooo pretty. What a beautiful project.
FSC-Creative: Soooo cute! And thanks for the pattern!
Lorraine Castellon-Rowe: Oh how darling!!! Great tutorial!! They're so easy to make. Thank you very much!!! ❤
Della Pitre: My grand daughter LOVES to color. I think I will make her some of these...she would love them.
Margaret Moon: These are adorable. It will be cute to make some with school colors too. (green and gold or maroon and white for instance)
Margaret Gonzalez: +JMJ+ Thank you for sharing your talents.!! You made everything with such joy and happiness ♥️ I’ll be making them for my granddaughter God Bless You..!!
Jemima1377: I'm starting to get a Karen-radar - I could tell by one look at the colourful material and her hands in the close-up, that this was one of her videos. ^_^
M.Gil: These would be great to make on a Cricut and use iron on for the black.
Andrea F: Is there a link for the faux leather?
Vivian Hamilton: so cute!
Eileen: Where can I get the bow pattern?
Maria Barrera: By: aidascreations Sew cute!
susie wheeler: Nice project
murphy1384: Adorable