Girls French Hair Bow Tutorial & Free Pattern
- Posted on 21 October, 2019
- 6D Hair Extensions
- By Anonymous
Create stunning layered faux leather bows with this free SVG cut file and printable pattern download.
Use the hair bow SVG download to quickly cut bows on your cutting machine (Cricut, Silhouette, Scan N Cut...etc.) or print the PDF download and cut them by hand.
Use this free bow SVG file to create hair bows, cheer bows, or decorate presents and cards. The possibilities are endless!
Get the pattern and step-by-step tutorial here: http://sweetredpoppy.com/hairbow/
Shop Canvas Sheets here: http://tidd.ly/28b801c0
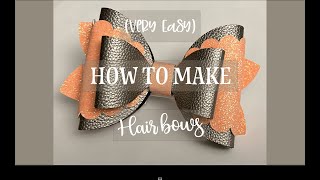
Hello, I'm Kimberly and welcome to sweet red poppy. Today we are going to be making the cutest boutique bows if you've ever been to a boutique with your little girl, you've, probably seen these layered bows and they can cost anywhere from $ 10 to $ 30. Well, when I had a little girl, I fell in love with these bows, but it wasn't so in love with a price tag. So I figured I could make them myself and save a little money in the process and I'm going to share all my tips and tricks I'll share with you where to buy the materials for them. I have a free pattern download to make them and I even have some tips if you want to sell them. So to start out with, you will want to download my pattern and this is available at sweet red poppy um. So this is what it looks like and I have it available in two different formats. So, first off you could cut it on a smart cutting machine. So if you have a Cricut, that's great or another, cutting machine download the SVG file and then upload it into your design space, and you can just cut it out on your machine. If you don't have a cutting machine, you can still participate in this project. You'Re. Just going to be cutting it with a pair of scissors and I'll show you how to do that and I'll share some tips and tricks for getting them to look really great, even though you're cutting with scissors. So let's go ahead and get started. So one of the things I get asked all the time is about where I get my supplies for these bows. All of these canvas sheets are from pretty and pink supply for this tutorial, you'll need to print out your pattern or download the SVG file. You'Ll also need some canvas, glitter sheets, a pencil, a pair of scissors, some tape, hair clips, hot glue gun and a space to work. First off, you need to choose the top piece. So this is your bow, so you can choose this one which folds in, like this all four sides fold into the center, and it makes this really fun bow or you can choose these templates which work together and you just stack them on top of each other And then you end up with a stacked bow or you can even do them single by themselves. After that, after you've chosen the top part, then you need to choose a bay, so you can choose any three of these first up. I want to show you how to do this by hand if you don't have a cutting machine, we're just gon na walk through all the steps, what it looks like to make them with a pair of scissors and with a pencil. So it's really easy: all you're going to do is print off that PDF cut it out. This is what your end. This is what you'll end up with I like to use cardstock and the reason I used cardstock is it's a little bit sturdier than just your regular printer paper, and that way you can cut out a ton of bows and you don't have to worry about your Pattern piece getting messed up, so I have three different canvas sheets that I've picked out that I want to use on this project. I don't want to think about how you want these to look. So what color do you want to be on the top? What color do you want to be on the bottom? That'S just like a visual idea, here's here's kind of what we're looking for so first, we need to pick the bottom, the middle and the top. So I think it would be really pretty to have this gold. One on the bottom, so I'm going to start with that one so flip it over line up your pattern piece and then, with my pencil, I'm just going to trace around it trace around this bow template with your pencil. You can also use a washable marker. You can even just tape this on and then just cut right around it and you can see now I have my template and I'm ready to start cutting it out. So I'm just going to set this to the side and trace the next two pieces out. I'M just using a pair of Fiskars cut these out and I like to cut from the backside and the reason I trace it on the backside as well is just because you have that nice canvas back and it's easier to see everything. Can you trace it on that side and when you cut it on that side, one of the tips when you're cutting these out is just to go slowly and take big long cuts that will make everything a little bit more smooth. You don't want to rush this. Otherwise, you'll end up with jagged edges, so one of the benefits to cutting these out on a cutting machine is you get really smooth edges, but if you don't have a kind of machine you just do it by hand. So I want to go through quickly how to cut these, both out on your Cricut machine or your smart cutting machine, whatever brand you're using. So what you want to do is use one of the heavier weight mats. So this is the purple Cricut mat and it is the stickiest mat and it's great for cutting these bows out. Now I get tons and tons of questions about how to cut through this canvas fabric. Sometimes it's called leather. Sometimes it's faux leather. You might see a few different names. What you want to do is place this face down and you want to press it down, firmly adhere it to the mat and then what I like to do is use a little bit of washi tape or even masking tape. Whatever you have on hand and secure this to the mat because it has glitter on the other side, it's not going to adhere all the way to the mat if you just place it on there. So what the tape does is it just gives you a little bit of little stress stickiness. It'S just gon na hold it in place. While we cut this point, you want to make sure that you have a clean or even a new Cricut blade in your machine, because you want to make sure that it's going to cut all the way through this material. So I'm just pulling up Cricut design space on my phone and I've already downloaded the sweet red puppy pose and have uploaded them into my cloud. So I want to turn dial to custom and then in design space. I want to select canvas on the very first number. It says number one canvas you want to select more, that's so one of the tricks that I always use, because it's gon na be a little bit thicker than a normal canvas, because we have all that glitter on the back. So go ahead, hit more and that's something that I use on almost all of my Cricut projects. I'D rather it cut all the way through then not enough, so I almost always select more, if I'm not sure if it's gon na cut all the way through. So now everything is set to go and I'm going to load my map press, my cricut button, so it's all finished. Cutting now I'm going to eject my mat and set my Cricut is a I like to do is just put my mat over feel my material away from the knot, and now you can just peel your bows up. So it's still a little bit stuck just because of the glitter, but it actually did cut all the way through, and this is just my favorite way to cut them is face down at first. When I tried to do this, I cut them face up and it just doesn't work because you really need the blade to cut through the fabric backing and not the glitter. So now I have all three of my pieces and we're ready to start assembling. I want to start with my largest piece first, and what I'm going to do is just flip it over and place a big glob of glue on the back like to spread it out a little bit and then bring the outside pieces and towards the center. Let it cool down just a little bit and then put your thumb on there and hold it in place until it's completely cool, putting some firm pressure on it so fold. Those sides inwards, let that hot glue hold down just a little bit. The reason I like to use hot glue on this is because it cools so quickly you could use something else: a different adhesive, maybe like quick grip or be 6,000. It'S really up to you, but I like to use hot glue on these. Now we're going to work on the middle of the boat place it in front of you, so it's facing upwards place a dot of glue in the center, and now we're going to stack our bows. So the largest one is going to be down first and again put some firm pressure on it until it cools a little more glue right in between then we're gon na place, the smaller bow on top and if you get any little glue strings, just pull them Away once this is cooled, we're going to flip it over, and now I like to put a little bit of hot glue on this part and attach my hair clip just put it right there and then the tricky part is you're actually going to fold this, the Opposite direction and then flip this over a little bit of glue on top, and then you want to pull this part tight, especially if it's thick, you really want to pull it tight and then it's just gon na wrap over to the back another bit of glue And then you want to hold it in place until it cools and there we have our finished bow. So we are all finished up with our DIY stacked bows. I loved getting to share this tutorial with you, I've linked below in the description to the sweet red poppy tutorial and pattern, so go ahead and download that and you can just make these along with me. I'Ve also linked to the Etsy shop, where I get all of my supplies from that's where I get these candy sheets from. I also get my little clips from and anything else that I might add to my bows. If you enjoyed this video, don't forget to subscribe to it subscribe to my channel that way you get notified the next time. I have another crafty video that goes live I'd, love to see you guys next time, if you're planning on using this tutorial. Let me know in the comments below I want to know: what color are you gon na make these out of what type of fabric do you want to use? You can make them out of anything. I can't wait to see what you guys make and tune in next week, because I'll have another fun video to share with you guys.


Comments
Betsy Lopez-Hatfield: Thank you for the gorgeous free pattern .
Denise: These bows are adorable! Thank you for sharing!! I can't wait to make these for my granddaughters!! Is the pattern still available? When I use the link above, I can't get the pattern to open. Thank you in advance for your help!!
Houy Chea: Thanks for sharing. I can't wait to make for my daughters and niece.
Magic kingdom Wishes: love these ❤️ thanks for sharing
Dilenia Hernandez: Thank you!!! You make this soo easy
Patti Curington: Can’t wait to make these in all kinds of pink glitter for my grand girlies. On my way to my work space!
Vanessa Richard: Thank you . My daughter loves bows and I haven't tried making one with my cricut yet definitely our next project.
nsnsnsns: Can't wait to try this! Thanks
Kiylee Davis: This is the only bow pattern I use. Thank you for sharing!
Arlyn Rayfield: are you using vinyl to make the bow? and if yes, what do you do with the underside of the vinyl? or What is the best fabric to use for these bows?
C Williams: Great video, thanks! Peace & blessings ❤️
pjsales09: I love these! Which blade did you use?
Stephen King: I love these!
Sarsha Buck: Thank you so much for sharing. This is the most helpful channel. And the easiest svg to download, I have nothing but trouble downloading.. Thank you so much
Karly Masters: These are adorable. I’m wondering the size of the clips ?
Tabitha Yust: Do you have video on how to layer your large bow? I downloaded it but I’m new not sure how to lay them. Thanks by the way love your work
Brandi McBrayer: What blade do you use to cut the faux leather?
MaryKaye Small: Absolutely adorable
Sue Guidry: What size do you cut your bow pattern?
Wicked Swift: I love that mint glue gun. Where can I get one? I searched Amazon (Canada) and there were none to be found :(
Kalie Bowman: What size clips do you use?
Alexis nadine Reyes: Can you show me step by step to download the bow prints to my cricut
lorena Gutierrez: Hello what Cricut did you use ?
Eileen Vega: Can I used my cricut joy to this project?
Priscilla Bentley Ramos: Love ur tour orals
luz carmen gentry: how do we get the svg file. if i click on the get the pattern link, after supplies it says get the down load. Is this where we get the svg file
Dieuda Dash: I tried downloading the sheet but it say not a valid email
Jenndesigns_4: Hi! How can you get the patterns? I click the link and I can’t find it anywhere.
Achala Cougnery: Beautiful....from INDIA
Korey Smith: Not able to download free SVG for the bows
Evelin Higareda: Pretty in pink supply is an etsy shop? Is it in the US? I ask for shipping I ordered my first time and it comes from china it will take 1 month to arrive
JoAnn Erickson: I can't find the PDF file?
Ly Molko: hello i cant up load it on my cricut program why is that? i tried differente download files and it doesnt work
jenniffer burns: What kind of hair clip is that?
Lady P: Hey sweetheart I cannot find the free SVG file for these on your website
Donna Ann: Other then Esty where can I get the canvas sheets at
Refugio Macias: Hello I have a question mine is not cutting at all is it that my material is to thick ? I got faux leather to
Bravo, I: Finding your template is so hard it keeps taking me to this page that page this page and then that page and no template so annoying.
Annette Gann: The download says it cant open the link
Latoya Davis: Trying to find the svg
thomas cox: farming simulator 19
Emily Mrotchek: nirvana