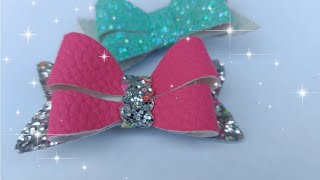
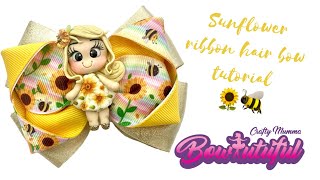
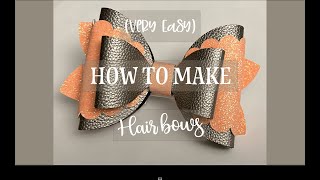
How To Make Custom Bullet Fabric Hair Bows
- Posted on 09 August, 2021
- 6D Hair Extensions
- By Anonymous
Hey guys in today's video I show you how I make my kids hair bows using bullet fabric that I sublimated on!
_________________________________________
♡ SHOP WITH ME ♡
_________________________________________
♡ CREATIVE FABRICA ♡
https://www.creativefabrica.com/ref/23...
_________________________________________
♡ GET A GLOWFORGE ♡
GET UP TO $500 OFF A GLOWFORGE!
https://glowforge.us/r/YVTJSLLE
_________________________________________
♡ PRODUCTS USED ♡
- Sublimation Printer- https://amzn.to/2sPjK1o
- Sublimation Printer- https://amzn.to/3zMJAR3
- Sublimation Ink- https://bit.ly/35FzGSt
- Sublimation Paper- https://amzn.to/3kYOYJP
- Sublimation Paper- https://amzn.to/3l1Anjr
- Heat Transfer tape- https://amzn.to/3x3yJ37
- Heat Transfer tape dispenser- https://amzn.to/3iTcNCR
- Butcher Paper- https://amzn.to/2URM5T2
- Teflon Sheet- https://amzn.to/3BQvn7w
- Bullet Fabric- https://etsy.me/2UVhQKX
- Cutting Mat- https://amzn.to/2ViyXWQ
- Rotary Cutter- https://amzn.to/2WgkTh9
- Rotary Blades- https://amzn.to/3kYzEQd
- Cutting Ruler- https://amzn.to/3jSmL8f
- Rubber Bands- https://amzn.to/2VtFKOd
- Thread- https://amzn.to/2VAZaAF
- Needles- https://amzn.to/3jzAwbv
_________________________________________
♡ SHOPS ♡
https://elleraikids.wixsite.com/my-sit...
_________________________________________
♡ SOCIAL MEDIA ♡
Instagram: ElleRaiDesigns
Facebook: https://bit.ly/2NjxUma
Business Inquiries: [email protected]
_________________________________________
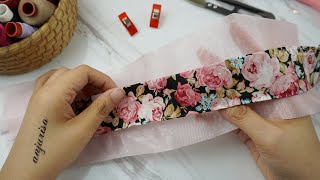
Hey guys, it's cheryl from el ray designs, and today i'm going to be showing you guys how i make my hair bows um. So this hairball tutorial is part of my series. I'M doing right now i showed you a video on how i sublimate my fabric. For my baby bummies um, i've also made a video of me, showing you guys how i assemble and sew my baby bummies, and this is going to be a video on how i make my matching bows for my baby bummies. So for this video, i'm gon na be making a four two four inch bows on four inch piggy bows. So for that, for my dimensions, what i do is i determine what i'm making if i'm, making a two inch, three inch, four inch or five inch and even a six inch bow and that's going to be my height of my bow. So this right here is four inches and we have a ruler here. You can see here it's roughly four inches and then what i do for that is. I take my height and i times it by three. So this bow is going to be four by 12 inches. If i do a two inch bowl it'll be two by six inches. If i do a three inch bow it'll be three by nine inches. A five inch bow five by fifteen six, six by eighteen and so on, um, so yeah. That'S how i measure it. I just feel like it gives it the nice thickness. It doesn't make the bow flimsy because, basically we're going to be folding the bow over two times to make sure it holds its shape. So what i like to do with my bows um first you're on the audio materials you're gon na need your fabric. So i have all my fabric here: you're gon na need whatever size bow, you want and then you're gon na need your centerpiece. I do my bows in two pieces for my center pieces. They'Re always the same size they're, usually like two by four inches um. That'S just standard for me because i could fold it. I can make it smaller. I can fold it. I can make it thicker. So two by four inches works for me and then you are going to need a needle and thread. Any thread works. Polyester thread. Cotton thread, it doesn't really matter just any sewing thread. I usually stick with white. I don't try to match it with the fabric. There'S no need because you're not going to see it um. If you do black, maybe you want to use black but other than that white works for everything else, and i have my needle and i also have thread already on it. I do double my thread, so i fold it over. So this is double threaded. Um you're gon na need either hair elastics or you're gon na need hair clips. Your preference, my bows, automatically come with hair clips. Unless the person wants hair ties and for my hair tie, these aren't the ones i use they're stirred away. I use the nylon hair ties and i offer them in black in nude um. Also there's two ways you could do it. You could do your hobo with needle and thread, which is what i prefer now. When i first started, i did do the rubber band method and i will show you that way as well real quick. I don't use that way anymore, though um and then you will just need scissors and i also like to use some type of ruler. Usually i just use my cutting mat. My cutting mat is at a different station and my filming station is over here, so i just pulled up my ruler and is to just make sure my bows come out even and they're exactly four inches, so i do i'll. Take my fabric fold it over. It doesn't matter which way you do it um. If it's upside down or right side up, you just want the non-printed side facing up and then you'll find a part on your ruler to measure um, so we're gon na do 18 and i'm gon na do eighteen, i'm gon na fold this over until fourteen, because All the way over to fourteen that's gon na give me four inches. So then, how you would know i put in 14, my 14 should go to 10. 10 to 14 is 4 inches 18 to 14, 4 inches 14 to 10 is 4 inches and then, as you can see, i have ten to six here. That'S another four inches and then i'll just take this and we'll fold this over like so, and this is now as you can see, 14 to 10 inches, that's four inches, so our bow is four inches now and now we're gon na flip it over and now, If you're gon na do the rubber band method, what you're gon na do is you're gon na just you're gon na just fold your bow to make your own pleats um. So you could do that or you could use your needle and just sew and pull it. So now i find that this is easier before i kind of get the needle and thread tweak my pleats, but now it's easier for me um and this was actually harder, but it was easy for me at first. So what you do to fold is you're just going to take this. I folded about a third of the way up like so so, probably halfway up a little under halfway up and then i fold it back so you fold it up and then you put it back and you're. Just gon na compete repeat that step. So i'm gon na take it fold it up back up back and then you make sure. Then you make sure your top and bottom layer are both facing backwards. And then you will get your rubber band. The clear elastics work the best because you can't see them and then i just wrap my ribbon around two times and i just try to get it centered, so i just play with it move it around. But as you can see what i was talking about, you want them both the top and bottom like the top and bottom part of your bow facing back. You don't want this part, your rough edges facing the front of your bow, so you want to make sure they're both going to the back and then just play with it, make sure it's centered. You can also use your ruler for this so place. My bow back down so baby between 10 and 14. um, so the center of that is 12, so i'm gon na make sure my rubber band is at the 12 mark and that's how i know my bow is even on both sides. So that's that way, and then i'm going to show you guys how to do it just using the needle and thread so again, we'll do the same thing place our fabric face down at 18, we're going to fold it all the way over from 14. and then We'Re going to fold this part over again, so our bow should be between 10 and 14. for four inches. We are going to flip our bow over then for the needle part. You want to make sure you put it in the center, so between 10 and 14 the center is going to be 12.. So i'm going to take my needle i'm not going to start it all with the bottom, because i want this part to go under. So i want it to be in the back, so we're gon na go up just a little bit like right here. We'Re gon na poke that through and then literally you're, just gon na go up and down through your fabric and make sure you stay pretty centered. You want to make sure you get at least four pleats. You want your both to have the same amount of pleats. I did um there's four in this one, so make sure i have four on this one. So there's two, that's three! That'S four! So all these bumps are pleats. So if i get four, i'm just gon na pull my needle and thread all the way through and you're gon na pull it pretty tight and then you're just going to start wrapping your thread around the center. And if you want, you could place it down right now to make sure you're getting it centered. So if you do 10 to 14, make sure you're pulling it at 12. and i like to do mine around three times and then we're gon na flip it over and we're gon na secure this. So i just take my needle and i just kind of thread it through part of the fabric in the back pull it make sure your string isn't tangled and then i'm gon na take my needle i'm gon na put it through this loop and i'm gon na Wrap it around one extra time and then pull it and that's going to make a knot, we're going to do one more time. So just stick it through a piece of the fabric. This is all going to be in the back part of the bow, so where this extra flap is that's your back part of the bow so take it, pull it and open up that loop of thread you're gon na take your needle put it through that loop Wrap that around one time and then pull it to secure it and then you could cut off the excess and then that's going to be your bold ear. We'Re going to fix it and everything. After and now we're going to go back to the rubber band bow um, i still want to sew this up, because i want to make sure it's super secure, because it's a rubber band, it could clearly break um. So what i do is basically the same thing. I just take my needle. This is basically just a guide. That'S going to keep my bow in place, so make sure everything is. Even one side looks a little bigger to me. Let'S get it as even as i can find the center and we're going to flip our bow over to the back side, and i'm gon na. Take my needle just push it through the center, throw a piece of fabric, pull it and again we're gon na wrap that around three times as well. So, as you can see, it's just a kind of extra step to do, but no matter what i do always whether the rubber band method or just the um needle and thread method. I always still secure my bows in the center with a needle and thread that way i just i know it's not going to fall apart, so this is how our bows are looking and now we're going to need our center pieces. Okay, you guys so now we are going to do the center part of our bow if you're gon na get this piece here, make sure your bow is facing up and the upside down. If you have a pattern, that only goes one way then you're gon na take this flip. It upside down and you're, going to fold it about halfway and then fold the other part. Halfway and again, if you have a set pattern, make sure your pattern is going upright as well and then you're just going to take this and you're gon na place it in the center of your bow and then you're gon na just pinch it in the back To hold it like so and then what we're gon na do is we need to flip these so you're going to hold each side and we're going to flip it the same way. So i'm going to so i'm going to flip this one up, i'm going to flip this one up too, i'm not going to flip one up and one down. Then your band will be twisted so again, i'm gon na flip them both up and connect them. So now your band should be twisted and then we're gon na take our needle and you're. Just gon na start sewing this band so on both sides together, i start at the end, push it through. Also, i'm not pulling the band tight at all um. It'S literally i'm pulling it as much as it will stretch, i'm literally just holding it how it how it is. I didn't pull it extra, i'm not pulling it tight. Nothing like that because, since this is sublimated fabric, if you pull it tight too tight um, your print will start to distort, and you don't want that so now i just pretty much go back and forth with my needle tie in the two pieces of the middle Band together and then when i get to the end of the band here, i go over that quite a few times, just to make sure it's really secure. So i'll do that probably three to four times then, when i get to the other side, i'm gon na do the same thing just make sure i do a couple passes at the end. To make sure it's really secure and nothing is going to just fall apart or break on the customers and then once i do that and i feel like it's secure. I'M gon na take my needle i'm gon na put it through a little piece of the fabric, and then i put my finger through to find a loop. I put my needle through that loop and i wrap it around one time and then i'm gon na pull it tight. So it forms a knot and then you're gon na do the same thing again. Put your needle through a piece of the fabric. Put your needle through the hoop or wrap it around and pull it and then you're gon na cut your excess thread off and then we're also going to take this we're going to try to hold our bow back through our fingers. So what i do is i take my thumb and my ring finger and then kind of push the bow down. If you can see - and then i use my pointer and middle finger to pull the extra fabric from our middle piece and then i'm going to cut just above those threads, we just sewed to remove the excess fabric, because we don't need all of this. And then we're going to take this you're going to tuck this piece under so you're going to flip it back. That'S why it's important to make sure when you put your two b and piece your middle band piece together to sew it you're flipping them the same way. So that way after we flip it under, nothing is going to be twisted now you're, just gon na play around with it. So that's how the back looks as you can see. It looks neat: it's not dirty um, it's not dirty! It'S not a big loop. I don't like the big the knots just didn't. Look that nice and now literally, all you're going to do is play around with your bow now play around with it, get it to how you want. If you notice some of your bottom pieces here are sticking through what you're going to do, you'll just take this, like the middle part, you'll take that trim it with your scissors and then tuck it back in and then you're going to just fluff it out, like So and then i use hair clips so i'll just put my hair clip in and i put my hair clips on the bottom, so my fabric is facing upright. I take this and i put my clip at the bottom. It just helps the bows sit nice on the child's head and it should look just like this, and now you have and completed hair bow. Now, if you're going to be doing a hair tie, what you're going to do is you're going to do the same thing. Take your middle piece you're going to fold it in half fold it in half you're, going to take your hair tie and put that over like this, and then you would take this, make sure everything's the right way and you would just basically do the same thing. But your hair tie has to be on first, and i just make sure my hair ties in the front. So it's out the way now flip it over. Take my band make sure i turn them the same way. So i always like to just fold them up. Put them both upwards, then punch them together, and then you would take your needle and then just sew the band, the two band pieces together and then cut off the excess and then, when you're done, you'll just take your hair tie and pull it to the back. Like so um yeah, so i hope you guys found this video helpful. If you did, please give it a thumbs up. If you guys want to see more bow, tutorials or more bunny tutorials, any type of tutorials. You have in mind with sublimation or baby clothing or whatever. Please leave them down below in the comments and now make sure to add those to my list. Um again, i thank you guys so much for watching and i'll see you guys my next one bye, you
Comments
Amy Redd: This is awesome! Thank you for the tutorial!
Eileen Muccillo: The perfect bow! Thank you for sharing!
Kat Attack: So simplistic; I looove it! Great video!
Shelby Price: Thanks for this!!! So easy to follow
mdh allen: Great tutorial! Thanks!
joyvenita: Thank you they look great.
Cynthia Catnott: Yes.I prefer a separate center-piece.Thanks ,
Eileen Muccillo: Hi can you make these as a headband too with the cute bow in the middle of the child’s head? Thanks!
Honeychilecrafts: Does it matter if the sewing of the band is really neat?
Jessica Orr: Where do you buy your fabric?
Kitty Smith: Can I use hot glue?
Jessica Orr: What type of fabric?