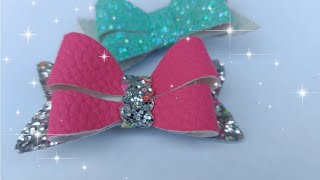
How To Make An Easy Four Loop Tails Down Grosgrain Ribbon Hair Bow
- Posted on 16 April, 2014
- 6D Hair Extensions
- By Anonymous
Learn how to make a hair bow with four loops and long down tails. Supplies include 1.5" grosgrain ribbon and a lined hair clip.
For step-by-step, written and photo instructions on How To Make A Hair Bow link to http://www.hair-hardware.com/how-to-ma...
Hi everybody i an laura from hair-hardware.com and today we're going to make this really cute tails down four loop hair bow, takes just a couple minutes and turns out to be really cute. So let's go ahead and get started for this hair bow I'm using 36 inches. One and a half inch grosgrain ribbon - this is garden rose to help make the bow symmetrical. I'M going to make mark every six inches. You don't need a huge mark, kinda using black marker fo this so that you can see it on camera. You really only need a tiny little mark to help keep each loops proportional and sized right. You will go across the whole length of the ribbon. You can adjust this more or less depending on the width of ribbon you are using and how wide you want. The loops to be when you are done, you will have 6 dots on the ribbon and when you fold your ribbon in half, you are going to have one dot that will fall in the crease.. Take a pin and stick through the center dot. Then take one side pierce it through the pin like this. Yes take the other side, do the same thing, see about taking shape and then you're going to take this side and bring it up like this, and then your last piece bring it over and cross it. So when you're done should you should have ribbon that looks like this ribbon that looks like this. This will be the front and this will be the back. This has some straight pieces now: leave the pin in place, so nothing slides and you don't loose your shape. Take a salon, clip and clip right in the center. You can have the pin sticking up in the middle and then what you're going to do. Is your gon na check your loops, make sure that everything looks right and over make sure that the back and make sure that this straight piece is still straight? So, basically, you're just checking your loops, making sure that everything looks the way you want when you're happy with how it all looks, you can take the pin out leave in the salon class and then you're going to take a quarter inch sheer ribbon to tie the Center give you a nice crease, flip the salon clip over and make sure you are tying off on the back. Pull the ribbon tight with a couple knots to hold it secure. Then you can take it out of the salon clip and you will see you have a nice crease in the center. You can also sew the center your choice, how how you wan na go about so now that we have the bow done time. You have your four loops and your two tails are going down. Your two tails are going down.. You are going to trim the bow tying ribbon off. You don't need that anymore anymore. Now we will add a center to the bow to the bow and I'm using this glitter velvet ribbon. So to put the center on, we need to put glue on the back of the hair, bow put one end of the ribbon on there and wrap it around. You only need three inches or so, if you have extra on the back trim it off and glue it down to secure the center, we will trim the tails now and I'm gon na do a dove tail so fold the ribbon in half and cut at an Angle and do the same thing from the other side now, because these ends are cut and exposed, you will want to heat seal them., so use a wood burner and start in the middle start in the center of the dove tail and work. Your way out that will keep a nice angle in the middle of the dove tail and it won't be curved. The bow is almost done and we just need to add a clip to it. I'M going to add a partially lined single prong alligator clip to the back of the hair, bow I'm using four and a half inches of three eights of an inch grosgrain ribbon. I am using d670 double sided tape. This tape makes lining clips very easy. You don't have to worry about bumpy glue from the glue gun or anything like that. Put the tape on your ribbon. It has paper on one side that you peel off open up your clip and on the inside, make sure the paper is off, bring it around to the top press it down and push it in the spring and then along the back of the clip. Now. To add it to the back of the bow, add a strip of hot glue and flip the clip over just glue it straight on the back, make sure it's secure and you are all done. You have made a really cute tails down hair bow
Comments
Allison Wrinkle: This is such a great tutorial! As a new girl mom I can't wait to try and make my own bows!! Thank You!
carla togneri: Parabéns, muito lindo e prático também! Como consigo uma régua e um clip como esses ???♡
America theBeautiful: Many thanks for making this video. It was really super simple and detailed. :-) Thanks!
Christina Springer: Wow you made this super easy to understand, THANK YOU!!!!!!! This tutorial really helped me out alot!!!
Maria Vergara: LOVE all your videos! Please make more. Thanks!
Jazzy Star: Simple,neat,and beautiful!!
nolababy74: Loved this, Made this in 15 min with limited materials MacGyer style (10' tape measure, safety pin, extra hair clip instead of salon clip, hot glue gun, and husband's finger when I had to cinch it and tie.) I was also able to use one sided ribbon. It requires an additional twist of the ribbon before you add 3rd and 4th loops.
Geemarylou: By far the best tutorial on making this bow! Thank you!
LifeStyles of Staciek76: Wow that was so fast and simple! Thanks for the pin trick!
Kaelacraftygirl: Cute bow! I want to try and make this!!!!
Perla Montoya: Loved how easy it was
Madelen Maricela Cuellar Ribera: Beautiful!
Sarah Pinkham: Thank you its so hard to find a video that you really like and understand love this bow
Haley Denae: That was so easy!
EDITH BERZUNZA: Its awesome! But can you tell me where I can buy the ruler please!??
Amber Jane: Very amazing and very impressing
Stephanie h: thank you so much this help me to make my bow easy and faster.
Caitlyn Welch: How long would the ribbon need to be if you made this with like 7/8 inch ribbon. I have a tiny 2 year old and she doesn't need one this big
GINA42608: where could I get a ruler like the one you are using?? super EASY way to make the bow love it!!!!!
cissa fernandes: Beautiful,thank you
Lisa Hutchins: Is there a way to make this type of bow with ribbon that's printed on 1 side? I love the way it came out on the first one I made and then I realized that half of the bow comes out backwards with printed ribbon.
AmberBrockett: curious where you got such a huge salon clip.. mine are way smaller.. and the ruler too.. pretty neat it has holes for marking.. thanks
Perla Salgado: Bellisimo,hermoxo lastima que esta en ingles pero viendo como lo hase espero aprender, asi es qué a practicar
Karina De Leon: Wow I HAVE WATCHED DOZENS OF BOWS AND YOUR THE ONLY ONE IVE BEEN ABLE TO LEWRN FROM
Maria Garcia Suarez: Cada cuantos centímetros ponías la marca?
Patricia Howell: thanks this showed me ALOT
Ceci0206: Hi how much should I sell a bow like this for
zeliha Akpinar: Cok guzel detayli anlatim ama kullandiginiz cetvel bizde türkiye de yok oyuzden kac cm lik grogren yay kullandiniz ve ara bosluklari kac cm birakip isaretlediniz bunlari soylersebiz mukemmel olucak . Turkiyeden sevgiler
cv2562: Ok. Where do u buy the ruler from?
Noob Adven: I love how easy your tutorial is,but I wish you move your hand a bit fom the camera and take a moment to pust each loop because I can't see how the loop twist. but nice job!
Jorgina Leigh: How do you think of so good ways to make bows
4Given Embracd: What kind of ruler is that?
Terisa White: Where do I get the ruler u used? AND what is it called?
Stephanie h: I agree with you xxblue a lot of tutorials that I've watched were complicated.
Tara Prisk: How can I do this with printed ribbon
Khaing Zar Thin: You need 36 inches... Me who has only 30 inches of ribbon and is in quarantine:
hanizahhh: The back should be the front. It's nicer that way
helen myers: This way doesn't work on printed ribbon, just plain as mentioned before...any ideas on how do make it with printed ribbon please x
Edgi: THATS HELLA COOL, LADY
alma hdz: where do you get the ribbon
Janet Sandoval: You end up with 5 dots not 6
Brenda.Luannn: it's 5 not 6 dots