How To Make Hair Bows With Ribbon | Hair Bow Tutorial | Diy Hair Bow | Velvet Hair Bow | Knot Bow
- Posted on 17 November, 2020
- 6D Hair Extensions
- By Anonymous
Velvet Hair Bow / Knot Bow / How to make ribbon hair bows
How to make hair bows // ribbon hair bow tutorial // DIY hair bows
#hairbowtutorial
#velvetbow
#knotbow
#ribbonhairbowtutorial
#hairbowswithribbon
#howtomakehairbows
#hairbows
#hairassessories
#CATSRIBBONBOWTUTORIALS
Subscribe for more EASY TO FOLLOW HAIR BOW TUTORIALS https://www.youtube.com/c/CatherinesRi...
SUPPLIERS FEATURED IN THIS VIDEO
Velvet 2" ribbon is from Eva's bows and craft supplies link below
Ribbon suppliers with good range of solid colour grosgrain ribbon in wide selection of ribbon widths
Love Your crafts Ltd
krafty Koala
Eva's bow and craft supplies
https://www.evasbowandcraftsupplies.co...
You can purchase the wooden templates I use in alot of my tutorials from
UK
SIOBHAN at CHEVERELLA HAIRBOW TUTORIALS
https://www.facebook.com/cheverellasbo...
USA
Hair bow centre plastic versions US
TNT Versions
https://www.hairbowcenter.com/catalogs...
MEASUREMENTS
2" ribbon on 5" template
1 x55cm
1.5" ribbon on 4" template
1 x 45cm
1" ribbon on 3" template
1 x 35cm
ITEMS FEATURED IN VIDEO
UK LINKS
Two prong curling clips for holding ribbon
Mini glue gun Topelex plus 50 glue sticks 7mm
Glue sticks Topelex 7mm 100pk with 25 colour sticks
Topelex Glue gun plus 12 pk of 11mm glue sticks
Glue sticks 11mm 100pk
Gutermann extra strong thread black
Gutermann extra strong thread white
USA LINKS
Two prong curling clips for holding ribbon
Gorilla Glue gun and sticks
Glue sticks tavda tech
Gutermann extra strong thread black
Gutermann extra strong thread white
Watch next –OLLIE BOW TUTORIAL https://youtu.be/p51rGbSfxl0
Recommended Playlist Easy to make 1.5" DIY ribbon hair bow tutorials: https://www.youtube.com/playlist?list=...
Let’s connect:
Facebook Page - Catherine's Ribbon Bow Tutorials and Follow Alongs
https://www.facebook.com/groups/768238...
Facebook Group - Cat's ribbon bow tutorials and follow alongs
https://www.facebook.com/Catherines-ri...
Instagram – @catherinesribbon
TIKTOK – https://vm.tiktok.com/KCh825/
DISCLAIMER:
Links included in this description might be affiliate links. If you purchase a product or service with the links that I provide I may receive a small commission. There is no additional charge to you! Thank you for supporting Cat's ribbon bow tutorials and follow alongs so I can continue to supply free tutorials each week!
I'm always happy to help if you are struggling with any part of tutorial and need more advice
And I love seeing creations made using my tutorials so do pop across to the Facebook page, I reply to everyone and offer lots of bow making tips, and information every day as well as the tutorials
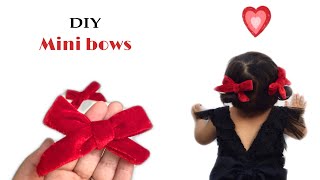
Everyone today, i'm going to show you how to make these super super, pretty knotted velvet bows and we are actually going to use a template to get our knot today because, like i said, some people struggled with the hand tie just in hand. So i thought i'd show you a different way to do it. So today i've got my five inch template and the most important bit is to have like a little bit of a gap with this. You can use the plastic versions as well, but when it comes to this particular knot tie i would definitely suggest plastic or wooden the um. If you've made the hand plate made cardboard ones, it's really not going to work for this kind of knot because you do have to do it quite tight. So, like i said sorry, if you've got the cardboard ones but, like i said um, i will speak to born and find out when she's going to relaunch the wooden ones in the uk. For you and there's a link below with the ones for the um plastic ones from the us, so here we go so got the template and all we do first is we take this and make sure it's velvet side up just put a little bit over that Side, i'm just going to clip that there just hold it in place and then we're going to go round, like i said, make sure it's a little bit over, but not too much so straight this side, and then we bring it over and we're using two inch Of them and we're using 55 centimeters, because we need it longer because normally we do it to about here for, like a chair type bow, we need a bit longer, because this is the bit that we're wrapping the center with. So at this point, we need to make sure it's really tight around the template, which is why we need the wooden ones. What we do is from here. We gather this top one together like this and we bring it between. There make sure it's still all gathered together here straight over and then pop that through right there you want this, like i said, quite scrunched up because, like i said this is going to be the center. This is the front of the bow this bit here is all going to be the back of the bow, so pull it really nice and tight to get that nice, scrunch, look and then what i want to do is this loop here, where you can see my Finger we want to bring this underneath so curve it so under. Okay, so you've got this and then we're going to take this bit through here over this direction. Can you see and again you want to get that all nice and tight on your template, and you want that over here you see how tight that knot is and, as you can see on myself on our template, i've celebrate celebrate the sides. It just makes these kind of things easier to slip off, even when they're, nice and tight on the template. So, as you can see, this is what you've got at the moment, so this one's the wrong way around and you can open up your scrunch if you want all if or not now the first thing we do. This is we're just gon na twist that round. Just twist it like that, so both the fronts of your bow are the right way up. Okay, the other thing i do is obviously one side is currently longer than the other, so bring them up together like this, and obviously your niche scissors at this point cut them, so that they're both the same length and then you can shape them. I like to like a curve just do a gentle curve and the same on this side: okay and we heat seal as normal, because it's still rubbing after all, we don't want any freeze in the clear blue bit of the flame and, like i said you can Keep manipulating until you're happy with how the velvet sits there. We go now the thing with this. Obviously, you can see here your scrunch is sort of here, so you can sort of open that up and you can make it as wide as you want or as scrunched as you want. So if you want it more scrunched scrunch it like this. If you want it wider, you can sort of pull it apart a little bit. So it's entirely up to you and again, if you're, not it's not quite where it's meant to be, you can move it about until you've got your loops balanced as well. So, to put your clip in this just take a bit of practice, so i've got a slightly longer than average clip, so i've got a 60 millimeter clip here, which is six centimeters and what you want to do. Is you get it under this side here and you sort of work it on beam, see where we did the loop over you sort of wedge it in that bit there we go so that's nice and nicely in, like, i said, don't be afraid once you've got Your tails, where you want them and your clip so if they're, where you want them, what i do to get my clip nice and everything else twist it where you want bring this down away from your and you can put a bit of glue here, and this Will also stop your knot from coming open permanently again. Take all your velvet away from there and glue your clip, and the other thing you can do is once you've got your tails, where you want them angled the right way. You can also lift these up and put a touch of glue here twist it exactly where you want it and again this side make sure it sits exactly where you want touch glue and there we go. We'Ve got our nice, get my glue stringers off. We have got our lovely template tied like i said. If you want to do longer, you can do sort of 60 centimeters to start with and do like more of a turnover so on your tail. Instead of doing a little bit over, you could do a couple of centimeters over and you get slightly longer and that's another one. That'S slightly longer and like i said you just slip your clip through adjust it till it's where you want it flow it down, glue these bits down. If you want to or like i said, manipulate them until they hang exactly how you want it. Just take a couple of minutes just to get them to twist, where you want same as when we first twist them around, but it is worth it in the end because, like i said they are so cute, you could add a little charm on them. If you want to there, you go, you can make them as scrunched or as wide as you like. Like i said, you can just manipulate that more look and, like i said you can just play around and have some fun um. If you want to do smaller ones like i said you can do the 1.5 inch of it on a four inch template and again do about 45 to 50 centimeters play around with your tail length and things like that, and you can work it but, like i Said it will work on all methods? You could do like one inch velvet on like a three inch template and again i would do like 40 centimeters always do a little bit longer, because obviously you can cut ribbon down. You can't add more back on selected um or keep it on the roll until you've worked out where you want to cut it, but, like i said, you always need a good percentage more across the template. So if i show you, it's got some more of the purple, so if you want longer tails start further across your template when you turn it over when you clip, but once you've got it to this point, so you've got it across back. This wouldn't be long enough, you'd need at least another bit that comes at least 10 to 15 centimeters longer than the size of the template, so that you've got enough to scrunch middle and get your loops and turn it under your knot, a bit like. So if you don't leave yourself enough length this bit like said, you won't have enough to do the middle. So, like i said, do you think that when you use the other template sizes but you'll be able to work it out yourself just by playing around so like i said, hopefully that helps. Thank you all for watching. The links to my facebook, page and group are in all in the description center along the description, along with all the measurements and i'll speak to you all soon. Bye. You


Comments
Sahdia Parveen: This was a super helpful tutorial, thank you! Would the same technique work with satin ribbon?
Amerah Salik: may i know what fabric did you use? thank you!
Hope Darling: Can you link the video of the hand tie version you did? I couldn’t find it
lisatownrow1986: Hi where can i purchase the template from?
gsz crafts: Amazing
DJ.SIERRA: Ariel the Kiss Cosplay dress blue diy adult diy