Bow Genius - Tail Up Tail Down Hair Bow - Diy Bow Maker
- Posted on 10 November, 2015
- 6D Hair Extensions
- By Anonymous
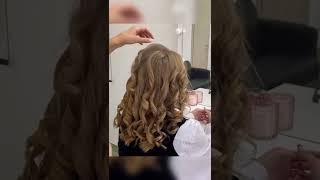
A perfect hair bow created using the Bow Genius bow maker. The Tail Up Tail Down style is perfect for cheering, competitions, everyday hair styles for girls and more. Show us how your Tail Up Tail Down Hair Bow turned out using #bowday @offrayribbon on Pinterest and Instagram!
Purchase Bow Genius here: http://bit.ly/1OzQfmF
Hi today we're going to be making a tails up tails down bow using the off rainbow genius bow maker. This is the configuration that your bow maker should be set up in we'll be using the larger set of combs, as well as the needle Center. Okay, the additional tools that we'll be using and needing would be a clip pair of scissors, hot glue, gun upholstery weight thread with a pre tie. Knot at the end already, and an additional needle we'll also be needing 32 inch length of off a ribbon already. Pre dovetails at the ends and how we do that is by folding it in the center and just linking the scissor and cutting it at an angle on both sides and a 5/8 inch with a ribbon in white pre knotted. Just to cover the center of the nose of the book so as begin to make our bow you're going to leave about an inch and a half to two inches on the end and you're going to leave it between these two sets up combs on your far Right as you pass over the needle you're, going to puncture it and you're gon na make your first loop by going around to the far left in between these two sets of combs. On that prong and you're going to move it straight across and doing the same thing on the far right. As you see here, and as we pass over the needle we're going to puncture again - and these are actually the first two loops as you'll see later and you're - going to go through the bottom again and you're - going to mirror what you've done back here in between These two sets of combs looping around again heading it over top and as you're passing over the needle you're, going to puncture it again here. So this is what it looks like before you put in your thread and the needle Neal, but this is how the bowl is going to be formed. You'Re going to take your thread feed it through the needle that you have here, you're, going to leave about four or five inches at the end here, and what you're going to do is you're gon na take your fingers and go underneath all the ribbon. Okay and you're going to grab all the loops, pull it straight out and you're going to pull the excess thread through. So what you see here, we've made that little nose there that little loop there. It shows you exactly where the center of the so at this point in time you can either hold it and thread another needle. You may find a clip handy, so this will hold it in place. I'M gon na set this down on the side here. For now. Take the other end of the thread you're going to feed it into another, needle that you'll be doing your stitch with and we're going to be doing a drawstring stitch. So here we are again I'm going to move my clip into this configuration and we're going to put a drawstring stitch in so between each stitch. I would say about a quarter of an inch before you leave it through and, as you see here, I have used that knot as a gauge of my Center and I'm all the way at the end, I'm going to pull it through and I'm going to pull It tight I'm going to wrap this about three times, just to make sure that it's in place, I'm going to put a lock stitch in the back, I'm gon na pull tight, and now I can shape my bow. As you see here, tails up tails down. Okay, I'm going to cut the excess, the red off, shape my bone and now what I'm going to do is. I have my pre-tied 5/8 inch nose already in place and what I want to do is I want to put a dot of glue in the front of the bow. Just hold the knot there for a second for positioning, okay, so it's dry, then I'm going to turn all of it to the back. Put it in another dot of glue hold that in place for another. Second, you know the dark blue to finish. It turn it around and there is your tails up tails down.


Comments
lizardlady31: would of been helpful to know it needed to be double sided grosgrain ribbon.
TheKeithvidz: ha ha - a search of 'Offray' brought me. I knew it as the given name of a man who made ribbon.