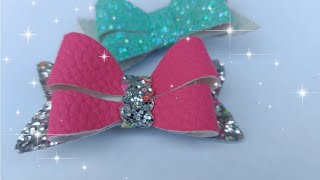
Tutorials For Making Hair Bows.How To Make Glitter .How To Make Fabric Hair Bow, , Hair Clips.
- Posted on 31 December, 2020
- 6D Hair Extensions
- By Anonymous
Hair hair bow making with fabric
Welcome to my youtube channel wisdom and fashion. So today we are here to learn how to make both a hair bow. So i hope you will benefit from it and i'm i'm very excited to get started. So please keep watching like my video and share it share. It share it and subscribe. So what do we need to start with? You need a nice table also fabrics to lay on your table depending on what kind of fabric you want to use. Today, i decided to use one of the tablecloth small table: mat that i've designed by myself just to make sure i'm comfortable, so we are going to start um number. One. This to put in place is to make sure you have your fabrics. You have your fabrics in place today we are going to use glitter chunk glitter fabric and then you can decide to use any fabrics you want, you can decide to use the fine glitter, it doesn't matter or any other fabrics, and then you need your pair of Scissors, you need your pencil, you need a clip, a hair clip you need fabric glue, be careful not to use another glue, make sure it is fabric blue. This is a clear fabric, glue, a fabric glue and then a ruler very important. You need a ruler, so today we are going to use two measurements, 15 cm 50 centimeter by 6, and we need 2 of that. So we are going to measure them 15 centimeter by two 50 centimeter by sister and two so number one things to do is to take your ruler, your pencil, to make sure you find perfect for yourself. So then, i'm gon na put a widow there to measure. Okay, up to here 16 centimeter down, then at the top you are going to find just up to 6 centimeter, you put a little bit dot today and then you cut it down, cut it down. So if you cut it, this is what you get. So what is next, we are going to say, hold your pencil and your ruler at the top. Here we are going to find the middle. We have six centimeter here ccm, so we need the middle, which is going to be three so place. Your dots with that in the middle with your pencil and then at this side measure the top from the top down to somewhere here, just 5 cm and do the same at the both end and turn it around and do the same here as well place. The dots at the three here, the middle of the c, is three put a dot there and then measure here to here. Five sorry first cm and do the same thing to this end as well. That'S all we need so anytime here and then we are going to trim it perfectly yeah. This is the first piece we need then do the same thing to this one as well, because of time you don't need to begin to measure this again just place them overlap, place them at the top of each other, so that you can find the perfect side. Just like this, like this, then trim it down. Okay, these are the two sizes you can see. They are very identical, so this is good. Now, good start. What is this? You are going to fold one of them take one of them before you can do it either both ways of today. We are doing this way and then next time you can learn how to do more. Just keep watching keep following my page, so you will see so we are going to fold it into two fold it into two into two perfectly fold. It then take your glue place a little bit of your clay glue in the middle. Like i said before, i usually use glue gun, but i just decided to start using. This is very handy for me. They do the same work anyway. So a little bit glue in the middle. So look the opposite way, is folded at the one and then see what we have. Then you fold another second part: you need to be folded as well perfectly see what we have then use your clip just to make sure you hold you don't unfold it mistakenly yeah. I use my glue to hold it down, then take the other one. This is the second one fold it into two again just to trim this thing here fold it into two and drop a little bit of your glue in the middle middle as well. There look, then you do the same thing fold it here in the opposite way. You have two of them now perfectly for the the same size same pattern then place them side by side play them side by side. You see what we have now you see the back and the front so use your clip again to hold them together, because you still need another little pieces of the fabrics to hold them together. So just grab your fabrics again, wrap your fabric cut. Just maybe a little bit once am down to maybe up to six of five independent. How large your bow is, what i have a piece of fabric, so what i'm going to do next, just remove your plate and then little bit of your glue again in the middle, where you are going to tie them around a little bit of your glue. Be careful not to mess the glue in the so take your piece of fabric and place it and hold it close it look. They are together now, look at the back, so you are going to cut just a little. This one cut it away. You don't need it. We are going to trim this away, throw it away because before you do that just put a little big glue in the middle here and then close, it make sure it's tightly closed so that you don't put the lid on it so that you don't make it Dry up here you go. They are together now. So what i'm going to do just to trim it down little bit, because it's too long, let's put this down here, so we are going to do something just, but this is a flare flare fabrics. We need a little bit just tiny of the flame place it. I use the cream color because it doesn't match his water, the color of our bowl. So little bit of glue on that. Okay go. You put drop a little bit on the glue and make sure it's properly covered cover it very well and then place it in the middle to seal it up. There you go where we tie you can see, then what is this normally? I will leave it for the glue to dry up a little bit just few seconds before i use my clip where you are doing your own, make sure you leave it for a few seconds before you, you put your clip so that you get it closed. Just put your clip in the middle here there you go and look at your bow ready to use ready to use you see. So i know it depends on where you want to put it on your hair. Look wow, look at that! It depends on what you want to do with your own. Maybe you want to pack your hair before you put it on. Girls can use it. Ladies, it doesn't matter. I i do make children one as well, you see. So that's all we need to know today. If you want more on my channel, you want more to see more video of mine just keep following this page subscribe. Like my channel sharing with other people. Look, this is you can make your own? These are ready for market. These are ready for markets. You will find my website on the page as well. Don'T worry, that's me see you next time. Bye,


Comments
Laratiti Ish: Lovely
Ishola Odunlami: i love this tutorial
Vjworldtv: Nice one
Favour Family TV: Good job
ilu: I am a bigger fan