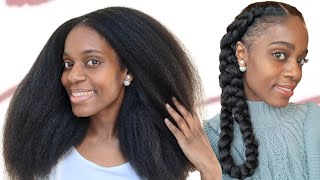
How To Install Straight Clip Ins On Natural Hair!
- Posted on 07 November, 2020
- Clip-in Hair Extensions
- By Anonymous
How to install straight clip ins on natural hair, easy hairstyles
Check out BetterLength for your textured clip ins: https://www.betterlength.com/?utm_sour...
Save $5 OFF any DOUBLE WEFTED clip ins
Promo code: Beverly769
Follow BetterLength Instagram: http://www.instagram.com/betterlength
My Clip ins Info:
Texture: Light yaki
Hair Length: 14"
Color: 1b off black
Link to the same hair: https://www.betterlength.com/clipin-ha...
Hey guys! Today I am showing you how to install these BetterLength clip in hair extensions on natural hair. This is perfect for kinky straight hair and also straighted or relaxed hair. I also show you a few natural hairstyles for medium length hair but if you have short hair they will work just as well! BetterLength is specialized in making textured clip ins for black women. I hope you enjoy this video, don’t forget to like and subscribe. Thanks for watching!
———————
-- PRODUCTS --
Tresemme Heat Tamer - https://geni.us/3ylXZ1
CHI Silk Infusion - https://geni.us/916vc
Blow Dryer - https://geni.us/Apdz
Tyche Flat Iron Spray - https://geni.us/TlitOD
Flat iron (something similar) - https://geni.us/9KbU
Pantene Hairspray - https://geni.us/6qWe
Edge Control - https://geni.us/c9eSJ
———————
-- KEEP UP WITH YOUR GIRL --
Instagram: https://www.instagram.com/beverlyadann...
Pinterest: https://www.pinterest.ca/bevadanna/
———————
—BUSINESS INQUIRIES—
———————
-- ON THE BEAT --
@hayku.
———————
-- FAQ --
◦ RACE: Nigerian
◦ LOCATION: I live in Toronto!
-- Tech FAQ --
◦ Camera: https://geni.us/iqa03l
◦ Ring Light: https://geni.us/OPfhY
◦ Studio Lights: https://geni.us/ELgbLA6
LEGAL DISCLAIMER: Some links included in this description are affiliates. If you purchase with any, I make a small commission at no extra cost to you.
#Betterlength #Betterlengthclipins #lightyaki
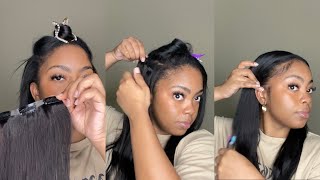
Hey guys welcome to today's video, so today's video is a very exciting one. Um, i'm starting off on blown out hair. I will list the products that i used to blow out my hair in the description i'm going to be using this straightener and this flat iron spray. That'S new, but i've heard so many good things about it. I actually really love it like you're gon na see. Why so the way i like to straighten my hair is i like to work in sections, and i use the heat protectant to spray the front and the back of that section, and then i work the product in thoroughly, because your girl does not want any more Heat damage, i'm still dealing with the ones. From the past i like to pass a straight iron through my hair one or two times it just depends on the section before you start straightening your hair. You want to make sure your hair is properly detangled, so you can chase the flat iron through your hair with the fine-tooth comb. The directions on the bottle also say to spray the hair slightly after heat styling, and you guys can see how silky my hair looks. Like i'm so happy, it's so silky, so then i just continued to progress through my hair spraying and detangling properly. I decided not to play myself, so i just threw on this white shirt. You guys can see how silky my hair looks and also this product is really good, because your hair won't start frizzing up. I also like to pass the iron a few times through my roots before i drag it down the rest of the length of my hair. Whenever i get to any awkward angles, i just push my head forward and drag it. You got ta, do what you got ta do when i have about this much left um. This is when i create my part. I hate creating middle parts. Guys, like i don't know why it just takes so much time to get my part the way i want to and half the time i'm just like. You know what let's just deal with what we have so now. I just start straightening the hair, so it lays to the side of my face and i just repeat that for both sides of my hair, if i feel like i need to straighten a section again, then i use my comb to hold it and then i come Back to it, i also did that again here once i am done straightening my hair, i just go back in with the heat protector. Just you know for an extra finish, and then, after that i used some of my hairspray. This is the pantene one. This is the one that i had on me so now, after all of that you're looking cute you're feeling cute, i just detangle my hair a little bit more and now, let's get into the sponsored content. Today'S video is sponsored by better length. They are actually my very first sponsor so shout out to them. The hair comes in this really nice silk bag, which is good because it's actually soaked in and out. So you can put your hair back in afterwards and it's protected better length is specialized in making textured clip-ins and i'm using the light yaki clip-ins today which are designed for relaxed hair, but they blend so well with my natural hair, it's amazing, so i just cut The ropes holding it together with my matching scissors and, as you can see, the wig clip-ins are attached to the clip-ins themselves and they also give you some extra wig clips. As you can see, these clip-ins have bought d wow and it's also true to length which is nice. So all i do to prepare my hair for styling is. I just used some heat protectant and straightened the ends just a little bit and you can see just with that. Little pass, it's already looking good, so it takes well to heat so for the first style. All i do is i prep my hair. Sometimes i use my hands. Sometimes i use my comb. It just depends on how i'm feeling - and i just grab a piece that measures against my head exactly right, and then i secure the clips in and it clips on very nice, which is really good. I also detangle, as i go, there's no added tension with these clip-ins, which is very surprising, because i was actually a little bit nervous about that. When you start bringing the clip-ins towards the front of your hair, you always want to make sure to bring out a piece of your own hair so that you can cover the clip in track. Do you guys see this blend wow? So once i get to the top of my hair, i create my middle part and i just start attaching clip-ins to the side of my middle part and i always make sure, like i said, to bring out a piece. So it all blends in - and you know no one's, seen any tracks so for this look i grab the shorter pieces of my hair and i just drag them to the front. So we can have a little bit of bangs. That frame your face so cute and looks so cute, and then i just tie my hair into a ponytail i like to make sure it's a little bit lower. And then i just use some of my edge control and i didn't want to use too much product because i want to make this straight hair last as long as possible. So i don't want product build up, so i use my edge brush to apply the product in and i also use a hard bristle brush to just blend everything together seamlessly, and i also use just a little bit of aloe vera because it's so light to tame The flyaways um that i may have this style was definitely my favorite. I was just feeling myself, okay, so for this one you're, just gon na start adding pieces um row by row to the back of your hair. Until you get to the top of your hair, then you're just going to create a side part and bring some hair towards the side of your face. I also like to use some edge control just to make everything, look, blended and seamless, and then what you want to do is just add clips around the side part and also bring out a piece in front of your hair, so that everything is blended and seamless. So so this is another nice and quick one. All you need is a hard bristle brush to brush the hair and make your little ponytail. That'S it, okay, guys so for this last one. What you want to do is you want to create your part from ear to ear and brush your hair forward and then you're just going to add a clip in the largest one that fits from ear to ear and secure it in place. Then all you're going to do is tie off half of your hair and clip it away and start adding clip ends row by row until you get to the top of that section, then, once i'm done with that, i just detangle everything once again. Thank you. So much to better length for sponsoring today's video, if you guys, are interested in checking out this product, i'm going to leave the link in the description, and i also have a code, so you can save some money if you're interested in buying this product. Thank you. So much for watching, don't forget to like and subscribe and i'll see you in my next video bye
Comments
Beverly Adanna: Hey guys! We have a sponsor!! Let me know which style you liked the best! Don't forget to check out the link for the clip ins if you're interested
Tombara akene: Binge watching your videos today. This look is absolutely beautiful. I am going to try getting the clip ins soon, it seems easy to install.
__tivia__: Loved the second and the last hairstyles
xo_donshanae: I literally screamed with glee seeing you slick your edges back! I don’t know how to properly “fleek” my edges.
KrustyKab: 2nd style was my fave too!! giving me smart brilliant entrepreneur!
Kimbo Gayle: Definitely feeling the low ponytail! <3
KrustyKab: ahhhh the hair blends so well with yours!
JJ & C Family: I like all of them but my favourite one is 1 and 2.