Kinky Curly Clip Ins On Transitioning Hair | Amazon Clip-Ins
- Posted on 04 March, 2022
- Clip-in Hair Extensions
- By Anonymous
Wassup y'all! ✌ In this video I show you how I install kinky curly clip ins to my transitioning hair. Very EASY & AFFORDABLE! Hope you enjoy! Let me know what you think of this style in the comments
------------------‐-----------------------------------------------------
ITEMS MENTIONED IN VIDEO:
Clip ins: https://www.amazon.com/Urbeauty-Extens...
Leave in Conditioner: https://www.walmart.com/ip/Aussie-Hair...
Detangling Brush: https://www.amazon.com/Detangler-Textu...
Styling Gel: https://www.walmart.com/ip/Eco-Styler-...
--------------------------------------------------------------------------
MUSIC IN THIS VIDEO:
Intro/Outro: https://www.youtube.com/watch?v=msxg95...
Throughout video:
Lakey Inspired - Chill Day: https://youtu.be/3HjG1Y4QpVA
--------------------------------------------------------------------------
Jazzie Facts
Married almost 7 years
Step Mom to a beautiful Registered Nurse ⚕️
B-Day: July 4th
Hometown: Kansas City
Hobbies: Trying new restaurants (But you knew that if you watch my videos chile ), shopping, reading, and spending time with family and friends.
_______________________________________________
SUBSCRIBE: https://www.youtube.com/channel/UCkMaG...
INSTAGRAM: https://instagram.com/_mrsjazzie
FACEBOOK: https://m.facebook.com/JazzieRayShaune...
BUSINESS INQUIRIES: [email protected]
#clipins #naturalhair #transitioninghair
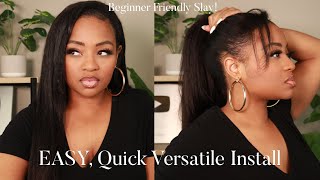
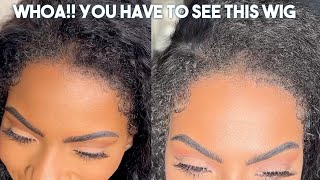
What'S up y'all welcome to my channel in this video i'll, be showing you how i install my kinky curly clippings um. I am currently transitioning for the second time child. It'S a long story, but i want to show you how i install my clip-ins with no leave out so, let's get into it. So i've already washed and deep conditioned my hair and i let it air dry a little bit. So what i'm doing now is just dampening it a little bit with my spray bottle with some water and then i'm going to go in with my aussie leave-in conditioner. If you watch one of my previous vlogs, you know that i love that aussie leave-in conditioner. I also apply it to my clip-in sometime, so that's what i'm going to do right now, so i've already detangled my hair when i deep conditioned it so it's pretty manageable right now, but now what i'm going to do is i'm just going to go through it With my detangling brush um to get it back into a low ponytail, that's how i'm gon na make sure it's covered, so my hair is covered so that the clippings will cover it. So right now, i'm just brushing it back to get it into a low ponytail and my hair is so thick so usually after i wash it when i'm trying to get it back into a low ponytail. I do one side at a time. So that's what you see me doing here. I take a clip after i brush one side and then go in with the other, and then i can do it all together after i finish each side. So now i'm going to go in with my regular brush just to smooth that smooth my hair out um, to put it into a sleek ponytail majority of the clip-ins are going to cover it up, but i still want it to be sleek. I don't want any flyaways or anything like that, so that the clippings will be manageable once i install them now, i'm going to go in with my eco style, olive oil gel and use my regular brush to smooth out my hair. You see how it's looking right. Now it's a little a little raggedy, so i want to go ahead and smooth that out, because some of my hair will be out um. My edges at least, will be out after i install the clippings. Now i'm going to take some more of my gel, but this time i'm going to go through with my edge brush just to smooth out the flyaways and everything around my edges and where my hair you'll be able to see my hair after i install the clippings. I want that to be as smooth as possible. So now i'm going to take my ponytail and split it in two i'm going to make two braids and then i'm going to pin them i'll, show you how i pinned them, but i'm going to pin them that way that it's easy for me to cover my Hair with the clip ends now we're going to lay these edges child i'm going to go ahead and lay my edges with the eco style gel, but i'm going to go in behind it with this softy edge control that i got from dollar tree. I really like it just to make sure it holds my edges in place. Now. I'M gon na put this softy growth oil that i got from dollar tree. I'Ve been using it for probably about a year, maybe over a year now, but i really like it, but i'm just going to apply that to my part and my edges just a little bit. I already did this after i deep conditioned, or while i was deep conditioning, but i wanted to get my edges in my part, just for a little shine and a little moisture. Now, before i install my clip ends, i want to make sure my hair is laid down and as smooth as possible, so i'm going to go ahead and let this do rag sit on my head for at least 30 minutes. Sometimes i do it overnight if i'm just styling my hair for the next day um, but i'm going to put this do-rag on and my bonnet shower, so i won't be looking crazy with just this durag. Somebody told me i look like a cancer patient with this durag, but anyway um yeah, so i'm gon na let that sit before i install these clip-ins three hours later. Okay, so now i'm going to take off the bonnet and my do-rag to make sure my hair is smooth and my edges are laid down and, as you can see, that laid down pretty well here looks smooth, no fly-aways or anything like that. So we're ready to go ahead and install the clippings. The first one i'm going to use is the one that has three clips in it. I'M going to use two of those and i'm going to start at the top of my head. So i can know where i'm going to stop um the style that i'm doing. I want to start at the top. So i'll know where i stop installing the clippings, as opposed to starting at the back of my head towards the neck. I'M going to do that to both sides. So now i'm going to flip that over towards my face that way, it doesn't get the way in the way of the clippings that i'm going to start installing towards the back of my head. So i'm going to start as close as possible to my neck and that's how long it comes out so that one was a three clip in piece. The next one i'm going to do is going to be a four kilo clipping piece and i usually kind of size it. I don't want to put one that's too long. So that's why i didn't start with the four clips, so i'm gon na go in with the four clip now right above the three clips and then i'll just continue going up all the way until i get to the top of that first set that i put In at the top of my head now, this last one that i'm putting in right behind the first one i put at the top of my head, i'm gon na do that one flipped over um and, as you can see how i'm motioning it's gon na, be Flipped over so that you can't see the actual track where the clip in begins, since this one's gon na be on top. I wan na cover up those tracks, so i'm going to flip it upside down so that you can't see any of the tracks from the clip-ins. So now i'm going to take the clippings that only have one clip on each of them and i'm going to take those and i'm going to braid them to cover up that top row. The cover of those tracks y'all see those tracks right there. I want to cover those up, so i'm actually going to braid these two single pieces to get that covered up. Now i'm going to take a bobby pin and i am going to put that through the end of the braid, so that i can kind of secure it once i place it on my head, so one end will be secured by the actual clipping and then the Other end will be secured by the bobby. Pin i'm going to do that to both of the pieces that i braided and then what i'll do is i'll. Just put the clip on the side of my head and then i'll pull the braid across those tracks and then secure it with the bobby. Pin i'm going to do the exact same thing to the other side. So now that we have the tracks covered with the actual braided clippings that i used i'm now i like to take a piece on each side and kind of pull it forward and then pull it behind my ear. So i can cover up the track from that actual braided clip in that i use, as you can see, that i'm doing right here, all right child. So i have finished installing my kinky curly clip-ins and, as you can tell from the smile on my face, i absolutely love these. I purchased these from amazon about six or seven months ago, and i love them especially love. This look on me, especially for my transitioning hair, but if you made it to the end of this video, thank you so much for watching be sure to like comment and subscribe and i'll catch you in the next one huh
Comments
mssuzukisv650: Looks beautiful and natural
Brittany Taylor: Yesss I needed this video!