Easy Clip-In Hair Extensions For Short Thin Hair: Step-By-Step Tutorial For Beginners Ft. Y-Wigs
- Posted on 06 March, 2023
- Clip-in Hair Extensions
- By Anonymous
Get the look of tape-ins! Seamless PU clip-in extensions are made from real human hair and come with clips that are designed to lay flat against the scalp. These extensions are thinner, more seamless, and more comfortable to wear, provide a more natural look, and require less maintenance than regular clip-in extensions. They are also more durable and can last up to six months or longer with proper care.
●▬▬▬▬❤ Ywigs Hair ❤▬▬▬▬●
►Direct link to the seamless clip-in extensions:
►Ywigs Clip-ins Hair Extensions:
https://www.ywigs.com/collections/clip...
►Ywigs Micro Links Hair Extensions:
https://www.ywigs.com/collections/i-ti...
►Ywigs Tape-in Hair Extensions:
https://www.ywigs.com/collections/tape...
►Ywigs Natural Textured Lace Wigs:
https://www.ywigs.com/collections/natu...
►Ywigs U-Part Wigs:
https://www.ywigs.com/collections/u-pa...
►Ywigs HD Clear Lace 13x6 Lace Front Wigs:
https://www.ywigs.com/collections/13x6...
Connect with Ywigs:
http://www.instagram.com/ywigs_officia...
https://www.tiktok.com/@ywigsofficial
https://www.facebook.com/Ywigstore/
GO FOLLOW ME!
❄ I N S T A G R A M➜ http://instagram.com/dionalatia
❄ T I K T O K➜ dionalatia
- - - - - - - - - - - - - - - - - - - - - - - - - - - - - - - - - - - - - - - - - - - - - - - - -
Serious Business Inquiries Only: [email protected]
- - - - - -- - - - - - - - - - - - - - - - - - - - - - - - - - - - - - - - - - - - - - - - - - -
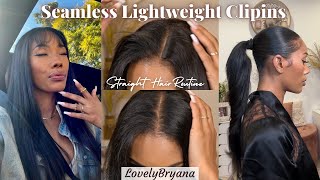
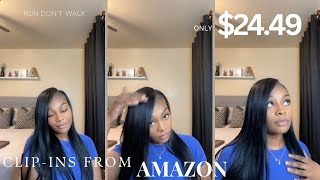
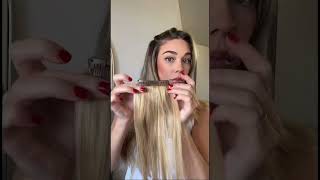
Foreign, the hair that I'm installing today is from y wigs. All their information is below. This is what the bundles look like. You can see the texture, it's super silky and straight. I think this is 22 inches, but it really is like close to my natural hair texture, so each bundle has its own set of Clips, so the first one comes with a a track that has four Clips on it, and it looks like this. You can see how flat it is and then you'll have two of the medium length Clips, which comes with three Clips per track and then you're gon na have two of like a shorter length. That comes with like two clip-ins per track and then you're going to get two of the individual one inchers per track, so that comes per bundle. I use two bundles total, so let's go ahead and get into the video I decided to flat iron, my hair off camera, because we all know what that looks like and, of course your hair should be straightened before you do this just to match the texture. So the first thing that I'm going to do is start by parting. My hair. At the back now mind you this. This is very beginner friendly. Only thing I did was part the hair and then measure the clip in track like against my hair, just to make sure it's like the right length to make sure I'm using like the right size to clip in then you'll just unsnap, each of the little Clips Which are like mini Combs and you're just going to push the Combs down into your hair. Now, when I flat ironed my hair, I made sure I didn't get too close to my scalp so that it was kind of still a little coarse near my scalp, so that when I put the combs in they had something to grasp onto, I snapped them back. In place - and this is what it looks like so I'm going to go ahead and repeat this process - I'm going to show you this a few different times just so you get the hang of it, but it's really really simple. You'Re just going to part your hair again, um measure like which clip that you want to use and then snap it into place. So when going from the very bottom, like the first one I used was the three Clips, the three Clips I use those two at the bottom um because there's it's a shorter distance between you know, ear to ear near my neck. But as I moved up, that's when I started applying the longer Clips like the four prong Clips, those went near the middle of my head because that's where the longest part was - and it just made the most sense now - everybody's hair is kind of different, but I Think I mean for the most part, it would probably be about like the same type of application and also remember each bundle comes with its own set of Clips, so that means in total, in between the two bundles. I had two of the super long ones, because only one four prong uh clip comes in a bundle. Then I had four total of like the three prong Clips, because you get two of those per bundle and then four of the two prongs. You know because two per bundle and so on and so forth, right so at first I was kind of scared because I'm like oh, this is not going to be enough for in full head. But for me it was enough um mind you. I have thin hair, as you can see like, as you saw at the beginning. My hair is very, very thin, especially when I flat iron it. So two bundles was enough for me, but if you have thick hair, I definitely recommend getting like three. Maybe four bundles. Just to play it safe also, I love how well the texture of this hair matches my natural hair and my hair is not even like bone bone straight like as I could get it, but I mean it's straight enough from, like you know a non-professional flat, ironing Or straightening like how well that it matches like all I had to do, is brush it, and it Blends really well the texture, even though it looks shiny and silky. It'S kind of like a thicker like coarser type of hair, like the texture is, is not as silky as it looks, but it's just shot it's just shiny, but the fact that it's not silky is actually perfect because it matches my natural hair texture. Now, when you start working your way towards the top, this is when things get a little dicey. You just have to take your time and make sure everything is measured out, really well um. What I wound up doing is on the sides of my head. I used the little two prong Clips because that worked for me: um it fit at first. I started with a three, but I realized that was too long and I didn't want it to stick out in the front, because I wanted my edges to stick out. So the two prongs were long enough foreign. So for this style I decided I wanted to do a middle part, so just to make sure that my hair is even on both sides. I'M working my way up the sides of my hair simultaneously, so meaning like I'll apply, One Clip track to one side and then I'll do the same thing to the other side and then I'll go back and forth that way, just to make sure they match. Also in the back of my head, as I'm working my way up, I'm applying Clips in the middle as well I'm using the three prongs in the back and I call them prongs. But you know Clips the three clip tracks in the back and the two clip tracks on the sides. So once I've finally reached the top of my head, I'm going to part my hair down the middle um in between my leave out. What I like about these clip-ins is that you can really leave out a very, very, very small amount of hair, as you can see here like I parted my leave out into two sides, and I parted one side again. That means like this is how much hair I left out to cover the track, and you couldn't see it at all now at this point, I'm using the single clip clip-ins because we're at the very top, but once I put my hair over it and brush it Into place you couldn't see it at all. So after that, honestly, the style is pretty much done. I'M just going to do my edges to kind of clean up the look a little bit, I'm using my black Eco style gel as well as my Edge booster. I haven't relaxed my edges in a while, so I need a little extra support when it comes to laying them down um and after that, I'm going to wrap my edges and let them sit for a little while foreign just going to touch up my hair. A little bit with a flat iron just to make everything super smooth and silky, but besides that the style is done. Look how silky this hair is. I absolutely love. Love! Love! Love, love, love these clippings, honestly! I might. This might be my go-to before a quick weave honestly, because this is way faster than a quick weave. The only thing is your hair, okay. Well, the way I did it. I left my hair out in between each track. I know that you can like braid your hair up in between each track, but I left hair out so just know you will have to like flat iron your hair and keep it up and maintain it as it's in this style. So next I just want to show how versatile these clip-ins truly are. I can grab the hair as is and brush it back into a ponytail, and it looks completely natural like when I brush it straight back. I can wear it half up half down. I can wear it in a high bun. I can wear it like in a regular bun like a high ponytail like it's super, versatile and another thing that I love is like how comfortable they are. When you apply the tracks just make sure you're not grabbing any. Like loose or straight strands, because that can like tug and make it uncomfortable, but as long as like when you're putting the hair in you're, making sure like you're, moving it around and making sure it's comfortable after you're done, you can put this hair up down flip. It all around whatever and it'll be super super comfortable. I really love that about this hair, so the last thing that I want to do is show the alternative way that you can wear this hair. What am I, what I'm doing now is taking the back two tracks out just the bottom: two: that's it and I'm flipping them upside down and applying them upside down. This way, when I pull the hair into a ponytail, it lays extra flat like if you're, not a fan of the look prior, where it kind of looks kind of bulgy. In the back. I, like the bulgy look. I don't know why. I think it's cute, but if you like you're, not a fan of that and you want like a super Sleek ponytail look all you have to do is flip the back two tracks upside down and it you'll get such a smooth flat ponytail. It looks so seamless and you can't even tell like anything like it's. It looks really really seamless and flat again. I honestly prefer it the other way, because it's more of a Messier look, but if you want more of like a cleaner and a neater look, all you have to do is flip the back two upside down and grab it back into a ponytail. You don't have to change anything in the front the sides anything like that, just the back to but anyways you guys. I am such a huge fan of clip-ins. I used to like not be a fan of clip-ins, but for people, especially like with hair. Like me with super thin hair, like this really helped bring, my hair to life like your hair, does not have to be thick or long at all to wear clip-ins. As you can see, my hair in the front was super super short, and this really helped just make it look 10 times better um. So, like I said, all the information for this hair will be in the description box below. Thank you guys so much for watching. Adios till next time,
Comments
LaDonna's Boutique: Does anyone know how long it takes to receive the clipins
Shemesha Duncan: I like those clip ins ....they look so thin...u can even see no bulk from the tracks
👉 BUY YOUTUBE VIEWS 👉 Link in Bio: Love the effort!
Saniyyah Aaliyah: NEEEEEEEEDDDD THIS