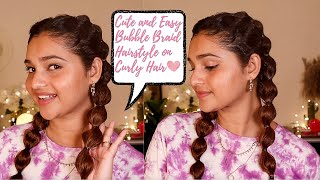
How To Do A Double Bubble Braid With Hair Extensions
- Posted on 17 October, 2020
- Clip-in Hair Extensions
- By Anonymous
In this tutorial, Mckenzie Turley, creator of Invisible Bead Extensions® shows us how to do a Double Bubble Braid, french style while hiding two rows of handtied hair extensions. It's all about braid placement, creating a messy finish and that curtain coverage in the back to hide your rows.
-
Have questions? Please drop them below!
-
For more information on becoming a certified Invisible Bead Extension stylist click here: https://www.invisiblebeadextensions.co...
-
Shop all things IBE® here: http://bit.ly/SHOPIBE
-
LET'S GET SOCIAL!
IBE® on Instagram- https://bit.ly/2FeSlw4
Creator and founder of IBE®
McKenzie Turley on Instagram- https://bit.ly/2ZfF5yf
MB01QEZF8FHLQZO
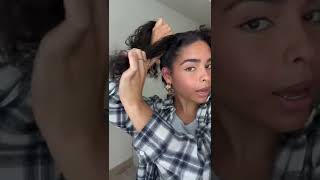
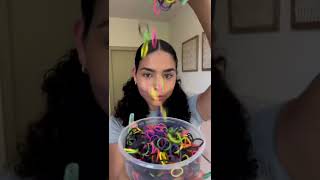
Hey everyone mckenzie here, i'm so excited to show you a little trick today we're going to be talking about a bubble braid. What that looks like and i'm actually going to do, two with a double bubble. I mean if anything at least you get to learn how to say that word, because it's fun to say so, hang with me check out how i'm gon na do this. Okay. So before we begin, i wan na tell you she is wearing two rows of extensions. She'S actually wearing two rows of invisible, bead extensions. So what i'm going to focus on today is showing you how to actually do bubble braids and keep them invisible. The first thing that you're going to do is you're going to part her down the center. All the way from the forehead to the nape and right there you can see she's got one row of ive right here. You can see that sewn in and then another row right here. So what we're gon na make sure that we do is cover that up with the way that we are placing those braids okay. So these are the rubber bands that i like to use. I like to keep everything clear, because that way, it's not showing up. It'S not sticking out again. We want this seamless and invisible double bubble. Braids so find some of these. So i like mine to start about from up here. You can start them back here, but today we're going to be going up here. First. So what i want you to do is i want you to take a small section at the top. Now again, this is just her hair, i'm not taking any of her top row of ibe we're just going to start out with this small section right here. We'Re going to attach one of the clear rubber bands and we don't want it to be super tight. We want this to be like loose and flowy have some volume so again, once you get it in there, you can kind of play with it and make sure that she has some volume up here. Okay, so now what you're going to do is you're going to go and you're going to take another slice out of a section. You can use a comb or your fingers. This doesn't have to be perfect. We almost don't want straight lines, because then it looks too perfect. Okay, so i'm going to grab this now. I want to show you here's the corner of her extensions right here. Okay, so i am dragging hair in front i'm pulling hair in front and i'm making sure that it's going to cover that, so you want to leave enough when you take your first slice, you want to leave enough to cover that corner right there. Okay! So then, you have these two kind of ponytails that you've started out with now. What you're going to do is you're, going to split this down the middle you're gon na. Take this one up, just like this you're gon na take this one that was underneath you're. Just gon na flip it and clip it. Okay, then you're just gon na continue on i like to go. You know about an inch on every section, so i grabbed my next inch. I'Ve cut through my row. Okay here is my row of ive right here. You can see i cut through it, so i took a little bit of the top a little bit of the front, and i'm going to add that now you can make adjustments once you have something in you can kind of pull. You can make those adjustments on where you want things to go. Now, i'm going to drop this we're going to do the same pattern, split it in half, move this one up. You know the drill flip it and clip it. So the most important part to realize, when you're working and doing these kind of braids with hand-tied extensions, you always have to leave this this buffer in front. This is what you're using to kind of cover and go over your braid, and again i mean you want to make sure that your extensions are blending with your natural root. If they're, not no matter how hard you try, this is going to be really difficult to cover these, so you want to make sure that your stylus is blending, that top of your extensions to match, split it. Okay, once you get to this back part right here, here is our weft. What we want to do is we want to make sure that this is in the middle of our section, if it's at the top or if it's the bottom look. If i went to just grab this, i would be pulling this hair. You would totally see that, so you want to make sure that this is like hidden inside you're, just going to take a slice and you're going to add that okay, also, this we're going to pull out a little bit and that's going to end up covering. So, there's a little bit of like a curtain that you create with the client's natural hair. That'S going to come across that because if you pull super tight again you're going to see stitching you're going to see where those rows attach, so this is almost a veil. That'S created to go over the top. You can pull that out after the fact, or you can just make sure that you're aware of that as you're putting in your first rubber band, okay, so again right here, we put this in the middle. What do we do with this last one? So we're going to split this to make sure that we have a veil. You always want to leave that veil. So i'm going to make sure that my next section comes from right here, so that when i grab my next, this will be covered once again. Here we are on this bottom row, so i have this veil that i've created right here with her natural hair and i'm going to grab a little bit underneath that, so that row is basically just kind of tucked up inside and again what i'll do is i'll Pull this out at the end and create that coverage for that almost like that curtain grab the remaining whatever's left down at the nape okay. So what you can do now is go through and just kind of make those adjustments so again right here we're going to want to pull this and create a veil. Okay, just like that. Now it's hidden! So these parts right here where you're pulling it's really important. You don't want to get too far into your braid before you make those adjustments, so i actually like to go through and pull through this top part. First, you're going to grab these two outer edges and you're just going to pull on them pinch and pull we're going for messy the messier and bigger the better there's, no perfect way. We don't want them to look perfect. You almost want to have some loofing, some things being pulled out again this. We want this to be covered, okay right there and then, when we go on this side and we create those veils, we'll be totally covered. Okay. So now what you're going to do? You'Ve got this thicker part which was coming out through the braid you're just going to grab another rubber band. Go down about this far and then you're just going to poke to the middle and you're going to bring this one out. Okay same thing and you're just going to repeat that process all the way down as far down as you want to go now, this is really fun because you get to customize like what your look ends up. Looking like at the end, you can stop like you. Could stop right here if you wanted and leave a little bit of a tail, you could tie on a bandana or something like that or you can go further down. So i'm gon na go a little bit further back down, but not too much okay. So once you get down to about a point where you are finished, then again, you're gon na kind of do the pull out trick, grab the two sides, pull them up and make it as tight or as loose as you want down there to the ends. Again, i like mine, super messy and that's the beauty of wearing extensions. Is you have a lot of hair to play around with and make messy i'm going to show you how to tack these down when i get to the other side as well, we'll leave these for the end. So i want to make sure that these two front sections are symmetrical, and so you know most of the time you're braiding you're working on the back of your client's head or the back of your own head. But look in the mirror. Look square on with your client make sure those are even before you do the whole braid and realize that they're lopsided and remember you're, going to split this in half, pull this one up through and clip again. We'Ve got this corner here of her extensions, so i want to make sure that i'm not grabbing any of that hair. Otherwise, it's going to cause kind of like a bubble right there so allow this to like flat you're going to pull the hair in front of it. Just like that, then you don't see anything. What i'm doing right here is: i'm grabbing again this hair that's in front and am using this to create this buffer piece. If you grab too much of this corner of the hand-tied extensions, then it's just going to cause bubbles and bumps, and it's not going to lay flat so again, i'm getting now into where this top row is so i have enough hair to use as a veil. I don't want to pull it super tight, because then i'm going to see that so we're going to use that as a curtain over the top and then again leave a curtain that can go over this row. This you're going to pull out so that it relaxes. So i want you to look at the difference between the one on the right that has already been pulled and the one on the left that is still nice and flat. So i don't know about you, but i definitely prefer this look plus by pulling everything out. It helps to create kind of this looseness and this flow to your braid or to your double bubble, braid, which is going to hide your extensions if you are wearing them. Okay, so let me remind you again of how i like to do this once you're just dealing with this and not french braiding it in anymore, you're, just gon na make ponytail continue on that process, all the way down the back of the head. Okay, so i finished off the right side and, as you can see, you can't see any elastic at all almost looks like you tied your hair in a knot which is pretty cool. So i'm going to show you how to do this and again, i'm not going to take credit for something i didn't create, and i want to tell you this is a sam via trick that i learned man like way back when i was in cosmetology school. So i'm going to show you that now, just in case you haven't seen before okay, so you're going to take this smaller end and you're going to wrap it around this elastic and then you're going to take this bobby pin put the end through it all the Way up and then you're going to feed this down through your rubber band, you're going to pull it out might have to give it a little wiggle and voila. Now it looks like we've tied her hair and not without any elastic. Hopefully you guys learned something new. Today, thanks so much for watching and as always, please like subscribe share, do all the things you

Comments
That1CoolChick: This came out SO CUTE !
Clara Maria: Omg thank u SO much for the tutorial!! (I found your video because of lorrayne's video ❤)
Yasmin Vitoria: I Love it!;)♡
Mrs Tami Keathley: LoVe This, I was Lookn For A Really Good Example-I got it❤️
Lucy Giles: can you please do more hair tutorials xx
Madison Cameron: What state or city is your salon located in? I want you to do my extensions!
Shafaq Zahra: Can u show what is the proper way to attach Clipin Extensions?
Adri Carlos:
Adri Carlos:
Miria souza:
Benetta Howard: How to use clip on im your hair