How To Install & Style Your Curly Hair Extensions
- Posted on 04 February, 2021
- Clip-in Hair Extensions
- By Anonymous
#CurlyHairExtensions #CurlyHairTransformation #curlyhairstyles #curlyhair
Want to learn how to add volume to curly hair? Want longer curls? Bebonia Curly Hair Extensions are the easy fix! In this video, Brandi Pope will show you her detailed step by step instructions on how she installs and styles her Bebonias.
You can easily use curly clips-in extensions to pump up the volume or add layers to your naturally curly hair! Plus there are endless styles to try with the help of your Bebonias
Let us know in the comments if you tried them out yourself!
Bebonia Curly Hair Extensions are high quality, made from Remy human hair
We offer several curl patterns that blend beautifully with type 3 curls (including 3A, 3B, and 3C). Perfect for anyone with natural hair who is looking to add length and volume.
extensions in video: Curly, Dark Brown, 220g, 18inch
Need help matching your hair type with our extensions? Email us!
Shop Curly Hair Extensions now: https://bit.ly/2pvaChj
CONNECT WITH US
---------------------------------
❤️ Instagram: https://www.instagram.com/curlsbybebo...
❤️ Pinterest: https://www.pinterest.com/curlsbybebo...
❤️ Facebook: https://www.facebook.com/curlsbybeboni...
❤️ Our Curly Hair Blog: https://www.bebonia.com/blogs/blog
If you have any questions or would like a product recommendation, email us: [email protected]
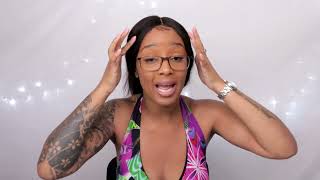
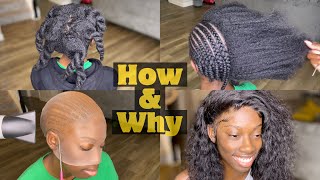
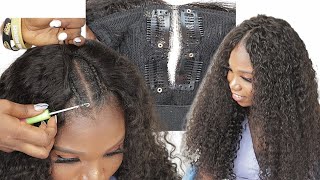
Hello, beautiful people welcome back to my channel, i'm brandi and you're, watching the glam bell, and today we are talking about curly hair extensions. I posted this photo on instagram. You guys blew up my dms and in my comment, section freaking out over the hair, and i did wear curly hair extensions in this photo. So i want to share today with you guys what i used in that photo and how i actually install my curly hair extensions. This is not sponsored if you're interested in finding out how i go from short hair to long luscious, curly locks then just stay tuned. If you're not subscribed to my channel already, you know the drill go ahead. Hit that subscribe button down there make sure to turn the bell on so that you're notified when i upload videos here on youtube and please, if you have even the tiniest little second to hit the thumbs up button or hit the thumbs down button. If you don't like a video and to leave me a comment, it really does help out the algorithm here on youtube. So i appreciate all the interaction that i can get and without further ado. Let'S just go ahead and jump on into this video okay, so i've actually had my hair up for most of the day, so i'm gon na take it down, and this is gon na look crazy, but i promise just trust the process i didn't feel like washing And restyling my hair or anything for this, so i just want to start with kind of my crazy hair here. I'Ve got a lot of gray coming in. Let'S ignore that, okay, so the ones that i purchased for this particular picture was the uh curly style extensions from bobonia. They have three different styles from wavy curly and then like more like a kinky coily style um. So i got the curly style because that looked like it most matched my curly hair. I also only got the 110 gram set. They have a 110 gram set and then they have a 220 gram set. The 220 gram is a lot more hair, of course, and i got it in the chestnut color. Now i got those before i colored all of my hair. I still had quite a bit of blonde so that chestnut color was like a perfect match to my hair. Color before - and i actually can still use that color and it almost looks like a little bit of ombre in my hair. Those were also the 16 inch set i'll put all of that in the description box, so that you don't have to remember it. I purchased the first set but babonia reached out to me, and they wanted to send me another set that matches this color. So i got the 18 inch, which is just a little bit longer than the first set, and i got the 220 gram which is more hair and i also got it in the shade dark brown. So again, i'll leave it in the description box, the ones that i used in the picture that you see and the ones that i'm using today to show you how i install them when you get them - and i literally have only tried these on one time. So these are pretty much fresh out of the box. I haven't even styled them yet um, so this is how they come. This is what they look like. This is the curly set. So, as you can see, it's got that nice little curly wave. It'S not like ringlets, you know what i mean they do have a style that is more of that ringlet. But this matches my texture, the best the 220 gram set is going to be a lot more extensions than the 110, but i have pretty thin low density. Hair, so the 110 gram set worked perfectly fine for me. I just wanted to be a little extra with this next set so that when i really really want to pump up the volume i have all this extra hair to use. I probably will not use all of this hair today, just fyi okay. So to start off. The first thing that i like to do is take a three clip weft right here. I just kind of shake it out because when you first take it out of the package there, you know the curls are kind of like stuck together and you can separate it once you put it in your hair. I'Ll show you exactly how i do that this is the trick that you want to use when you're doing extensions. I flip all of my hair over and i clip these extensions in um kind of like upside down. If that makes sense, so normally you would separate your hair and put the clips in just like this and clip them, but i'm actually going to flip them upside down and clip them in upside down. So i'm going to show you i have pajama pants on this. Is the real life of youtube? Okay, uh business on top party at the bottom? So i'm gon na flip all of my hair over and take the three clip weft and just clip that in just like that. Okay flip it back, and then you have that first clip in okay and what this does. Is it eliminates that weird funky piece of hair like where your hair shows through right at the bottom, and it's like a dead giveaway that you have in extensions? So that's like my favorite little trick to really like concealing that you're actually wearing extensions. If that makes sense, next thing i do is go right above that, and i'm just gon na kind of put my fingers through my hair, separate it gently and clip all of this up just like so the next one i'm gon na go in with is a Four clip weft: okay, i'm gon na go right along this little hairline and clip it in just like that. Okay, so just like so, and it doesn't have to be perfect because listen, these are all going to be covered. Okay, so i'm going gon na go right here above the ears. I want to easily separate your curls, so you're, not tearing your hair and ripping your hair to shreds okay, okay and since this is the widest part of my head. What i like to do is take two three clip: wefts, okay and i'll start on one side and do one three clip here and then do the other three clip on the opposite side. Okay, i'm just gon na start right here! Just push that in push that in here's, my other three clip weft and i'm gon na go this way push that last one will overlap just a little bit and that's totally fine, here's what it's looking like now, we can go like right at the temple. I have a little two, this one's a little wonky. This was like the little sample piece that they put in there for you to kind of match your hair up. So it's a little wonky, but we're gon na fix it. Okay and we're gon na put one two inch on one side, two inch on the other side. I just kind of like checked to see where or if i need any extra any extra help here. Look at all of this hair, y'all wow. Currently, from that 220 gram set, i still have a four clip weft, another three clip weft and another three clip weft. So if i really i mean that's a lot of hair, that's a lot of hair left right, but what i might do just to add a little extra right here at the at the crown. I might put a little little three inch right here so just to be extra. I don't think i need this by any means, but since we have it, let's go ahead and use it literally just kind of pushing it in and clipping it. So then, once you have all of your clips in you can really start to like separate out some of these pieces. Here comes the part that some of you might not like and listen. You really could just like style, your hair at this point and let it go. You know. However, you want you can pull part of your hair back. You can do all kinds of styles with it right. What i like to do is take a curling iron. I know don't kill me you're, probably like. Oh, my god, don't add heat to your hair. Listen, listen! I understand. If you don't want to use heat on your hair you don't have to, but in order for it to blend the best, i find that this works. The best now i am using this curling iron today, but i typically use a smaller curling iron than this. I usually have like a half an inch. I think this is a one inch. I usually have a half an inch um curling iron, but i have no idea what the heck i did with it. So we're just gon na have to use this. One today pick up little pieces and i start to just twist it around, and i really start with just the extensions first, because my curls are a little more of that round. Curl shape, you know, and these tend to be a little bit of a tighter kind of wave pattern. So this just helps to blend that all in i'm just taking pieces and just wrapping it around and you don't have to do your whole head literally just picking up random pieces. All of these are the extensions you guys. I try not to even pick up any of my own hair, but for the most part i try to stick to just using the heat on the extension just to help blend it. The best that i can, and so as you can see like some of the ends, are a little bit like stringy. So i like to kind of hit the ends just a little bit to make sure that they have some shape and they're not looking frizzy, and these are human hair. So you can use heat on them. You can wash them dry them style them. Whatever i mean. That'S the beauty of these. You treat them just like you, would your regular hair and i like to just kind of get in there and kind of separate out just like i would kind of, like my natural hair, you know separate out. Some of those waves helps give it even more volume, and so typically, i wouldn't really curl any of my own hair, but because i didn't refresh and my hair's been up in like a messy bun. I am gon na just like hit these few little front pieces. Real quick and again, if i would have already refreshed my hair, i wouldn't even need to be doing this on the front part. I just don't want it to look too crazy frizzy. So that's just like a quick little reference of how i would do this now. What you can do is go in with a pick and i like to kind of press up. Not only does this give it more volume, but it also helps to blend your hair with the extension gel. Look at that. Oh my gosh. This is what my hair used to look like when i was a teenager for real for real, so this. This is the side that you know. This is what it would look like once you're done, and this is kind of when you first put it in and it's not all you know completely blended. I could take a lot more time and make this look even more perfect, but i'm not going to do all that because it's not necessary. I'M just going to go ahead and hit this side with the curling iron and then i'll be back to show you guys. The final look so for time's sake, i didn't even really fool with the back. I just kind of focused on the front so that you guys could see this took me like maybe 10 minutes just to you know kind of blend everything and whatnot, but y'all look at all of this hair and i don't even have all the extensions in i Mean these extensions are so beautiful, very high quality. I am obsessed with them. I'M going to show you the back, even though i really didn't perfect the back. I just want you guys to see what it looks like definitely could have uh full with that a little bit more, but hopefully you all can see that. Oh, i'm just so obsessed. So there you go. I'M obsessed with these curly hair extensions, you're gon na see me wearing these a lot so, if you're interested in checking them out i'll leave everything linked in the description box, the kind that i had in the picture and this set as well. I hope you guys really enjoyed this video today. If you did please again make sure to give it a thumbs up. Let me know what you think in the comments, and i will see you in my next video peace out.

Comments
Josie Stoker: It is a lot easier if you wash and style the extensions on their own first. that way you don’t have to worry about the ends being too frizzy or the curls being flat and wavy instead of curly. Don’t wear them right out of the bag. Take care of them first.
Rachel Kidd: Beautiful . I'm getting married in May and you have inspired me to rock my natural curls and get these extensions. Thank you so much. You look great
kaitlyn harvey: I have been wearing extensions for 13 years and would have never thought about putting the weft on the bottom upside down like that!! Thank you for this video!!
Sariyah: I ordered the chestnut spirals & they were too loose for me. So I ordered the curly set on black Friday. I love the flip over tip you gave.
Corazon: Love the Glam Belle! The hair looks beautiful <3 Cant wait to receive my set!
Yessika Diaz: You look amazing! Cant wait to receive my curly hair extensions
Jesse Brunette: When you clip in the bottom upside down like that do you notice it damaging the weft at all? Like loosening up clips or anything?
Brittani Blankenship: So obsessed! I get married in October and will be purchasing these. Do you think you should have one pack the same length or a mixture?
Kimberly M Paschall: That eyeshadow is awesome!
Karola Winter: You have an amazing personality! You look awesome too! Karla
Brittany Love: Hi I love my extensions I just did a review on my channel ❤️❤️
Shy Heppner: You are so gorgeous!
Mary Underwood: Where do you find your curly hair extensions? I cannot find curly ones.
Tsedi Habte: Thank you
Jose Contreras: I love that photo of you!
esmee nicole: that wasn’t a good color match i feel like