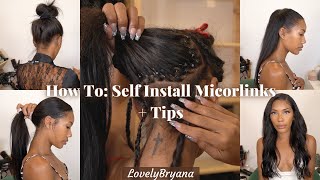
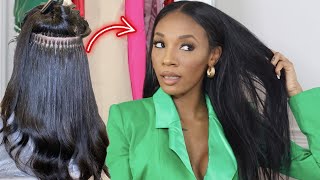
Very Versatile Vixen Micro Links For Black Hair, Looks So Natural, Can Be Braided & Styled | Ywigs
- Posted on 14 July, 2022
- Clip-in Hair Extensions
- By Anonymous
I used two and a half bundles of Yaki Microlinks.
Direct link to the Light Yaki I Tip Microlink Extensions:
Ywigs Micro Links Hair Extensions:
https://www.ywigs.com/collections/i-ti...
Ywigs Tape-in Extensions:
https://www.ywigs.com/collections/tape...
Ywigs Clip-ins Hair Extensions:
https://www.ywigs.com/collections/clip...
Ywigs U-Part Wigs:
https://www.ywigs.com/collections/u-pa...
Ywigs HD Clear Lace 13x6 Lace Front Wigs:
https://www.ywigs.com/collections/13x6...
Ywigs official website: https://www.ywigs.com
Connect with Ywigs:
http://www.instagram.com/ywigs_officia...
https://www.facebook.com/Ywigstore/
Snapchat: Ywigs Hair
.
.
Other videos:
YOU CAN’T TELL ITS FAKE HAIR. Versatile micro links on 4c hair, Looks so natural || Ywigs hair: https://youtu.be/5gn1R8GZvC4
YOU CAN’T TELL ITS FAKE HAIR. Versatile micro links on short curly hair, Looks natural || Ywigs hair: https://youtu.be/Lz_uyNqxb-0
Only 15mins, Amazon prime Lace front wig, NO BALD SCALP, NO BLEACHING, NO PLUCKING | Unice hair: https://youtu.be/NjRDHcIEpQg
Lazy Amazon prime Lace front wig for beginners, NO BALD SCALP, NO BLEACHING, NO PLUCKING |Unice hair : https://youtu.be/N408hA9Di8w
Only 5 mins, READY TO WEAR GLUELESS Lace Front 5x5 closure Wig, NO WORK NEEDED! |Julia hair : https://youtu.be/HyDjEmSX0-s
How to: INVISIBLE V PART WIG TECHNIQUE Looks natural from the scalp + FAKE SILK PRESS | Julia hair: https://youtu.be/A4Rr2V0zQps
How to: U-part wig crochet illusion, NO LEAVE OUT, Looks so natural | Ywigs: https://youtu.be/XLrWJrX4VLY
YOU WANT A PART OR FLIP OVER? U-PART WIG NO LEAVE OUT CROCHET ILLUSION | curls curls: https://youtu.be/wTwGw9q06j0
How to: Individual crochet illusion for short passion twist. Looks natural from the scalp: https://youtu.be/WRlKnGBuQmU
How to: individual crotchet illusion for BOX BRAIDS. Looks so natural + NEW BRAIDLESS METHOD| Gottin: https://youtu.be/KWLjYiAhemM
DETAILED PARTING TUTORIAL WHILE DOING BUTTERFLY BRAIDS AKA JUNGLE BRAIDS: https://youtu.be/iJX750B5Fmc
BRAIDS CLASS: Get Perfect box braids size, Parting size for spacing, and Fullness + Gripping roots: https://youtu.be/zlqOQcRA_Ok
Still cant grip twist to save your life? Try this! No rubber bands needed! | XTREND SPRING TWIST: https://youtu.be/opJxOo0aN8o
NEW STYLE! TWIST LOC TUTORIAL...MARLEY VERSION! If you love marley twist and faux locs, try this: https://youtu.be/FkW5RXuUUXw
HOW TO DO MULTIPLE PARTS IN FRONT FOR TWIST OR EVEN BOX BRAIDS + GETTING THE BRAIDS TO LAY FLAT!: https://youtu.be/pXiFDyCeY3c
TWIST CLASS: Multiple ways to start twist, twist from the root, Knotless twist + box braids twist: https://youtu.be/Q4Ut5qX9arY
NEW STYLE...MYSTIC BRAIDS TUTORIAL, different from passion braids, passion twist and butterfly locs: https://youtu.be/5cGnn5_Eqes
GAME CHANGER, this is how to refresh knotless box braids no re-braiding using crotchet needle WOW!: https://youtu.be/QQAcgcVNi58
DETAILED KNOTLESS PASSION BRAIDS TUTORIAL WITH BONUS BOHO TECHNIQUE | PASSION BRAIDS NOT TWIST: https://youtu.be/b88nsTehEmI
THE BEST BUTTERFLY LOCS TUTORIAL COMPILATION NEW TECHNIQUES FOR LONG & SHORT HAIR: https://youtu.be/RXLS0HBgwBc
THE REAL PASSION TWIST TUTORIAL..EXACTLY BOHO BABE TWIST and LOC TECHNIQUE: https://youtu.be/9wQCFOxXynk
BRAIDS CLASS: BOHO BOX BRAIDS TUTORIAL | PART 1- Hair details & Prepping: https://youtu.be/FZ9_cQ4WH8c
BRAIDS CLASS: Perfect your box braids, no lumps, no bumps + Dipping technique to remove stiffness: https://youtu.be/i2hAXJf2ASk
So, hey guys welcome back today we're going to be doing a very versatile vic sand micro lynx install - and this is my model's hair. So this is the length natural length of her hair, and this is her hair texture. So we're going to be using extensions from um y wigs and we're going to make her hair look longer and do it in a way that she could style it in multiple ways. So this is the hair we're using, and this is why wigs hair and i'm going to be using that yaki texture micro links hair. So in the box, i have three bundles of the hair, but i'm not going to use all. But i i will use about two and a half, but i have three bundles and the texture is yucky. So it's a little bit coarse, which is perfect. So it's going to blend with my model's hair and um yeah. So i'm just going to let you enjoy the install because i've done micro links before, but this is going to be a super versatile technique, so just keep on watching. Okay. Now we have the leave out for the perimeter if she wants to put it up in a ponytail. So the next leave out we're going to do is for the vixen okay. So we're going to split her hair in four quadrants and we have to make sure that this quadrant is equal and to make sure it's equal, i'm going to first part down the middle like i'm doing right now and then after parting down the middle. Next, i'm going to part from ear to ear. Before i start adding the extensions okay, i want to make sure that all quadrants are equal. So now i'm parting from ear to ear and i'm going to try to make sure that you know the left side and the right side are all equal and even and then i'm going to start to borrow hair from each quadrant. On the horizontal and the vertical sides, so another thing i'm doing is to take less amount of leave out at the very back at the bottom like right here: okay, like the back right here, this is because i don't want it to be too obvious when she Has the extensions in her hair and she, you know, wear her hair down, it's not like looking separated. You know, you don't want the length of your hair to separate from the extension. So that's why i took a less amount of leave out at the very, very, very back, okay - and this is also important if your hair is shorter. Luckily she has, you know, kind of a good length of hair. So, but if your hair is shorter, you don't want to take too much leave out at the very back all right. Now, i'm satisfied with the leave out that i section so now we have our equal four quadrants. I tried my best to make it equal, even though um we usually have more hair on the left side of our head, but i tried so now what i'm going to do for the install okay, i'm going to imagine that that middle braid is not there. So i'm going to start parting in this smile direction. Okay, so just pretend like that middle braid is not there and just start parting in a small direction from one quadrant to the other like this, and then i'm going to start installing the links all right. So if you're new to micro links, this white stuff, you see is the loop that you use to install the hair. So it's going to make it easy to just pass her natural hair through and i'm going to use a plier to secure the bead. So this is how to install it. Okay, if you're new to micro links again after you pass the hair through, do not push the beads too close to her scalp leave a little bit of space, and then you just use a plier to clamp it down. Not too hard, but you know secure enough. Just don't put too much pressure. The plier is strong, so it's gon na you know clamp the bead easily, so don't overdo it, okay, hi! So all right we're halfway through. I hope you saw how i laid the micro links um, you kind of want to lay it starting with a smile and, as you go up, the parts get smaller and smaller. You know until you finish it, because you don't want it, you want it to be seamless, you don't want it to be bumpy, so you have to lay it like that and now this is how i'm going to lay the front. I'M going to start with the smile again and then, as i go all the way up. The smile gets smaller smaller until there is no smile and again just pretend like there is no braid in the middle and just part across from all quadrants to the other foreign, hmm, okay, we're getting closer to the finish line and it's getting even smaller and smaller. So i have a slower video of how i install micro links. If you want a more slower, detailed video, i will leave the link to other micro link videos. I'Ve done if this is your first time and you're not grasping what i'm doing just check out the links to the videos in the description, okay guys. So what basically done now, i'm going to show you multiple ways. You could style this hair before i curl it. So so so so, do i really like how versatile this technique is, and i'm super super glad that this hair blends perfectly with my model's hair, it's as safe, like they just knew the kind of texture that she has and just like, created this yaki texture. It just blends so well. I love it. So that's it for this video, if you enjoyed it, make sure you give it a thumbs up like subscribe and also don't forget to check out why wigs hair, i will leave their hair in the description box of this video. Try it out and let me know what you guys think bye. So you

Comments
Tea Cup: WOW.....that really takes patience....looks Great!!!!
Chinese by Tyler: Hi there! You did a great job I gave this video a thumbs up. thank you for sharing
Johanna Stokes: That's beautiful work... Your awesome with this line of work..
Sierra Lockhart: Beautiful
Jackie Camacho: Very nice
Adrienne Davis: Flawless
Catina Daniels: AMAZING!!!!!!!
Onyemaechi Doris: Where are u located! How do I do this on my hair? Does it have any side effects? It's really amazing
Tina Marie: Hi my name is tina you do a good job and I love too much now hostess
Владислав: Alles sehr schön. Aber zuerst zusammen die Nummern 10 und 1. Eine emprutt.ONLINE Brünette und eine anderej Blondine. Es wäre unfair, wenn ich 4 wählen würde