Trending Protective Styles Of Summer 2022 || Style Ideas And Tutorials
- Posted on 13 July, 2022
- Clip-in Hair Extensions
- By Anonymous
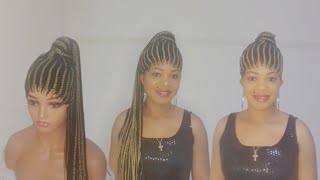
1. Goddess Braids
2. Boho Braids
3. Confetti Braids
4. Custom Curled Braids
5. Custom Ombré Braids
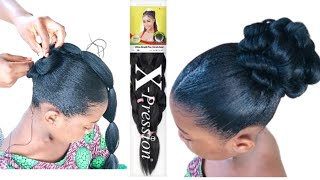
Goddess Braids:
Time: 4-5 hours (depending on size and length)
3 packs of pre stretched braiding hair
2 packs of Free Tress Deep Twist
Nail Glue !!!!
Boho Braids:
Time: 4-5 hours (depending on size and length)
3 packs of pre stretched braiding hair
3 packs of Free Tress Bohemian OR Water wave
Nail Glue !!!!
Confetti Braids
4 hours
3 packs of pre stretched braiding hair
Hair tinsel
Sedfzo Hair Tinsel Glitter Extensions Kit - Sparkling Shiny Fairy Hair with Tools for Ball Party,Easy to Install (47 inch,12 colors,2400 Strands) https://a.co/d/c1rzswq
Custom Curled Braids
3 packs of pre stretched braiding hair
Perm rods
Custom Ombré
3 packs of any color pre stretched braiding hair .
If you’re doing a 2 color blend ombré get 2 packs of the main color and one pack of the color use wish to feed in for the ombré.
If you’re doing a 3 color ombré then purchase one pack per color
Follow me on Instagram:
@pretti_britti (personal)
@braids_by_brittany (hair)
THANK YOU FOR WATCHING !
Please don’t forget to LIKE, COMMENT & SUBSCRIBE ;)
Diamonds: what's up y'all welcome back to my channel on behalf of Brett. If you're new here welcome, I'm Brittany and today I will be showing you all what I feel to be the most trendy or trending most popular protective styles of Summer 2022 and I'm gon na. Do it like demonstration style or tutorial style? So I have my mannequin mahogany here. Y'All have met her before if you're new to the channel. This is my mannequin head mahogany and I'm pretty much just going to show you guys, five different styles that are really popular. Amongst my clients, I went through my book and calendar and I just chose the five styles that everybody seems to be booking right now. Um this summer I decided, I would demonstrate them to you guys just in case you want to try these Styles or you need some ideas. I'M going to show you what you need and how you can achieve the look if you're gon na try them yourself before we get into the video. I want to thank all of my new subscribers. Everybody who's been subscribing. Lately. I'Ve had a lot of new people to join my channel, and I also want to thank everyone else who has been subscribed for a while, but continue to come back and support my videos liking watching and commenting on my videos every single week. We are about 50 subscribers away, I'm at 19.50 right now, I'm 50 subscribers away from 2 000 subscribers. So I wanted to say thank you. Thank you. Thank you to everyone who supports my channel. I will say this with me doing the demonstration on mahogany there's no way, I'm gon na sit here and do a full head of five different styles in one video. So y'all see this little piece. I pulled out a patch of her hair right here and for each style, I'll probably do just two braids I'll demonstrate two braids for each protective style that I'll be showing y'all and then somewhere on the screen. Probably right up in here I'll show y'all a picture of whatever I can find in my portfolio, so whatever the style is I'll show y'all how to do it and then I'll show y'all the picture of how it would look if it's fully done on a full Head, if the pictures that I end up choosing aren't my work, it will be displayed on the screen that it isn't my work so that I'm not taking credit for someone else's work. The very first look that I will be doing today is the goddess braids, and for my goddess braids, I use three packs of pre-stressed braiding hair. Of course, with me only doing a little tiny patch of my happiness, hair to demonstrate. I only needed one pack of pre-stretched braiding hair, so I got the utre express expressions or outrage: Expressions, pre-stretched, braiding hair. This is one of my favorite Brands um and the 52 inch and then, in order to make it goddess, goddess, braids honestly can be achieved with any curl pattern. But this is the curl pattern I use in majority of my goddess Styles um, and this is the Deep twist um braiding hair by freetress um. This is the curl pattern that I like to use for my goddess: braids. It'S curly um pattern right here, but, as you can see, freetress is sold in a variety of different curl patterns um. So I let my clients go crazy if there is a curl pattern that sticks out to them in the store that is different from this pattern. They just want to try something else: um they're able to do that. But when they're looking at pictures and sending me pictures of styles nine times out of ten, this is the curl pattern. That'S trending um online right now, so basically you're just going to braid your hair with the straight hair and as you get down to the end, you're going to feed in the Deep twist hair. So I'm gon na go ahead and open it. Um I'll just hear. Y'All was found in my stash, I didn't go, buy any extra hair for this video all right, so my hair is unpackaged. I have the pre-stretched hair and the curly deep twist hair. I have a wristband with some braiding wax, I'm using shine and Gem. I have a clip for separation and for my guided Styles, I use nail glue. This is what's going to seal the curly hair towards the end of the braid. Once you once you feed in the curly hair you're, going to seal it in with a little nail glue so that the curly piece does not slide out when you go to run your hands through your braids styling them washing them. Whatever that curly hair will start slipping, if you don't seal it with something, so that's what the nail glue is for make sure that you remember that okay, y'all typically, if I was doing a full head of goddess braids, I would separate all of my curly hair Onto a braiding rack, so it's ready to catch when I'm about to feed it into the bottom, but because I'm only demonstrating two braids, I'm just gon na sit this piece of hair on top of her bun go ahead and unscrew my nail glue. So it's ready to go and then we're going to get into it disregard how she's rigged up on this chair, I lost my mannequin clip that Clips her onto my desk, so I kind of just nailed her into this chair. It'S real ghettos. You can go knotless with this, but for the sake of time, I'm just gon na do a traditional box braid and just go ahead and box braid the hair, how you normally would, with any other style or with traditional box braids, just go ahead and add that On like so once you get down to where her hair is about to stop, you can see where her hair is stopping, because it's still kind of wavy from that protective style. I just took out you're gon na dab a little bit more product and go ahead and smooth that into the pre-stretched hair, and once I get about four inches from the bottom I'll go ahead, and I feed in the goddess, hair and you're. Just gon na go behind the back of the braid, go behind it and braid that in go ahead and Tack on a little of the products and braid that in oh you're, gon na braid, all the way to where the pre-stretched hair stops. And then, once you each once, you reach the end of the pre-stretched hair. That'S when you go ahead and seal it with your nail glue. I go in with just a DOT and then I also go into where I added the curly hair in at where I first started, feeding it in it, and I put a little dot there too, and there you have your goddess braid once I seal it, I Like to add a little bit of shining gem to kind of bring that curl together and get separated when you're braiding it in - and these are my medium sized small, medium size, long and nasty goddess braid next up are the boho braids or Bohemian braids, and it's Pretty much the same concept, except with the goddess braids. You only feed the hair in at the bottom, with the boho braids there's a difference. You guys are going to feed the curly hair in throughout the braid. There will be curly pieces sticking out of their braids. Oh and for this particular style, you would use Bohemian Hair by freetress um, so the curl pattern would say Bohemian or Waterway. Today I have water wave because again, I'm using what I had in my stash already at home, but they do sell. It'Ll say Bohemian right here, but the reason why I can get away with Bohemia I can get away with water wave instead of Bohemian, since I don't have it right now is because the water wave curl pattern in Bohemia are almost identical. I'M going to go on freetress website and show you guys um the two packs right next to each other right now on the screen. So you can see your curl patterns they're very, very similar um. So it's not going to make much of a difference, but it's just a spiral: curl a tight spiral curl. So I'm going to use water wave. I'M only going to do one braid, because I've already showed y'all how I feed my hair in towards the ends. Typically, when I do a style like this, I use three packs of pre-stretched braiding, hair and three packs of boho Bohemian braid, hair or Waterway by freetress, quick tip when working with Bohemian and water wave curl patterns, they're separated into these locks and the reason why I'm Able to only use three packs to do a full head is because I take each lot and I separate it either, three or four times, depending on how thick the lock is I'll, pull apart, three or four pieces from each lot to stretch the hair longer um. So you want to go ahead and do that if you have a braiding rack and you're doing your full head, go ahead and separate all the locks into three or four different strips and lay it on your braiding rag. Here'S a demonstration in case you needed one. Sometimes the hair is a little like Twisted. You want to go ahead and just untwist it at the root kind of just separate it like so once it starts doing that it's ready to pull apart and you're just going to split it into three pieces as evenly as you can you end up with one Two three pieces, like I said some locks can do four pieces, but this one feels like it should be three so you're gon na start that braid off the traditional way you can do knotless with this as well. Of course, I will show you guys examples. Some people cut their hair short and they do a boho look with like a Vibe type style. That style is really really cute, because when you pull it up in buns or do different styles with it, it's just super super cute. Then, once I get about four to five inches down the braid, which is a third of the way, if you're doing long, braids I'll go ahead and feed in that first piece. If you're doing three pieces, I would start a little higher, but for a two-piece Bohemian braid I'll go ahead and feed in the first piece about five inches now in the braid four to five inches, I'm gon na take half of the piece half of it is In in with the other pre-stretched hair and I'm pulling half of it and I'm gon na go ahead and wrap it around, whatever hair is already pulled up. So if your client's hair is pulled up in a bun put up in a clip, a claw you're just gon na separate that piece you put in in half put it around the clip or the bun to move it out of your way and braid. The braid like so once I get maybe about two inches or just a little bit further from where I left that first piece out, I'm gon na go ahead and leave out another piece and then I'm gon na braid. It all the way down and don't forget to add that shine and jam as you go. If you feel any frizziness or any lumps with the person's natural hair, you want to go ahead and smooth that out as you're braiding, just like with the goddess braids. Once I get about four inches from the bottom of the pre-stretched hair, I go ahead and I feed in my curly piece, so I'm adding in my water wave now putting in a little shining gem and I'm gon na break this all the way until this straight Hair ends. This is how the water wave hair looks once it's all jammed up with the product, then you're gon na bring down those pieces that you hooked up and you're gon na add a little shiny gem to them too, give them a little TLC. You just take your scissors and you trim at an angle. So this is how a boho braid looks again for any of y'all who get confused. Sometimes the boho braids has tight spiral, curls added in throughout the braid, in addition to the curl. At the end, the goddess braids only have curls. At the end, I wanted to kind of just lift some styles to y'all, so y'all can know what is trending right now, but I also wanted to demonstrate that this is look one and two goddess and boho yeah. We'Re gon na get into the next look, which are my confetti braids. I know y'all tired of hearing about these because ever since they became a thing, I have been talking about them on my channel, but I could not do a trending summer 2022. Video without mentioning these braids and doing a demonstration on these braids, because my clients have been going crazy about them ever since I released them as a service, so the confetti braids, traditionally, what most people love are the ones that I have posted on my page, which Are jet black, just traditional box braids with hair tinsel um braided into it um? This is the Rainbow Tint, so it can be purchased off of Amazon. You guys, I will link the tent so down below um, but yeah. The most traditional confetti braids have black hair black pre-stretched hair, with um tinsel Rainbow Tint, so added in so I have this ocean splash twisted up Brandon. This is pre-stretched Hair by utre. They did a collab with twist it up and again. This is the ocean splash hair and for tent. So today I had the option of doing a royal blue and a teal blue. I'M thinking the teal blue will match better with the ocean. Flash versus the royal blue y'all May disagree. This might be a little closer, but I personally want to do the lighter blue versus the dark. This way it's quicker and it's just when you blend the hair all together, you blend the tinsel and the weave all together and with this technique, of course, you're going to get less tensile in every Braid By blending the whole bundle in with the tinsel, but it's Quicker hair tinsel can get away from you very easily. It is very slippery, very slick, so make sure when you're blending it I've gotten a little sloppy but make sure when you're blending it that you have a tight grip on the hair as you're pulling it apart. Make sure you have a tight Groove again, you can go knotless with this look but for the sake of time, I'll be going traditional, so you're just going to wax that part, get it nice and sleek and braid it in this is one complete confetti braid, with The tinsel added and with this technique pretty much after you blend in the hair tint, so with the pre-stretched hair, you just braid the hair, how you normally would so I'm gon na go ahead and do one more so I now have two confetti braids completed with The ocean splash blue and the teal tinsel with the second one you can see that I love strands of hair out. This is going to go into technique number four. I went ahead and decided to improvise instead of doing two new brand new braids. I want to show y'all how to do custom curls, so I went ahead and left the hair out, so I can show you how to custom curl it um. But yes, this is hair tinsel, AKA, confetti braids, very, very simple, very cute. It photographs really well in the sunlight with flash. It'S a look, so the fourth tip and trending hairstyle are custom. Curl braids, I'm going to take just a small pack out of my little perm rod stash. In order to do this look, but they became popular again and really a big Trend throughout this year and last year, when Coral array came out with her braids um, so I'm just going to show you how to achieve the look. I'M going to do one by just curling the ends, how I did with the very first style, the goddess style, where the hair was just fed in at the ends. Just in case you want to achieve a guide, establish you don't want to purchase that freetress hair. I'M going to show you how to ride your ends and get a wavy look at the bottom and also for Bohemian style. If you want curls throughout your braids and don't want to purchase water wave or Bohemian hair, I'm gon na ride that so what I'm gon na do, because I'm going to take one of my perm rods and go ahead and just go in a spiral motion around The rod into the hair runs out, and then I'm going to snap it same thing goes for the second piece, a downward spiral motion until you run out of hair and you snap it I'm gon na. Take a third rod, go ahead and gather the ends of both braids and go down in the spiral motion and snap it. But this is how it should look. I pulled and dipped the hair off camera make sure your water is boiling hot, because you're going to remove the rods only moments later. So you want to make sure that water is very hot and I told y'all these curls was gon na come out super tight, and this is a custom curl using the gray perm rods, which I believe is the medium size. I thought I would bring back out the water wave hair to show you guys how the curl pattern looks in comparison to the custom curl, and it's almost identical. So if you want to save money, go ahead and just custom curl it at home to get the Bohemian look. If the curls are too tight, you can just keep running your hands through it, pull them and release some just keep pulling them and releasing them until you get them to your liking, um, but yeah. A lot of that has to do with the fact that the water was super hot, but this is how it looks. This hair is 6.99 in most stores per pack, so for three packs you're going to spend about 21 dollars well with tax close to 25 on just the curly hair alone, and you still have to get the three packs of pre-stretched hair, which is about seven dollars. A pack so to save money and not have to get those three packs of Bohemian braids or water wave, hair um extra stylists that they can custom curl it or try to custom curl your pieces at home, it'll save you a dime, so yeah. I just wanted to show y'all the curl pattern in reference. It'S not that far off, just in case, you run into an issue this summer, where you want to try a color Ombre, but your colors aren't sold together in store. My custom ombre today will be the black hair that I used for the first two trending Styles, which were the goddess in Bohemian I'm going to use that pre-stretched hair. I had already opened for that and then in this second color that I use for the last to demonstrate, because traditionally ombre is dark to light, I'm going to start with the black and then I'm going to feed in this hair towards the bottom with custom. Ombre. You can rotate it. However, you want I'm just going to go from dark to light, since that's what's most popular the trick, the trick the trick to ombre is the color or the the color that you're feeding in towards the bottom needs to be thinner pieces as you're getting down the Braid, if you braid anything like me, um normally, when I get further down the braid and I get past my client's hair, the braid seems to get thinner. So I don't at the top of the braid I may feed in thicker pieces, but towards the bottom. The pieces are thinner, I'm going to go ahead and braid this in and then I'm gon na come back and demonstrate once I get almost down to where there isn't any more blood and excuse this dirty chair, y'all, already know what I use it for so once You get down to where you want to be you're, going to take that color and go behind the braid. So this part that's facing the top you're going to go behind that to add the color in behind it, and it's me flipping the braid um. That way, you can't see where the actual Loop is for, where you added the hair in and you're just gon na start braiding. The main trick is just to go behind the braids, so you don't see any knots any Loops, any inconsistencies and it's smooth like so and once you braid it all the way to the end. This is how it should look a lot of times. My clients would reach out to me when they have multiple colors in mine and I'll offer this service to them. It'S a little bit more um, it's a little more time consuming, especially if we're going to not this route, but anything is achievable. Y'All ombre Is My Jam. This is a custom one excuse my hugging, his hair y'all, but yeah. That'S that and that will conclude today's video. You guys. I hope that y'all were able to enjoy it really just take away some ideas on Styles. You can do and if you haven't done those Styles and you're a new braider, hopefully you were able to learn some tips and tricks with the many demonstrations that I did um also. I just want to say once again. Thank you. Thank you. Thank you very. Very much so so so so much for all of the continuous look and support that you all have been showing my channel welcome again to all of my new subscribers, I'm going to do a 2K giveaway. The same way I did when I reached a thousand and the channel got monetized, but yes, please, please, please hit that subscribe button and in the next couple of weeks I'll be announcing the winner for the 2K giveaway. I love you all. I believe that is it. So yeah see you in the next video foreign
Comments
Kelsey Arielle: I love all of these braid styles! I love the hack with curling braiding hair instead of buying water wave because those packs add up! It's also really helpful when doing braids with unusual colors (pinks, blues, greens, etc) and you can't find the curly hair to match. I just got into braiding with tinsel and I'm loving it!!! Congrats on your channel growth girl!!!
Danielle P: Yes! I have been waiting for another hair tutorials. Love the blue confetti custom curl braid. It is everything! Britt you are so talented and creative. So happy for you and all your accomplishments and everything that God has in store for you. Keep doing your thing girl
MJ Blessed: CONGRATULATIONS ON YOUR SUBIE GROWTH!!!!!! Extremely proud of you cousin!!!
jennifer joseph: Look how far you have cammmeeeee sissy I’m so proud of you . Keep doing a great job and reaching for the star ⭐️…You have so much potential and I’m here for it all ! Omgggggggg that blue is sooooooo pretty
Victoria Burks: I love that blue!!!!!!! So creative!!!!
Chris Blessin: Thank you Britt
starqueen: Enjoy the video.
Ashley🎀😍!!: Firsttt