How To Clip In & Style Hair Extensions | A Beginner'S Guide
- Posted on 09 September, 2019
- Clip-in Hair Extensions
- By Anonymous
How to Clip in & Style Hair Extensions | A Beginner's Guide
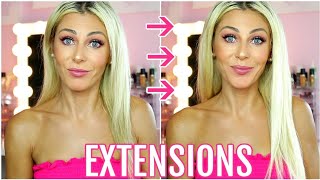
Did you make a $$$ purchase on a brand new set of beautiful clip in extensions thinking that you were going to turn into your #mermaidgoals only to be left dazed and confused? Well, you have come to the right place for a full rundown of how to clip in hair extensions for short hair, fine hair, and damaged hair! This clip in hair extensions tutorial will not only teach you how to get those bad boys in your head but also how to blend hair extensions so that they look MERMAMAZING. This is the ultimate "how to put in hair extensions for beginners" guide!
My Hair Details:
The hair that I have in is custom made:
- 20 inches long
- 150g
- Double Drawn
- 8A grade hair
- Color #4 and #8 blended together
Products Mentioned:
- Olivia Garden Backcombing Brush
- Texture Sexy Hair High Tide by Sexy Hair
If you are interested in a custom set, please email me at [email protected] and I can get you in for a consultation. Custom sets are only quoted for price after a full consultation has been done as the price can vary greatly depending on the choices you make.
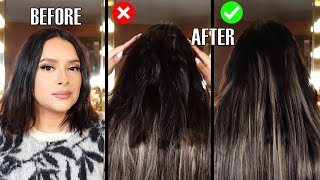
What'S going on friends, Welcome back to my channel. And if you just happened to stumble upon this video online somewhere and now you are here hanging out with me, then welcome welcome., My name is Gabi. This is Glam Girl, Gabi. Your place to come, hang out and learn about all things: glam., That's hair, makeup and fashion.. Some of you already know this about me, but many of you do. Not.. A few years ago I developed my own line of clip-in hair extensions, called Cabelo, It's Brazilian human hair.. It is so beautiful and silky and long double drawn equal thickness from top to bottom cuticle. Aligned. All the terms that you guys probably don't understand, but that mean so much to me.. It'S like word porn for a hair, stylist cuticle, align., ( high pitched opera singing ). But I get a lot of questions from my clients who buy these extensions and from other clients who also buy extensions from other brands.. How to put it in So I figured it would be easier for me to demo it for you than have to explain it. 300,000 times every single day in the salon., So let's go. So the way that a hair extension works is that you get wefts of different sizes that will go on different parts of your head depending on that size of that part of your head. Confusing right. I know, don't worry, stay with me. It'S really easy. Way that Cabelo is - and I know that it's also for a lot of other hair extensions.. What you're gon na get in your pack is a piece with four clips. Two pieces of two clips. Four pieces of one clip. And you are going to get two pieces of three clips. Step number one is to take your hair right at the nape subsection grab. This hair spin and pin it up in a clip., So that section is now gon na look like this.. Now what you're gon na do is you're gon na grab a backcombing brush.. This is the backcombing brush that I really love it's by Olivia Garden., But you can get any backcombing brush like this at Sally's or even I bet at Shoppers you can find it.. It has really nice tight bristles, which lead to a really good backcomb., You're gon na grab that section you're gon na lightly backcomb.. And then you are gon na open up your clips and stick it right in there. For this part of the neck and nape area. We'Re gon na be using a two clip weft, because it's narrower and that part of our head is also more narrow.. Now we're gon na take one inch section above that section slide it all the way through pin up that hair backcomb it lightly. Just like we did last time and put in a three piece weft., The three piece weft is a little bit wider, but so is that part of our head.? Now as we move along the head, we're getting to the ear zone., This is where our head is. The widest., So what we wan na do is go in with our four clip weft.. This is the widest weft that we have, which is perfect ,'cause. It'S the widest area of our head., So we're gon na do two fours back to back.. These extensions look a little different than the typical extensions you buy in a pack or even than the extensions that I sell., Because I converted some old tape-ins that I had into clip-in extensions.. If you are interested in seeing how I actually did that, then let me know, because I can make a tutorial on it. Now that the back is all done see we got our really long hair. We can work a bit on the front. I like to do. One the front is: save the smaller pieces and kind of puzzle them in the way. That'S working on that day., There's, no real right or wrong way to put in extensions. As long as the most amount of surface area on your head is covered and it looks good, that's it! So what I'm gon na do now is I'm gon na subsection right over here, out. Backcomb that piece. And I'm gon na put a one piece clip in there.. It'S a little bit too small for anything bigger than that.. Now I'm gon na take one inch above that put it down over the weft clip this up. And since I part my hair, this way, there's gon na be a lot of hair to cover this area, so we wan na fill in this area so that the Short hair doesn't look chunky with the long hair underneath., Because this area's a little bit wider. I could stick a two piece clip in there., So you definitely wan na stay at least an inch away from your front hairline. So that it doesn't show through here.. You need enough hair to be able to cover this area if the wind blows. Now, let's work on the other side. Right in this zone, I'm just gon na put a one piece weft in as well. All right, so I think that's pretty good.. I still have two one pieces left over and a three piece left over., But I don't feel like there's any hollow zones in my head, where I need more hair., So it's not necessary to use every piece.. Now I'm gon na show you a really easy way to curl these extensions that look amazing., So you're gon na grab a 1 1/2 inch curling iron.. This is a really nice iron for very long hair. It doesn't work great on short hair but looks beautiful on long hair., So we're gon na go in layers.. We'Re gon na grab the bottom of our hair.. Now I'm gon na act like the extensions and my hair is one piece.. I don't wan na curl my hair first and then curl the extensions ,'cause. You want them to all curl together to create kind of that fluid mermaidy movement.. You don't want it to look like you have extensions and then your hair's sitting on top of it.. So what I like to do is open up my wand. Put it right here, wrap around hold and then release that down., I'm taking relatively big sections, because I don't want this to be too curly.. I just wan na give it enough shape that it looks natural and sexy, but not so much curls that I have ringlets. Release another inch or two down grabbing big chunky sections and with my 1 1/2 inch iron, I am wrapping away from the face., So I've Done my hair, like this for a family, photo shoot that I had this week with Photographer, Mirrored Muse. And me and my boys and my husband. We went out into the forest and we did a really sweet family photo shoot., And I wore all of these extensions and I waved them in this exact same way and I think the photos turned out so lovely and I'll pop them up on the screen.. Just because the hair was so kind of romantic and fluid kind of fairy like for that setting., So if you guys are doing any type of photo shoot or if you're in a wedding - and you want that bohemian feel, then I really suggest getting hair extensions because It makes such a huge difference in how your photos turn out., Now that all of the extensions have been curled. I am left with just the top of my hair., Which is only my actual hair. There'S no extensions here. And we wan na make sure that these blend in.. So, as you can see, it's looking pretty chunky and not blending., So I wan na grab my own hair in a vertical subsection. I want to gently curl away from the face just like. I did the other pieces. As soon as you do this. The hair's gon na fall into the extension it's gon na blend seamlessly.. Okay, so now you can leave your hair like this. I'll, give ya a little sneak peek of what it looks like from the back.. If you want to give it a little bit more texture, if your hair doesn't have as much hold or curl as mine does then I'm gon na show you this really awesome product.. This is the Sexy Hair Texture.. So it's High Tide, it's a texturizing, finishing spray.. So it's for use on dry, hair, only. Spray onto dry, finished, styles for added texture and hold.. So what I like about this product, it doesn't have the same type of feeling as hairspray.. It has like a bit of a grittiness which gives you that lived-in beachy look. And see that's already, given it a ton of oomph.. Thank you so much for watching you guys. If you have any questions, then don't forget to comment in the comment section. Below. Leave me video requests, because I am always here to make your life easier.. If you have anything that you wan na see, let me know and I'll make it for you.. As always I'll see you next week. I love ya.


Comments
Boozy Mermaid Cocktail Academy: Love your videos, Gabi! I love extensions. You know you have some serious skills when you can do your own clip-in extensions, on-camera!! Can't wait for more :-)
Laura Bailey TV: Omg! I love using clip in hair extensions! I think you’ve done a great job explaining how application. I need to check these out!
Lisa Monique Beauty: Thanks for this great video! I sometimes have to put extensions in my photography clients and I learned to clip and pin curl each layer as you go but it didn’t always look good when I was down because of placement. I like putting in everywhere first and then curl!
The Joy of Pilates: I use extensions on fun nights out! LOVE this video and can't wait to see more!!
Glam Girl Gabi: Thanks for hanging out! Have you worn hair extensions before? I find that my clients either LOVE THEM or HATE THEM with no in between. How do you feel about it? Are you an addict or just not that into it?
Money with Maggie: Hi! found you on ytfb! Great video! Thanks for the demo! I am saving this for the next time I put my clip-ins on! :)
MyWorldInShadows: Excellent tutorial!!! Love it!!
Katrina d: so pretty, Gabi! Another great video : ) Where do you find the High Tide product? I really like Surf Spray (Bumble and bumble) I wonder if it's similar?
Coach Barb: Love your energy and great video and Beautiful Hair
Chill & Heal: You look amazing! Awesome hair!
Crystal's Copia: Great tips!!!
hayleyjade: U make it look so easy
Polished Professionals: You make it look so easy.
Amanda Kalbfleisch: Ooohhh I’m glad you showed what weft should go in what order from the bottom up. Thank you!
Ralph Ervin: Great video!
Laurie Bieda: Gabi I love your tutorials,you obviously have fine thin hair,no surprise,do the clip ins slide out of your hair,I so want to order some but think I am always gonna be recliner them?:)
Being Beautifully Honest: Yay! Thanks for sharing!