How To: Red Color Fusion Hair Coloring Technique | Hair Coloring Tips & Tricks
- Posted on 11 April, 2021
- Fusion Hair Extensions
- By Anonymous
How To: Red Color Fusion Hair Coloring Technique
Hair Coloring Tips & Tricks
*Giving is hold forever*
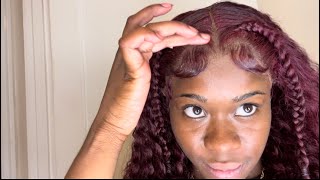
From san diego california excited to share some of my favorite tips, tricks formulas on how to get beautiful red hair color. So i'm just kind of going to give you a little eye candy here, while we get loaded, because this is going to be our end result for today so coming. In close, i want you to really see how gorgeous this is. I don't know about you guys, but fancy red hair. A new look really gets me super excited, especially when you can really see that vibrancy coming through hi everyone. Thank you so much for being here for logging on it's so good to be in this space with everyone to be talking about what we love and hair color, especially after a hard last year, but everything is moving on up, and so today, specifically, i have a Short amount of time, so i'm going to go ahead and get started. Thank you again, hi everyone. My name is tasha, i'm from san diego, i'm part of lonza's artistic team, and so our artistic design team and i'm sharing some of my favorite tips, formulas and um techniques on how to achieve really bright red colors, also keeping it modern. I am seeing a ton of these really bold money pieces in front and i got ta tell you i really like them. I think that they are stunning. However, sometimes i can't get my clients to commit to having um such a distinct piece in front with some juxtaposition. So a lot of change juxtaposition is a lot of change from that front piece to that back piece, and so i've done something that's sort of softened. It or made it a little bit more commercial, that's working for my clientele and i'm going to share that with you today. So again, this is going to be our end result. I'Ve already started working on this side since i have such a short amount of time with you um. I am my cameraman. I am my um artist today, so bear with me a little bit uh. I will try and make sure that everyone can see everything. I'M also watching your comments as best as humanly possible, if you have a question that doesn't get answered i'll, make sure that i go back in the comments and check it out and make sure that your questions get answered so please, this is super fun. If we all engage so i'd love to see you guys engage. If you have any questions, please let me know: okay, so uh. One specific thing that we were talking about is how to get that really bold money, piece um, and so i want to show you how i do that, because typically we're not seeing any hair left out in the front. So that's exactly what we're going to do, but what i'm going to do to keep it just a little bit different or a little bit more modern or commercial, to make it more commercial without losing the modern touch there. We go um, i'm going to start by pulling my hairline back, so i've left out about two fingers width right in front so about an inch or two fingers. Width is what i'm working with right now um and i'm going to go ahead and weave out right on my hairline okay. So i'm going to take almost little tiny zigzag pieces right on that hairline and i'm going to pull that down. So, as you can see, we have a nice little weave that goes on there, okay, so i'm using two different colors in this modernized money piece here and my formula for the first one is one of my favorite formulas. So both of these are, i mean, i know i'm gon na say that a lot, because i really love our color line. We have a three in one color line with lonza and there's so much creativity that you can have, but my first formula that i'm going to be showing you today. So this is actually 15 grams of g-mix and 10 grams of 100 series. So our 100 series is probably one of the most unique pieces that we have and i really love utilizing it because it can act as a high list and it can also act as something that we use in our translucent formulas. And today we're going to be using it as a high lift, so i've gone ahead and i've made this formula with double 40. and here's. Why? If we want to keep brightness in our reds, we have to use that higher developer, so natural hair and it's melanin needs to be a little fragmented. In order for us to see that brightness, so we're going to be using higher developers on everything today for our reds, so as you can see, this mix looks super cool. So again, this is g mix with 100 and double 40., and i'm using this as a high lift to create brightness and softness, because this is what's going to be directly on that hairline when people pull their hair back, so i'm creating hatch marks or x's in Order to get saturation also, it rolls the hair, so it gets it on all edges. We want to make sure this is fully saturated. Now, i'm just gon na close up my foil. I always like to do the tuck, especially around the face, to make sure that nothing is fleeting or that it's super secure and i can later move my foil all the way around. So i've got my first piece, so that was a weave. That was a zigzag that was right on the scalp. Now i'm gon na take a slice right behind it, so all sections should be thin enough that you can see through them in order for proper saturation. Now my next formula that i'm going to use is seven copper, copper with 5 grams of 100 series, because again that 100 series is what's boosting the alkalinity helping to keep brightness in my formula and make it so that it's really reflective. Because that's what i'm looking for lots of reflection, a little earpiece is falling out. So these two colors are going to stay within about three levels of each other and they're, also in the same family of each other, which is why i like to use them. And this is how i'm creating a little bit more of a commercial money piece that we have that's still really modern. So this is 7 copper, copper, 20 grams, and this is 5 grams of 100 series again just to give it a little bit more pop and with this one we're using 30 volume and that's equal parts. So this is going to give us a really beautiful, copper. Color bright, copper, too, and i got ta tell you these two colors when i'm working with keeping one of my natural redheads and just enhancing it. These two formulas are some of my favorite that i use and that's because sometimes what happens as natural redheads start to? Maybe get a little bit older is we see that their color starts to brown out a little, and so these bring everything back to life, so be prepared to use these formulas more than just this specific style, because you're going to have so much fun with that And i want to hear about all your formulas too and how you tweak it, how you make it better, because this industry is amazing and we have so much creativity, especially with lonza at our fingertips, with our three in one color. Okay. So now that i've done my slice i'm to come in and i'm going to weave again and we're going to use our gold mix in 100 series. So again, i'm creating a very small zigzag right on the scalp, not leaving any hair in between, and that's going to create a very fine weave that we have in this modern money piece. So, as you can see, it's thin enough that we're going to saturate all the way through having these two colors together is what is allowing it to look just a little bit softer, so that juxtaposition isn't quite as harsh, and so it's allowed me to work with Some of my clients and having this really fun piece, but not having it be too distinct for them if they have jobs or lifestyles that won't allow them to have something. That'S super super strong, it's still keeping them on trend and still keeping them very modern, and i especially like these colors when i'm working with any of my reds i'm going to twist those up. I like to fold once i like to lock in my foil. This will make sure that there's no bleeding, and it will also make sure that i have free range to move these foils about uh. When i need you later so um we're gon na do other color on this head. I don't know about you guys, but most of my clients are coming in and they want multiple different colors gone are the days where we just you know, throw on one color and everyone is super satisfied. You know now we have touch-up colors, we have melting. We have highlights, we have baby lights, we have balayage and you know we're trying to get this done as efficiently and effective as possible, and it's a lot going on, so we want to make sure that those foils are totally locked in. So i also want you to notice that i'm completely over directing my hair section back, that's on purpose. So what happens when you over direct that all the way back when you place your foil underneath and you come forward, it gets it right to the tip of the foil. So you want to over direct your section place, your foil underneath and then saturate all the way to the root. Another tip a lot of us want to pull our foil forward while we're saturating elevate it. Here'S what happens. Let me just adjust my model a little bit, okay, so here's what happens when we saturate here there's a gap right here at that hairline. That'S not getting touched when we lift and elevate that we're actually able to come in just a teensy bit tighter and that eighth of an inch is really what keeps that grow out. Nice and soft. So i'm gon na lift and elevate, especially as i come around the curve of the head right, because i don't know about you guys, but one of the challenges that i hit was having these really hard lines right in front. And so i found when i elevated the foil got in really tight to this front piece. I was able to have a softer line, less harsh lines of demarcation that i would later have to like. Maybe go root smudge out and it still looked really beautiful and stayed on par and then after we saturate this we're gon na go and we're gon na lock in our foil from underneath. So that way, we have a lot of mobility with our foil and again we're completely making sure that it's not going to bleed, because it's covering all of this space under here so really make that tight, lock that in i just do one little fold here, the Less times we're folding the less chance we have of bleeding and she's ready to rock and roll and, as you can see, they're still movable so we're going to do that, one more time again we're using a 100 mix, so 10 grams of 100 mix to 15 Grams of gold mix in this first one and we're using a double 40 because we really want to see a lot of brightness and a lot of reflection. So here we go last time my earpiece fell out. Excuse me one moment: she's back okay, so i'm over directing my section back. I am creating a very fine zigzag and i'm literally touching the scalp as i do this. This is going to drop out fine pieces and siri is talking to me and sorry about that. I'M over directing back i'm dropping in my foil, making sure it's locked in nice and tight, i'm taking my gold mix with my 100 series. I'M fully saturating, i'm lifting my foil to get in really tight here at that edge and then i'm saturating. So this weaved piece is hi. I guess i lost you so therefore it just softens everything into this thicker or more modern money piece, i'm going to lock that in and fold over, and then i'm left with my last and final piece - and this is a 7 copper, copper with 100 series to Really keep that brightness and 30 volume over direct your section pull it forward, our seven copper, copper, saturate, lift and apply all right. So thank you. Everyone! If we have any newcomers, i'm sorry for any glitches. I'M my own camera person today, i'm watching out for all of your comments. If i do miss something, please still write your questions. I want to hear them, i'm going to make sure that i go back and answer them later. So let me know in the comments, if you have any questions or if you have any really exciting shares on red formulas or things that you're seeing. So i'm going to fold this in lock in my foil and give two folds on the side that we have a ton of mobility: okay, so really quickly! I just want to go over what my placement looks like on my head here. So again, we were working with 15 grams of gold mix 10 grams of 100 series 50 grams of 41 because we doubled it. We want to create a ton of brightness and reflection and just in one moment, i'm going to go over why that happens, how that happens and how we can utilize it in all of our different formulas, we're also using 20 grams of seven copper, copper, five grams Of 100 series again pumping up that brightness and 25 grams of 30 volume. So what we have done here so this is the top of the head view. We'Ve taken a weave right on the scalp line and then we've taken a slice right behind it. So we are leaving no hair out in between no hair whatsoever. We'Ve done this back to back three times, so a total of six foils right here in front, and this is going to give us our thicker modern money piece. But it's also keeping it really soft and commercial for some of our clients who are less adapt to it or maybe have jobs that they can't have something thicker. So before i got on camera, i went ahead and i did the sides as well, because we want to make sure that that bold money piece is all the way across the front. So we have the same amount. We have our weave piece. We have our slice. We have our weave piece, we have our slice, we have our weave piece, we have our slice, we have our weave piece, we have our slice, so this is the foundation for how we have created this gorgeous money piece right in front now, something i want to Talk to you about is we've chosen, some really unique formulas in order to get these types of color, i'm going to bring her in really close, because truthfully, nothing is as good as being in person. When you see this, but look i want you to really see that hairline and how soft that looks when she pulls it back, because again we're going for something with high juxtaposition. So that means something that's totally different from the back right, really strong piece, but when they pull their hair back, sometimes it's really harsh and that doesn't work for everyone. So, by weaving right on that scalp, you see those beautiful gold pieces that are running through with that copper, oh, my gosh, so it always looks beautiful, no matter what and it's still really bold and there's still a big difference, so she's staying on trend, which we Like okay, so the reason that i use such high developers with some of my reds we're going to get into the back in just a moment. But the reason that i use high developers is melanin needs an opportunity to sort of fracture. So the way that i like to think about it is, i like to think about it as being kind of like a glow stick. Now i have a ton of lights on me, so we'll see if this works, but what happens when we break a glow stick is it starts to shine a little bit brighter right, and this is exactly what happens when we use things like 100 series in our Reds when we use higher developers, what we're doing is we're allowing the natural melanin in the hair to fragment to allow light to pass through. So, as we kind of break this whoo here, we go okay. This is essentially what's happening with our reds. So a lot of times we hear okay, i'm going to stay with a lower uh developer, because i'm just depositing right. I mean she already had lighter hair than what we are going for in this back portion and so there's no need to use a higher developer. But keep in mind just kind of like how, when we broke that glow, stick, it's sort of like a lot. It'S what happens with the color molecule. Is it fragments and it allows light to pass through just like this glow stick. So that's what we're doing with our next formula oftentimes, i am challenged or have been challenged or see. People be challenged with wanting a red color and how to keep its brightness, but also keep its level. So changing levels is one thing i could have easily used a seven red red had a ton of brightness, but i'd be changing the level and therefore changing the whole look of what i'm going for. I want to keep the depth. I want to keep the level in which my client wants, but i want to up the brightness, and so that's why i choose to use high developers with it. Also. It saves me a step of having to pre-lighten and then go back in and apply the color. So we're just going to up our developer, and this is how we get a really gorgeous finished bright red without having to lose our depth. Hope that makes sense. If you have any questions, please drop them below and i will be happy to answer them either. Now on this live or later, if i get the, if i don't see it so like i said, i'm kind of doing, i've got a lot of hands in the pot here on uh. How many things i'm doing so bear with me a little bit. Sorry, okay! So my next formula that i have used on this back section: we've used 35 grams of level, four red red, copper, we've used, 35 grams of level, 5 red red and we've used 10 grams of red mix, because we want to make sure it really pops and Then we've used equal parts, so that's 80 grams of 40 volume again don't be afraid to use it. What we're doing is we're creating that glow stick effect where we're creating a ton of brightness in the hair. So we are staying at about a level four and a half five um in our finished product. I think it's always nice that we have to see the finished products. You don't have to wait so long, um and i'll put these formulas in in the comments below. So you guys have any questions and then also check out my instagram page too i'll post pictures of her completely finished. So you can see uh what she looks like not just one half of her but um check me out. It'S at tosh, mahal, dot, co, uh, tash mahal, so t-a-s-h underscore m-a-h-a-l tosh underscore mahal, okay, so i've already started applying in this back section, because, basically, what we're doing here is a global application, we're doing roots to ends and, honestly, i think that you guys are Rock stars already, so you don't need to see me apply. The whole thing remember saturation is absolutely key. I'Ve gone in and based a lot of this already, so i'm just going to continue to pull through taking small sections i'm using x marks. This allows for better coverage and better saturation in my sections. Not only does it roll the hair back and forth, but it spreads it apart too. So you can really see how that makes a big difference in my saturation. So i'm going to keep rolling through each section here and get this done without compromising the integrity of it. And then the next thing i'm going to be talking about is really exciting. We'Re going to talk about how using lightener right over our color, yes, a full process color just like this, is going to change the tonality without having to then go back and glaze. So we just want to get a little shift and a little movement into this piece without losing its depth, but we all see all the pinterest photos that come in and you know a lot of us chalk it up to lighting and lighting is absolutely some of It we can say that, but some of it is technique that we're actually creating more reflection or more light bouncing off in certain in certain places, and so that's where our fourth formula is gon na come in today. We'Re actually gon na balayage right over the top of this formula. So again, this formula here that we're pulling through roots to ends is 35 grams of level: 4, red red, copper, it's 35 grams of level, 5, red red, it's 10 grams of red mix and then equal parts, 40 volume and we're using that 40 volume to really Pump up the brightness without losing the level on this. So as i finish this up, i hope you guys are doing well and then i'm going to show you all of these foils too, because i did pre-put in these side pieces. So once you get a little glimpse of how it's lifting so after we balayage in our color right over the top of this all over global application of color, i'm going to show you what those foils are looking like, and then i want you to come check Out my instagram at tosh underscore mahal and i'll have the finished look of this mannequin up a little bit later today. If you have any questions, please feel free to drop them below i'll. Make sure that i add all four of these formulas to the comment section here and if i didn't see your question i apologize, but i will be looking for them later on to make sure that everyone gets their questions answered. So again, i'm using a really high developer in order to keep the level but maintain brightness. We really want to push through a lot of light on this okay, so as promised. Now, what we're going to do is we're going to take our powder to colorizer in 20 volume and i'm just going to freehand in she doesn't want to stay in i'm going to freehand in some balayage pieces. So what i like to do is i like to just create a zigzag and i'm just going to use the end of my brush for the sake of staying tidy, i'm going to move this over to the side, i'm going to take the peak of that zigzag And i'm going to take my 20 volume and i'm just going to surface paint softly right over the top of this color. So here's the thing about lightner: it's going to push through anything! That'S already on the hair, since we've used a red color, it's going to lift with that same tonality and what it's going to do is just create some brightness, which is exactly what we're looking for just going to take a little zigzag. Take the peak of that load up my brush and i'm going to softly. I almost create circles, as i'm balayaging to softly lay that powder decolorizer and 20 volume right over top. Now, as you can see, i'm being very generous with my product and because i'm using 20 volume we're only going to see a shift, i basically want it to look like the light hit it just right and we're seeing this gorgeous color without it being like. Oh, i have to go back and tone and glaze now what will happen is it'll keep lifting lifting lifting lifting lifting until you get like to a seven copper and eight gold and it'll have all this gorgeous undertone. So, if that's what you're going for be my guest, i think it's awesome. I'Ve done it. I love it. I want to see your photos if you do it and it's absolutely stunning, but a lot of times what we do is we create these lighter pieces first and then try to work around it um, but let's work with what we actually have. So i'm just gon na surface paint right on top of these pieces. Sometimes i just do the mid. Lengths, too, don't be afraid to keep those ends at their brightest, because again, this is about almost creating like reflection in some places, you won't really necessarily be able to be like, oh for sure that looks balayage in that area, but it creates movement and that's what We want in our color, especially in our reds, where we create a lot of shape. Shifting shall we say and a lot of appearance of movement and keeping our depth too, because i don't know about you guys, but a lot of my clients are keeping long, hair, long layers and so uh. You know we need something to sort of break through all that density um, especially in that mid length, so don't be afraid to just balayage in that mid length here and notice that i'm being very generous with this powder decolorizer, it should be completely white. On top of that color, in order for it to be effective, if not i'll, show you what happens just just so you know. So if we don't use as much product and we balayage it as you can see, it really starts to melt in and it starts to take on the red more. You will not see as big of a change as you will with these as quickly because really the goal here is that we're not processing longer than what the color has. This is just an up service that we're adding to our color to make sure that it's really shining bright. So this is how i've been able to create this really modern money, piece, keeping it classic, keeping it soft keeping it so that you can pull that hair back um. You know a little bit more of a commercial take on it. I promised you, i would show you what these foils are processing like, because i don't know if you guys are like me, but i love seeing what's in the foil, so i'm going to show you on these side pieces just because we've been processing them a little Bit longer so this top one is our gold. So this, let me show you here, okay, so this is what our g mix our gold mix with our 100 series and our double 40 is processing like. So you can see how gorgeous how beautiful, how fun that color is um awesome. Okay, i have a question coming in um. Am i worried about the 40 volume on the roots can be a bit warmer in the mid length um, not really because we're creating more brightness by balayaging over the top. If you're worried about it drop your developer at the base to a 30 volume. If you want, but the goal is to have a consistent, even bright red from roots to ends with some of those brighter pieces, so you can see like these kisses these kisses that look like lighting, that's actually from the balayage, so it keeps the depth looking really Strong at the base - so i do this all the time now, if you don't want to do that piece and you are worried about it again, that's something that's easy to go ahead and adjust your formula. You just do drop. It drop it to a 30 volume. That was a great question. Thank you. So i was just giving you a little peek of that gold mix and then now we're gon na go to our seven copper, copper and our 100 mix with 30 volume. And this is what it's processing like here. So these will be ready to take out any moment. Of course they can sit as long as they need to to maintain um to keep up with this back piece. Here'S an overview of this back. So we have our four red red: copper, our five red red with our red mix, um. That was a roots to end application with 40 volume. And then we went right over top and we balayaged in our powder to colorizer with 20 volume. And that's: what's going to create those pretty bright, reflective pieces that we're seeing over here in this red that looks just like lighting so again, here's a close-up of this hairline, so that is our gold mix. Our 100, our 40 volume, with our seven copper, copper. 100 series: 30 volume - these are some of my favorite formulas to use if i'm taking a red head and sort of kind of punching her out of those mousy browns. Sometimes it gets a little bit darker as people age and they really want to keep their brightness and keep its off. So this looks like a stunning natural red here and then anytime, we sort of take a darker color, even though it has a lot of brightness here with our red. The difference or juxtaposition from the front to the back is going to give us that real money piece that modern effect here. So i believe i am out of time with you guys, but i have so much exciting stuff that i would love to talk to you guys about in all different forms. If you want to go to my instagram page tosh underscore mahal interact with me there. If you like, what you see, please let your sales consultant know i'm open to doing classes and i miss all of your faces. So please give me a book if you can - and i hope to see your photos of how you've tried this, how you've utilized these formulas and maybe how you tweaked them and made them a little bit different for what you're using show me. Send me a dm i'd, love to see it and i'd love to repost your work. So thank you for being here with me on this thursday afternoon. If i didn't get to your question i'll be sure to scroll through and let me know, thank you. So much have a great day, bye,

Comments
Maureen Vos: A word of advice: research fast hair growth shampoo to double hair growth.