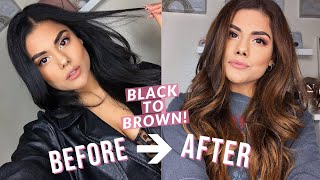
Black To Brown Box Dye Hair Color Correction - Full Hair Color Correction Transformation #Haircolor
- Posted on 09 August, 2022
- Color Lace Wig
- By Anonymous
In this hair tutorial, I'm sharing the full hair color correction steps needed to remove black box hair dye. She used Nice n Easy black hair dye and it was not an easy color correction!
I feel lucky that she trusted me to remove this black hair dye to transform it into dimensional brown hair color.
Step 1: REMOVE BLACK BOX HAIR DYE with @Malibu C Professional CPR and color disruptor. This softened the harsh black line of demarcation and removed some of the indirect hair color.
Step 2: LIGHTEN with @Kenra Professional Beyond Bond Lightener with 20vol
Step 3: GLOSS hair with a brown shade in Demi with 5N and 5B
Step 4: @Artistry of Lisa G ADDING MATCHING BROWN HAIR EXTENSIONS with 18inch @donnabellahair in color 4
TOOLS AND FOIL BY @Framar
https://framar.com/?rfsn=5729303.eb090...
COLOR BOARD:
https://cooboardtools.com?aff=21
Use coupon code “Mirella” to save 10% off your purchase
For more education visit my website
Join me in Beyond the Chair Mastermind
https://mirella-manelli.mykajabi.com/s...
Follow me on Instagram
https://www.instagram.com/mirellamanel...
Follow my Facebook Page:
https://www.facebook.com/MirellaManell...
Join me on TIKTOK
https://www.tiktok.com/@mirellamanelli...?
Learn with me!
https://mirellamanelli.com/online-hair...
Listen to my podcast!
https://mirellamanelli.com/hairbnb/
Book an appointment or shop at my salon
Shop all my favorite foils and color tools
https://framar.com/?rfsn=5729303.eb090...
Hair painting board by Cooboard:
https://cooboardtools.com?aff=21
Use coupon code “Mirella” to save 10% off your purchase
You know you want that extra big ass color brush
https://zerotimesystem-com.3dcartstore...
Malibu CPR, DDL and color correction tools
https://malibuc.com/shop/rebelfemme
Use code MIRELLA to save 10% off your Hair Extension purchase: https://donnabellahair.com/discount/Mi...
Buy me a taco and get a shoutout!
https://www.paypal.com/biz/fund?id=57J...
00:00 Introduction
00:56 Color Remover
02:59 Sectioning & Lightener
03:48 Highlight Application
07:45 Front Application
10:01 Gloss Formula and Application
12:07 Before and After
12:47 Extensions
13:56 After
What'S up and welcome back to my youtube channel today, i'm really excited because i'm going to be doing a black box dye, color correction, removing this super saturated, opaque band of black hair dye, specifically nice and easy, as well as blending in some highlights doing some tz Lights and a whole bunch of color correction and what i'm also really excited about is we're going to be adding, in some extensions to add a little bit of fullness and volume for this entire look. But before we get started, make sure you hit that subscribe button and turn on all notifications, so you don't miss a tutorial. Now, let's go ahead and get started. So this is my model. She colored her hair with black box dye about six months ago and, as you can see, she's got some new growth along with one other band, and then this black box die and it was specifically nice and easy. Now there was nothing nice or easy about removing this black box dye, but our overall goal was to get her to a natural brunette shade something to blend in her gray. That was going to be low maintenance and that she can just touch up every few months. I knew i was going to have to prep her with a color remover first, which is why i decided to go in with malibu c cpr and prepping her with camera professional, clarifying shampoo. I also followed up with color disruptor from malibu c and here's how i did it. I started out with two cleanses using counter professional clarifying shampoo, specifically on those mids and ends and just avoiding the scalp area since we're going to be doing more color services. Later i didn't want to agitate her skin or scalp area, so i just made sure to really work through and using my hands to agitate those mids and ends. So that way, that's clarifying shampoo can remove any surface buildup and basically kind of pre-soften it for the malibu cpr. So now i'm going to layer that right on top and really work it in section by section again putting that malibu cpr on just the mids and ends and i'm going to process her under the dryer for a full 30 minutes. Once that was done, i took her back to the shampoo bowl. Did another clarifying shampoo using camera clarifier and then after i rinsed this out, i decided to layer in the color disruptor. Now i felt this was necessary because we had lots of layers of black box dye and i processed this on damp hair for an additional 30 minutes, so this took in total a little over an hour just for this black box dye color remover, giving me a Much better canvas to allow for my lightener to do its job for her sectioning, i'm using her natural part, which is about right down the middle. That'S going to actually change once we get towards the front, and i do the highlights and then from the apex down behind the ear. You can now see that band softened a lot and we got her ends to about a good level to level three. So for this project, i'm going to be using counter professional beyond bond lightener. Now the reason why i'm using this lightener is because she does have pretty fine hair and we just did it two color remover processes beforehand. So i want something: that's going to give her hair a little bit more structure for those inner and outer bonds. I'M going to be mixing this up, one to two mixing ratio with 20 volume developer and to get started diffusing this line of demarcation. I'M going to start from the bottom and work my way up, so i'm going to be working with pretty wide sections, but also really deep, weaves here and i'm going to tease now. The reason why i'm using this technique is again to diffuse this line of demarcation, and i want the most blend possible, keep in mind our end result or our goal is to get her to a really natural looking brunette shade that can grow out really easily be Super low maintenance and she doesn't want a harsh line of demarcation. So that's why i decided to go in with this technique because long term, she just wants to be able to come in here and there for some glazes to blend in her gray she's, not super concerned with covering her gray. She just wants a blend, so i thought this technique was going to be perfect for her. So that way we can brighten up those ends blend in the grays at the top, and then we can see her every six to eight weeks for an all-over glaze. Now some of the tools that i'm using are, of course, my frimar brushes. I love the power painter for this particular technique and i'm also using my cue board. This is the really extra long wide one, and i just like it, because it pushes up those little teased areas really really easily. These foils are also from fermar making. My work flow be really quick. If i was using more traditional foils, i would have to use smaller sections and smaller foils, so that's kind of why i just like using tools that are going to make me work a lot more efficiently. Now, in a lot of my other videos, i do share the tz light without the t's, but with this particular client i wanted to create that tease, because i wanted the ultimate diffusion here and i'm taking really deep sections here when i'm weaving and so for that Reason i wanted this to be a lot more rooted, so when i'm actually teasing, it creates more of a rooted effect more for those mids and ends, which is exactly where that black box die is and another key thing that when you're going to be doing this Technique is to make sure you're combing through the lightener. If your section feels a little kind of thick, you could even go in with your hands and really work through this product, but it's very imperative that you get both sides of the hair when you're painting in the lightener. Now, once i actually got all of her foils in, i actually did go back and re-apply just because i wanted to double check my work and my application now. You'Ll also notice that all of my sections in the back are horizontal, and this has a purpose. So if you haven't watched my other hair tutorial on the placements of your hair foils and the effects they create, i highly recommend you check out that video, because i think it will bring a lot of clarity as to why i decided to use horizontals. Basically, if you haven't watched the video that is basically sharing, that horizontal is going to give you a lot of diffusion towards the back and since we're trying to break up a line of demarcation, and i wanted the most blend for this. Horizontals was the best option. I'M actually going to finish up this back section with just two more foils, but they do get a little closer together. So the sub sections aren't as wide as the very very bottom side and since we were able to brighten up that black box die on that underside and get her to a good level three. I wasn't too concerned about that still showing through. On top of these brown highlights that we're gon na make, but the overall goal here with the lift is i want to get her past that orange phase, because i don't want to have to correct any orange tones, because i want this to look as natural as Possible, so i'm really aiming for a level 9 here, but i'll be really happy with the level 8 as well, because i feel like i can still control that, but definitely want to get past that level 7 for a natural brunette shade. Now, for the front, i'm going to be doing diagonal back sections and again. The reason for this is because i want to create the most natural fall, and typically my client wears her hair a little bit towards her face. So this is going to be the most diffused natural fall for her. So that's what i want to replicate, i'm still taking really deep weaves here, i'm not too concerned about creating a money piece or anything like that. We want her highlights to not really look like highlights. We want to add dimension, so really soft natural highs and loads and again a rich brunette shade. I'M gon na continue on adding in my lightener, in the same exact fashion, still diagonal back all the way. Until i get to the top, so this is still split down the middle and if you remember from the very beginning, her part was just kind of like jaggedy and i left it that way. I did wasn't concerned about making it super perfect. I almost like adding in a purposeful zigzag parting for that centerpiece, because this is gon na aid in the diffusion that i'm trying to create. So less than perfect lines results in a more diffused end result, which is exactly what we're trying to do so lots of uneven pieces and then, as i get towards the very very top here, my sub sections become shorter or less wide. So just kind of keep that in mind: she doesn't wear her hair up. So overall, i wasn't too concerned with the underside. I wanted more extra dimension towards that top. I have a total of five foils on each side and then i'm processed her for a good, solid, 60 minutes and i made sure to reapply and just kind of keep an eye on it. And i did this all room temperature with the 20 volume. Keep in mind that kenner color does not recommend heat with any of their color products, except for the kenra color creatives, but for any type of lightning services. You just want to go low and slow and process room temperature and honestly, i am obsessed with these results. If she wanted to be a blondie, we would have had a really great time, maybe just doing a shadow root and a toner on these ends. But we wanted to do something: a lot more low maintenance, so brunette shade it was. We decided to use 5n at a one to one mixing ratio with nine volume developer and then for her mids and ends. I used 5b at a one to two mixing ratio with nine volume developer in demi permanent hair color. I applied her end shade right onto that root area and brought it down to where the highlighted pieces were at. So i wanted to be able to basically bring that down just enough. So that way i can blend the n into the b seamlessly. I chose the n series because the n in counter color has a balance of all shades, meaning that you're going to have the most natural end result and the best gray blending slash coverage, even though we're not going to get a ton of coverage. You'Ll see that it does a phenomenal job of camouflaging, her natural gray hairs beautifully. So once i get this on, i'm going to immediately start to apply my 5b shade onto those mids and ends. I do this by combing down each section and then applying that 5b right onto that line of demarcation and then using my hands to further blend and as soon as i get this on on the very very last section, i'm gon na process this at room temperature For just 20 minutes now keep in mind, there's so many different types of colors that you can do and toners that you can apply. Another great shade for her probably would have been 5n and blending it into 6b. So it's really just kind of up to you. Once you create a nice even canvas, but i think we definitely achieved that we pulled her blonde hair to a solid level. Eight, we got some pieces of nine, so this was just a fantastic canvas to break up all of that black that she had going on and look at this side by side, you can tell a huge difference: got rid of that black box dye diffused a line Of demarcation and left her with a much more natural shade, that's going to be super low maintenance. So i'll see her in about eight weeks just to touch up that root area with the 5n and demi permanent and then just reglaze. Those ends as needed, and i think this looks really rich and hydrated and has a beautiful finish. You just really cannot tell that there was black box dye before now we're going to get ready to install her extensions, which i'm super excited about, because i feel like this just kind of brings the whole look together. Now i teamed up with miss artistry of lisa g, all of her links to where you can find her are in the description down below, and i've also done a few videos with miss lisa as well. So she does amazing work and we collab quite a bit. So what we decided for our client today was that adding in one row of hybrid weft extension was going to be the best option for building up some density, but then filling in the gaps with carol inks now kara links are great for people who already have Fine thin hair because you can customize them to the max making them really tiny and putting them in places where wefts just cannot go, so our model actually was experiencing a little bit of postpartum hair loss. So since her hair was already a little bit more on the fragile side, doing the one row with color b, donna bella hybrid wefts, was the best option and i'll show you what that looks like at the end of the video with the care links installed. But here is lisa's silicone beads all lined up and now we're gon na get ready to sew this in and i'm not gon na bore you with that. I have plenty of other videos where we show you how to sew in wefts. So, let's get right into these after results. I am so excited to show you this one row of donabella hybrid weft in color four. These are 18 inch, there's only about three wefts in that one row and then here's the keralinks, where we added in some extra fullness for the density that she was lacking in specific areas just to kind of bring this whole look together and overall, this head of Hair looks beautiful, healthy dimensional. We exceeded our clients expectations in removing this black box dye and taking her to a much more wearable brunette shade. That'S going to be super low maintenance as it starts to fade and wear out. This total transformation took us about nine to ten hours and she was super happy. So i really hoped you enjoyed this hair tutorial and if you did, please give this video a thumbs up, make sure to subscribe and comment down below. What'S your favorite part of this entire tutorial was and i'll be sure to respond. You can find me on my other social channels like instagram, facebook and tick tock, all under mirella minnelli, and if you want free education, sent right to your inbox, be sure to head on over to mirellamanelli.com and sign up for my newsletter and if you enjoy listening To podcasts be sure to check out hairbnb it's a podcast where i help hairstylists, just like you, simplify hair beauty and their business goals and finally be sure to share this video with a friend and be sure to check out my other hair tutorials right here on This channel - and i will see you next time -
Comments
Emily Renee: This was sooo helpful! I’m a student cosmetologist with about 2 months left and when I graduate I intend to specialize in color and blonding! You’re videos are amazing and so educational! Definitely helped me step up my game while I’m still learning in school!
laneybug05kj: I absolutely love your videos Mirella, I find myself popping over to your channel when I’m in school and need inspiration for projects to work on at school. I’ve got about 2 months left of cos school and color corrections, vivids, n blonding are my favorite services to do! Keep up the informational videos
Lesley Morley: Amazing looked so healthy too .. great job as always
Ange C: Beautiful !
Kp1s Creations 🎧🎵: Excellent and brilliant job have a blessed day
Artistry of Lisa G : This app is free???? Thank you for all the knowledge!
MARCIALS BLENDS FRAGRANCE: GORGEOUS WORK MI AMIGAAAAAAAA
Tracy: Black box dye is a beast. God bless it.
Somer Styles: Beautiful Mirella
elena mill: Great Job!
Artistry of Lisa G : OH SHOOT IM IN IT