Diy How To Put On Hair Extensions At Home.
- Posted on 19 November, 2020
- Fusion Hair Extensions
- By Anonymous
Youtube Friends,
Please subscribe - follow me on social media to help me raise awareness and funds for my charity "Helping Poor Kids To School".
I believed the best way to get children out of poverty is through education. With Education, they can take care of themselves and will not become a victim of slavery or abuse.
As a refugee from the Vietnam war myself, I am lucky to be where I am today. I would have been sold into *** slavery if I wasn't fortunate enough to be here in a Freedom country like CANADA.
I am forever grateful, and I want to devote my life to helping children who are less fortunate/most vulnerable.
This is the only reason I started this channel and being on social media.
You can help me spread my mission by sharing my videos.
I can't do this alone without your help.
Thank you for your support.
Together, we can make a difference. No help is too small.
YouTube: KellyHongLe
Instagram: https://www.instagram.com/kellyhongle/...
Facebook: https://www.facebook.com/beautydivine....
Patreon: https://www.patreon.com/kellyhongle
Thank you all for watching and subscribing to my channel!
For Makeup and Hair Services business inquiries in TORONTO, CANADA: please contact me at [email protected]
Proceeds go to charity.
I'm doing these videos to raise awareness and money to help rescued victims of Child Sex Slavery to go to school. Boys and Girls are being sold into brothels as young as 6 years old. Please help support our cause by BECOMING A VOICE AGAINST CHILD SEX SLAVERY!
For more info, visit www.HelpKidsToSchool.org
xoxo
Kelly
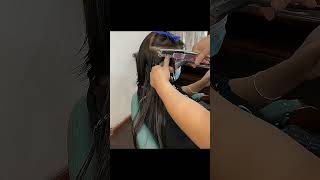
Hi everyone, my name, is kelly. Welcome to my channel so today i want to show you how to put on hair extensions, and this is the weft micro bead, hair extensions. So this type of hair extension is reusable, so you save a lot of money and it also gives you volume where you need it. So i have need volume on the side because of my ear or our ear, we don't grow hair as long as our nape. So therefore we lose a lot of hair here and i have like a bit of a step at the front, so i want to add in some row of extensions just to give me some more volume. So i'm going to show you how to do that. Okay, so this is how my hair looks like now when i wrap it in the bun with the stick. This is the volume that it gives me, but i still want to have some volume here, because you can see how there's a step or a hole here is not very full right there. So i'm just going to add in a few more volume at the front. So these are so. These are the hair extensions that i have. This is what i mean by a wealth, so it comes like this. Actually, it comes very long, but i cut it to fit my head shape. Okay, so these were the one i put in previously and i just we took them out just to replace them so today, i'm going to show you how i install them now. The concept of this is that it's attached close to your scalp and as your hair grows out, the extensions grow out with it. So when it grows out, you have to remove them and then reinstall them back up high. Does that make sense? Because it is far from your scalp that it gets tangly and brushing is hard and washing is hard, so these are ideally close to the roots as possible without causing any discomfort. So that's what the wealth is. So usually, i would use the fusion, but today i'm going to show you how to do the installation for the wealth micro links. So the tools you need is a tail comb, a clam like this lots of clips and the micro beads. This is what the micro bees look like. Okay, you need a string to put the bee through. So the beads look like this. It comes in a pack of 25 like that, and then you put the micro link through like this, so i usually put about two three or four depending on how much it can fit so like this. So usually i put about four. If it's, if i put too much, then i won't have any room to put the hair through okay, so um, depending on how big your wet is uh, i usually put it every half an inch, a bead, so it holds better. So you can put as much bead as you want, but usually about every uh finger. You can put a b so it can hold there. So i place it in my pinky okay, so i usually part my hair in the middle or off center. So usually, i would not put it any higher than the parietal ridge, which is the part where your hair curve, so around there. Okay, you can go as high as you want. It'S all experimenting, but for me i, like it around here, so use the clip to clip the hair out of the way. Now i'm going to okay, you see so you can use any color. You like i love to use the lighter color. Just to give me some highlights, instead of me, bleaching my hair or coloring my hair, so i use a lighter hair extensions to put it in okay, so i'm going to show you how to install it. So you put it there like this, don't have it too close, because it's gon na show so usually i put an inch away or two inch away from the front and then use the clip to hold on to it like this. So once you see it and you like the way it looks, then what you do is you're gon na take some at the bottom, so you can take you're gon na weave some from the top. I'M not gon na lie. It'S gon na be hard to do it on yourself, but you can practice this and learn how to do it. Okay and then you're gon na take some at the bottom, so the hair extensions become a sandwich in between your hair. See now i'm going to loop this through loop it through like this. Normally, i would do one loop or one micro bead, but if your hair is slippery or whatever reason you can loop, two so see there put this back on your pinky and then i'm gon na hold the bee with a clam move. It up. Okay see how it sandwich my hair, and then i just press it like that see so, basically, the bead is made out of like metal. So when you press it, it just becomes very firm, see now i'm gon na do the last at the back now. This is gon na be hard because uh, you can't see you just have to do it by feel so i'm just kind of feeling it i'm not gon na lie. Uh doing this, gon na cause your eyes to hurt, but um yeah. So when you go to the salon and they charge you a lot of money, there's a reason why? Because it's their specialty right. So if you want to do at home, you can but it's hard so loop. It through hold it with your pinky use. The clam and see so smooth out the hair, okay so make sure there's no okay and then just squeeze now, even if it sticks out a bit once you wash it and once you sleep on it, it will flatten down. So don't worry about. If it's a bit, unless, if it's very sticking up, then you're worrying, but if it's just a little bit sticking out, don't worry about it, because when you sleep on it it will flatten down so squeeze it, and then it locks okay. So i usually do the front and the back first, and it will make the middle a lot easier, so weave up weave at the bottom. Okay loop it through like this okay and then pull it through use the clamp to hold and then kind of comb. The hair out smooth the hair out so there's no odd, hair sticking to and then squeeze see squeeze so as long as you're, not feeling any pain, then that's good. Okay. This feels very comfortable, and the thing i like about this one is that it gives me a bit of a cushion like a bit of a volume. Okay, so you can add in another one here um so depending on. If you want it to be more secure, then you can add in two more here, but for me this is okay, and when i let this down see and you wash as normal, you do everything as normal. It'S very easy. You can barely feel it, and this is the reason why it has to be close to the scalp, because you don't want it long or um, far from the scalp, because it will start showing. So what is close to the scalp? You can't really see, and you can move your hair a lot easier, see that so it just add. This is great to add volume or to add color. If you don't want to color your hair - and you want to add in some texture and different color, it's very easy and this hair can be reused. So i'm going to do the other side. Okay, clip clip so wow. So when you finish you're gon na add in more beets, so this is a great way to add in volume for any hair type, the hair comes straight or curly um. If you want to get these hair, this is 100 remy hair. I love the quality of the um global best beauty, hair extensions. So if you need to get some hair, you can feel free to contact me. We do sell them and you can definitely do this at home to add in more volume to your hair. So once that loop it like this and then do the back so right now, i'm just doing it by feel like. I can't really see the back, so you just got to like kind of feel what you're doing or you can let someone watch this video and have them do it for you, okay, hold on to the beads move it up so make sure you smooth out the Hair everything is even okay and then squeeze see so do the front and the back first, so it can hold. And then you can take this out and do the in between so loop out, okay, hold bring it up, try to smooth out the hair. So there's no odd hair stuck in between. So if you don't want it to stick out, then turn your clip like downwards like this and then clip it that way, it will help it to lie more flatter down. Okay and then one more so so see it feels nice. You can run your hand through not a problem see you can still put your hair up see. So i have two rows inside my hair right now, once you finish putting them in try to run your hands through your hair, if there's any uh hair that is being stuck just gently kind of like detangle them try not to rip your hair okay. So if you happen to have any odd one that sticks just try to loosen it out, because there's a bit of a rubber silicone on the link it will, it can slide out gently. Okay, so usually i would add about two uh two to three rows and then, after you finish, you can trim the hair and blend it: uh cutting shears, okay and a long comb. I do sell these long combs if you want to get one, but these are the best comb, their carbon. You can flat iron with them, you can do heat with them and it won't melt and it won't go weird, but the most important thing is long so that when you cut long hair um, it's not like those short little scissors that you know it's hard to Hold the hair, because when you have hair this long, you need a long comb to actually help you hold the hair, because the fingers are too short, so you can't really hold the hair with it right and a lot of time. If you are not careful, you can cut yourself. So to start, i'm going to part the hair in half down the center like this okay. So i have done these videos before, but this is just a refreshed one for you. So once i like to style the hair before i cut it, so this is me um putting hot rollers in my hair just to help nice and shape and smooth. But if you have really um wiry or coarse or curly hair, it's best to straight iron them flat, like literally perfectly straight, so that you can see and cut it more easier uh. The reason why i like to cut the hair dry so that i can see what i'm cutting when the hair is wet. You can't see where the split ends is so you tend to cut more than you need right. So i love to cut hair when it's dry so that it's easier to comb, especially those people who have really tangly hair. If you cut it when it's wet and you have to comb it up, it does get very painful because you're stressing the hair, so the first thing i do is, i part the hair in half make sure you use a brush. I don't have one right now. So i'm just using a comb, so this is what i mean by you: need the comb long so that you can hold the hair see the comb can easily hold my hair in place. If i were to use my finger see how short it is, i can't get it and it bunched together like this. It won't be accurate. So with the comb, it comes. It kind of fan the hair out so that i can see. I can cut it a lot easier, so i bring everything forward. So when you comb the hair - and you feel these little tug, that means your hair has knots. Knots can cause split ends when they break. So this is the reason why we trim our hair. Often, okay, so i bring everything forward to the front and because i am trimming the ends about a quarter of an inch. I'M gon na do blunt cut instead of point cutting. If you cut a lot like a few inches, then point cut so that it's not so thick on the ends. But if you're just cleaning up the ends, then just do a blunt cut. Okay, to keep it nice and full at the bottom, see how i'm cutting downwards. Okay, so bring everything to the front, don't slide back because then you're gon na lose the volume at the front so once again hold use the comb hold the hair. So if you had one length hair, unlike mine, that's already been cut, then you can measure where you want the layer to start and then you can start cutting down from there. So since i already cut my hair already, i'm just following the guideline and i'm just trimming blunt cut okay, so you see how the comb is holding my hair. For me, that is the reason why we have have a long comb to help us hold the hair. Okay, so this side is done, you will not see much of a difference, but you will feel the end a lot healthier same thing for this side, so i'm combing everything forward. Okay, because i'm gon na do the front first, so see use the comb to hold the hair and from here as the comb comb through, i can see the split ends. I can see where the stragglies are, and i just follow the guideline and trim the hair. Now please go less and then you can cut more after than to cut too much okay. So once i'm happy with that, i'm going to trim the bottom. So with the bottom, you pull all the hair straight down: okay, no elevation straight down! So the end of the hair. Again, if you are cutting like two three inches off, then you can do a more point cut. But since i'm just doing the tips, i'm going to do blunt cut to keep the thickness at the bottom. Okay, so see i'm just doing a blunt cut and just trimming where i see students but uh. I hope that you enjoy this video uh, please, like my videos, like my youtube, subscribe to my channel uh, because i do all these videos to raise awareness for my charity and to help stop human trafficking and child exploitation so through your liking. Through your subscribe, i'm able to make money on youtube and all that goes towards my charity, and i couldn't do without you guys together we can make a difference. So thank you so much for watching guys and i'll see you the next one bye

Comments
clipinqueen: This was very informative! Thank you for sharing. I am going to try this method of installing extensions.
LALA: I LOVE YOUR HAIR !! IT IS GORGEOUS !
Ana Reyes: You don't even need hair extensions your hair has so much volume, so pretty!!