Diy Micro Link Extensions - Tutorial - I Love Them | Amanda Surprise
- Posted on 03 August, 2017
- Microlink Hair Extensions
- By Anonymous
Actual Install is @ 9:32 If you want a more in depth at home do it yourself install video let me know.
Hey Beauties. I am so happy to be back!! I will fill you all in on the reason behind my short absence. But I have NEW HAIR and I wanted to share all the steps with you.
If you would like a more in depth video of the installation OR a How To Care for micro link extensions LET ME KNOW BELOW!! ⬇⬇
Love you.. XOXO
Amazon Products:
Extensions: https://www.amazon.ca/gp/product/B00IP...
Brush: https://www.amazon.ca/Scalpmaster-Exte...
Tools: https://www.amazon.ca/Neitsi-100pcs-Ex...
Don't forget to SUBSCRIBE!! https://www.youtube.com/channel/UCwB2f...
Follow Me:
Insta- amandasurprise https://www.instagram.com/amandasurpri...
SNAP- amandalovly
https://www.snapchat.com/add/amandalov...
Twitter- amandasuprise
https://twitter.com/amandasuprise
Facebook- Amanda Surprise https://www.facebook.com/amandasurpris...
This Video was NOT sponsored. All opinions are my own.
Buisness Enquiries: [email protected]
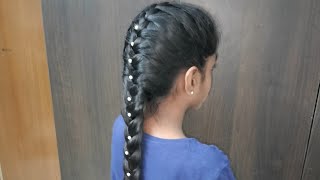
Holy they're off something about you didn't yet, hey guys. Welcome back to my channel how many of you guys are having a heart attack right now: hey, hey you're, probably looking at me saying girl, you did something different. What is it? I have Micro Link, extensions in and today I'm going to show you guys just how I did them, because, yes, I did them myself, because your girl is pretty darn crafty and likes to do things on her own. Well, I not to mention it was way way. Cheaper and I like to save money because I like to shop so wherever I can save money, I do okay, but before we get into that, I know it's been a while guys and I apologize profusely for that. There has been a lot going on and I will definitely fill you guys in on everything that has happened. Just a very unfortunate thing happened to one of my family members, so you guys will get a video. I will tell you everything and again, I'm so sorry that I wasn't around to post a lot of videos me and my family were going through a really tough time, but I am back I am getting by. I am smiling and that's all that matters and oh, I could not wait. I missed all of you guys so so much you will never ever know now, let's get in to today's video, shall we so I did my own extensions. I didn't go to a salon. I didn't pay anybody a bazillion dollars to install them no way I did it now. It did take me like a good half of a whole day, so that is tedious work very repetitive. But oh, the payoff is fantastic like it's not like clipping extensions or you have to worry about them, slipping or being noticeable. You can't even see the actual micro link speeds in my hair at all, and if you do it's just the slight little peak and if you're not looking for them ain't going to see him. So I love this method of extensions. Oh and I do also like fusion - but let's not even talk about that - it's all about micro link, extensions today. So I got my hair from Amazon and one of my dear friends shared that information with me because she happened to stumble upon the extensions on Amazon and told me about it, which was awesome. I'M so thankful that she did share that with me because to get bundles of human hair extensions is very expensive, especially if you're buying them in a salon. Now, if any of you guys have ever bought in human hair, clip in extensions gotten extensions before you know exactly what I'm talking about, I know that it sounds very intimidating Micra, like extensions. Oh my gosh, like how do you get them in your hair? I filmed my installs, so you guys can see everything, because I can't I love you guys in my hair I used two bundles of hair and in each bundle there is 100 strands. So this is what the bundle looks like here and yet they are 100 %. Human hair right there, so this is the bundle I'll take you for you, so the hair comes clipped like this and here's the bundle of here beautiful soft doesn't tangle easy, Oh beautiful. I was very surprised when I got my hair because 37 dollars 400 strings of human hair. I was skeptical I was, but when it came in and I seen it and felt it, I was very happy with the quality of the hair. This hair is human hair. So you can diet, you can cut it, you can straighten it, you can curl it. You treat it almost exactly like you would treat your own hair now. The strands in the bundle are like this in a better way to explain. They'Re, like tiny bundles of hair and on the tip this is where the installation happens. You put your small piece of hair through here, pull on this little tiny black bead. By pulling that it pulls your hair right through your little micro bead at the top. There, then you take your trusty little pliers and squeeze that so tight and then BAM it's installed and attached to your hair. Another very important item that you need when you're doing your micro link, extensions or your fusion extensions or any type of single extension installation. Are these guys. These guys come in handy so much because you're sectioning your hair and you want all of the little flyaways to get the hell out of the way, and these guys here are perfect and they're nice and long. So it covers a larger area along the sectioned off piece and they are bands half dick. Another, very important item that you definitely definitely need is a special extension brush. Okay, now you can't use just a regular hairbrush and the reason being is these bristles here are two parts. So if you start from here with this Russian brush down, it's not happening you're, definitely going to wreck your extension, I bought an actual extension brush. It wasn't expensive, it was like seven dollars and it looks something like this. So looking at it from this way it looks like a normal brush, but it's not sticks. It'S very skinny pieces of plastics that are actually like this all in the brush. So it's very easy to bend them very valuable bristles. It doesn't catch on anything anything whatsoever. Another good brush for extensions is a boar haired brush. Now, I'm sure all of you know what those are and if not, your grandma probably used one in her hair when she had a perm, nothing just kidding I'll put in a picture of one right here. So you know what I'm talking about. That'S a boar hair brush and that's going to work the same and do the same as the extension brush because it doesn't catch on anything up at the top of your head. So I'm going to show you guys exactly how long my extensions are like it's so natural, it's fantastic bada-boom! I love it. I'M in love! Y'All should do it. Are you ready to see it alright? So here is the back of my hair. I did blend and trim because I do like layers, you need your extensions to blend nicely with your natural hair. So then it's less noticeable on where your natural hair ends and the extension continues. You don't want there to be a very visible life, so this is them. I straighten them this morning, but I have curled them and Oh mermaid vibes. I feel like a mermaid princess when I curl them, Oh beautiful. So if you guys also would like to see how I do my hair with the extensions in, let me know in the comments, because there are so many cute and sexy hairstyles, that I can do with this long hair that I couldn't really do with my natural Hair well, why don't we take a look at the installation process? Okay, so, as you can see, I have a lot of hair. In already I have to make my next row, so you want to try to make it as skinny as you can, because not a lot of hair fit into the microbeads. Okay, I think that's good and all I do is start grabbing teeny tiny chunks, because you do not want your chunk to be bigger than what the extension is. So I try to match it as best as possible and then I take my hairpiece, which is right here. I put my two fingers in the middle of it as so then I pull my natural hair through and I grab the black piece here. Well, I'm holding with my index and thumb the micro bead and then I pull through. Then you want to keep it close to the root, but not touching your scalp. Then I take my pliers, lay it flat and crimp. You want the extension to be able to move freely in a 360 degree radius. So and there's no pain. No, nothing! Then you did a great extension. So then moving forward, I'm going to do the same. Well, I hope you learned a little something about installing and what you need for the micro link extensions. I will leave links to everything down below, so there will be a link for the hair, extensions and there'll be a link for the extension brush and also a link for the tools needed to install the micro link. Extensions. Well guys, don't forget to hit that subscribe. Button before you leave and while you're at it, you might as well follow me on all my social medias, those are always linked down below in that magical down bar and around the screen as well. Well, guys I am going to get on out of here. I have a lot of filming to catch up on and again I'm so sorry. I was a little bit m.i.a and I can't wait to tell you guys all about this crazy last week that I had because I have missed you guys so so much. I will see all of your beautiful faces in my next video. I love you guys mom, you

Comments
Noris Garat: Hello, how nice to see you again Amanda, you missed, Congratulations you reached the 203 subscribers, I admire how you did the process of extensions alone, I could never haha
Kickin It with Amanda: Hey Beauties! Hope you enjoy the video!! xoxo
BYAE E: So beaut x
Jodie Masterson: That hair is awful. You get what you pay for
Beth Simmons: Missed you