How To: Middle Part Quick-Weave With Leave Out | Ft Unice Hair Review
- Posted on 17 December, 2022
- T Part Wig
- By Anonymous
Email for ALL PROMOTION NEEDS : [email protected]
SOCIAL MEDIAS:
Main Instagram Acc: https://www.Instagram.com/nispazz
Hair appointments Dm: https://www.Instagram.com/spazzslayedi...
Dump Instagram Acc: https://www.Instagram.com/nispazzarchi...
TikTok: https://www.tiktok.com/@thenispazz
Twitter: https://www.Twitter.com/nispazz
Super Fast 3 - 4 Days to Receive The Hair
UNice Promises WYSIWYG!& No Reason Return & Exchange Services
Using my Special Code: NISPAZZ05 & NISPAZZ10 (full $49-$5,$99-$10)
▬▬▬▬▬unice.aliexpress.com ▬▬▬▬▬
Same hair in the video ➤ https://s.click.aliexpress.com/e/_oE61...
Hair info:Body Wave Virgin Hair Bundles Natural Color 22’24’26’28’
Ships from US/FR UPS 2-days Fast Delivery ➤ https://s.click.aliexpress.com/e/_opeV...
UNice hair mall ➤ https://st.unice.com/dhhvh
Contact to wholesale: +8613782365322
Customer Service Number/ Whatsapp: +16614809525
Contact to promote [email protected]
#UNicehairstyles #UNicelacewig #UNiceHair
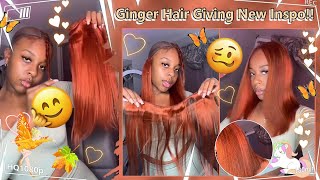
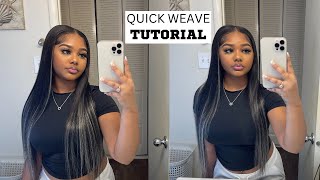
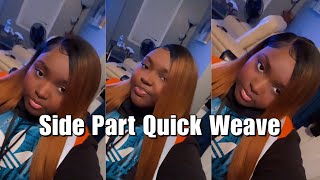
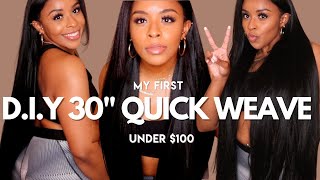
And I can let you know what's going to we're there with that, we're back if y'all don't know me hi, I'm Nye here we saw this and go on Vibes um, I'm not a hair Channel, but y'all love, hair videos. So I'm gon na keep giving y'all hair videos. I do quick weaves, I don't know the gift girl, so I'm here to show y'all how did my quick weaves and all that today's video is sponsored by you, nice hair yeah, I'm gon na get into it. First, reindeer yo: we hit 2K today subscribers. Thank you like love, y'all, so much, I'm gon na keep this content and y'all know I've been real, real, consistent y'all. Like am I why I got on this dingy shirt. I only did a shirt because when you do a quick, weaves you're not supposed to wear nothing, you really really like so yeah. It'S this big ass t-shirt. So you nice, sent me four bundles. I got so. I have bundles in the links. 22. 24, 26 and 28.. I'M gon na try my hardest to fit four bonus in my head. The most bundles I fit in my hair before was like two like. Then we have three bundles, but four is a little expensive but we're gon na try. I I probably won't even put this 22 inch bottle in my head, but we're going to try our hardest to fit all four. This was very fast shipping um. They set my hair in three days so yeah. This was damn near overnight. I suggested them for chicken wise we're gon na get into this hair review in my bag. I also received this little like kit. If you will, it has a bonnet in here, a wig elastic. This is not a wig, so I won't use this but okay, so it comes in here some lashes and a brush. I'M pretty sure this is for like if you put on a wig and you got a blend - I don't know, I don't wear wigs. So don't get me to lying to you, but this is in here hmm, so first things. First, I've already washed and blow dry. My hair. I dyed my leave out earlier today, jet black. I cannot find the bottle, but I use adore jet black dye. It was a semi-permanent dye and I just wanted it to really really match my bundles, so I just did my leave out. Nothing really major. If y'all want a video on how to do that. I can do a video on that, but it was my first time so I didn't want to steer y'all wrong because your girl is not. I don't got no knowledge on that. Just yet, but let's get into the video I am going to start by sectioning off my hair today we're doing a middle part. Sorry I neglected to tell y'all that in the beginning of the video, but of course it's in the title, so we're going to start off by sectioning off our hair um, putting your part where you want it just make sure that part is straight. I want my hair down like this. Just make sure I'm good so you're gon na go over about an inch or two. I want minimum leave out, so I'm only going over about and I make a line straight back from where I did my middle part at it. I'M gon na put a clip on this side and now I'm going on the other side and do the same thing make sure your leave-out matches make sure you don't have too much leave it on the right side or the left side make sure it is all. Even so, once you have your leave out down Peck I like to go back a little bit and like make a c shape in the back, because I like real, deep parts I just feels like it lays it lays better with this middle part. I want side edges so I'll. Take those out after I um break this forward. Yeah all the videos start out. Looking real crazy, but just just bear with me will look real cute right in so I'll split this all the way down the middle. Your middle part, all the way down middle, go ahead and put two braids braiding them to the front of your head. So just click one side like so, and then braid your hair to the front. This braid really doesn't have to be the best, but I like to break this down kind of tight, so I'm going to put on my cap, it's no like bulges or gaps in it. I'M just pulling out edges on the side because I do want some of this hair out with this installed. I'M gon na break this down and then start braiding. It start braiding my edges into this braid. So when I put my cap on this is good out. The way, I usually don't add edges to my middle parts, but today I am because it's cold outside and then like they gon na get big or nothing so might as well, but in the summertime, I'm not adding up we're going to do the same thing. This is how this side looks we're going to do the same thing to this. Don'T braid your edges down tight guys! Please don't write this down thing powder in half, so when the white tooth comb or a right tail comb just part your hair in half and section it off in two different pieces, I'm gon na go in with this strong roots and these meal drops to oil. Your hair, just don't oil, your leave out, but with my hair on through out and make sure you get your ends now with the rat tail comb, you are going to start braiding your hair in cornrows, going back braids going backwards. My head! Isn'T that big, but you can do as many braids as you like, you're gon, na break this braid close to the end, but not all the way now Midway through the second break. This first break dangling and add it into the braid that you're braiding. Currently, if you hear that song in effect chilling on my mind when you do this, you won't have to go back and sew in your braids together feel free to bring this braid down to the bottom. Better keep repeating the braid, adding braid braid, add in steps as we keep going on when this side is done when you're done braiding. All your hair up, you'll have more braids just dangling and you're gon na break that braid all the way down. Now we're going to start on this side, don't forget to oil, your hair and bang moving all the way through and hitting your ends start to section your hair to write it back in cornrows ers, all right guys. Now that you're done with your breakdown and we both look crazy, you should have two braids in the back um we're gon na put those up in the cap, and then you should have two braids in the front. With your leave out. I'M gon na go in with these Mio drops, not sponsored wait. Oh my god get it. I have a crazy. I can't believe I upload this. I'M gon na go in with these drops and you don't need that much, but I'm just going in between my braids sure my hair is coiled, really really well a quick ways. Last anywhere from two weeks to like two months, I usually keep mine in for three weeks and then I change my hairstyle, but you want to make sure your hair is boiled under that cap, because this is a protective style. I kind of overdo the oiling when I do quickly, just because you can't oil, your hair, when your hair is inequately getting the ends of your braids, is important too. Now that our hair is oil, we're gon na go in and put our caps on. I order my caps off of Amazon, the ones I just ordered. Recently I got 24 in a pack. I just get them in both. You can legally go on Amazon and type in um. Black wig caps in bulk and they'll come up. So two comes in a pack um. I use both of them, so we're just gon na go like this go on your wig cap. Put it down, so your two braids that are hanging out in the back do not touch your braids in the front. That is your lead out. Leave those alone, your two braids in the back you're, going to take your right, braid and cross it over to the left side. Put that up make sure the end of your braid is not leaning over your leave out just tuck it back, because when you put on the shield, you don't want to be shielding your leave out too y'all get it as we go on. Take your left, braid and cross over to the right side and took that make sure it's also the energy braid, it's not by your ear or anything. It'S like in the center of your head, then we're gon na go in with our next cap and pull that down as well. Now that both of our caps are on and our braids are tucked like first of all, it's already flat. So, just imagine how this install from the look y'all now you're going to go in with your protective shield and your brush. I have this protective shoe got this in my brush, I like to cover my head first with Spritz all around to like map out where my leave out starts. Wow, don't tell me, I got a defective bottle. You can also use a like white eyeliner pen, but I can't find mine now. I just go all around with my Spritz. This gets tiring, so like bear with yourself after you're done. Spritzing your hair you're gon na go in with your Shield, you're gon. Na put this on your head, I start on the side, squeeze a little going with the brush and start working it through. Do not put this on your leave out they're playing your first coat of Shield going with your blow dryer I go in with mine on high heat and I sit until it's pretty much dry. Then I go in with another coat and another coat and do the same thing over. So I do this two times look three times and I put it on the brush and then I push it upward um when we're getting ready to cut the cap. I don't cut the back of my cup now. This is the second layer I'm going to go back under the dryer, so yeah I'm going to get a little excited grab the bottle cut. This cap, I cut my cap from the front - do not cut this cap extremely fast, because picture here, like okay, all right now. Moving on to the hair, this is a 20 inch bundle body wave. So this is the bundle up here. I'M just gon na see how long it is side to side and then cut it back. I put the glue on the width that black band at the top of your bundle is what I put the glue on, not the actual hair um. We add the glue there you're able to use these bundles over and over and over, because you're, not adding actually adding glue to the hair. I don't keep cutting gluing cutting gluing over and over again to reach the top between every so many of them. I put the blow dryer on just to make sure it's completely dry on TV songs. So when I Lay My Tracks, I Lay My Tracks straight and not in the. U because if I lay them in you, I'm not going to be able to get nearly as much hair as I would be able to get in. If I didn't lay it straight just a tip. This is two bundles being that these bundles are on the thinner side I might just be able to fit in, for the hair doesn't seem bad. It doesn't not for sure it doesn't matter. It has another so far, but they are thin, like the width is thin. It'S not double whipped at all. So keep that in mind when you're ordering, if you usually use three bundles in your head, I suggest buying four. I usually use two and a half yeah as you're. My friends, I'm on my 24 inch bundle now now I can't believe it, but I'm on the sports fan, but so far they're real cute. This last one is 22, so I got 28 26. 24.. Okay, once I start getting to the top. The very top of my head, I stop doing, use around and start doing it halfway. So instead of coming back over here, I'm gon na stop it in the middle of my head, because it's easier and then you don't want your hair to be like uneven here. Let me cut this right here in glue down, because when you start getting to the crown of your head, you start making that! U Shake! Nothing is straight lines anymore, all right, guys, four bundles later and we're all done, I'm about to start flat ironing my hair, I'm just fixing it into two yeah. This hair does not shed OD, but I'm going in with my Paul Mitchell: silk sound like two pumps on my head, working that through y'all see how flat this is great, but we knew it was gon na be flat, I'm going piece by piece for ironing it. I have a epic guy flat iron. This is a one inch I think, and I flat iron my weave on 450. following directions: foreign foreign enough money for the Lord there's, a picture all right guys. That is all for this quick weave middle part tutorial. This video was sponsored by United's hair, so make sure y'all use my discount codes and description box below. I don't know why I thought that was so hard to say. Um and yeah make sure you like comment subscribe until a friend until a friend until his friend to come, live with us, and let me know how your hair turned out. Yeah foreign
Comments
Janee' Symphony: when Ni does a quick weave it’s going give Super cute♀️
Asia Collins: I haven’t even watched the video in its entirety yet and can tell you did your shit Ni!
khemila: this is so cute, how do i blow dry the protective coat for?
Damontae Hightower: Yesss it’s so cute ❤❤
𝟲𝟵𝗫𝗫𝗫.𝗦𝗜𝗧𝗘: - FIND YOUR LOVE IN YOU CITY! y