How To: D.I.Y Natural Middle Part Quick Weave For Beginners Under $100
- Posted on 30 October, 2022
- Sew-In Hair Extensions
- By Anonymous
In this video, I decided to be a baddie on a budget and did my very first quick weave on MYSELF. It came out super natural, was pretty easy to do, and it's under $100.
Shop what you will need here: https://a.co/feV8Do8
Product Mentioned:
2 Black Wig Caps: https://amzn.to/3SS1HOm
Salon Pro 30 Sec Moroccan Argan Oil Weave Wonder Wrap Dark- https://amzn.to/3Ft5gHK
Dye Brush: https://amzn.to/3DKau0B
Got2B InstaHold: https://amzn.to/3DJcvdm
Zury Natural Dream Hair (4 packs): https://amzn.to/3WdOsKQ
Salon Pro 30 Sec Bonding Glue: https://amzn.to/3FofvgC
Email for business inquires only:
WANT TO SEND ME STUFF?
The Notorious N.I.A
3300 Conner St #179
Bronx, NY 10475
Follow Me On Instagram: https://www.instagram.com/the_notoriou...
Follow Me On TikTok: https://www.tiktok.com/@the_notorious_...
Shop My Favorite Products Here - https://shoplist.us/thenotoriousnia
Shop my ESTY shop - https://www.etsy.com/shop/DIYbyTheNoto...
My foundation shades:
Fenty Beauty Pro Filt'r Soft Matte Foundation - 370 - https://myshlf.us/p-178239
Fenty Beauty Pro Filt'r Hydrating Foundation - 385 - https://myshlf.us/p-394238
Fenty Beauty Eaze Drop Blurring Skin Tint - 17 - https://myshlf.us/p-391322
ZARA Limitless Soft Matte Foundation - N940 - https://go.zara/36WWfb3
Huda Beauty #FauxFilter Foundation Stick - 430N Gingerbread - https://myshlf.us/p-394239
Cover FX Power Play Foundation - N80 - https://myshlf.us/p-394240
NARS Natural Radiant Foundation - Cadiz - https://myshlf.us/p-394241
NARS Light Reflecting Advanced Skincare Foundation - Cadiz - https://myshlf.us/p-394244
My Discount Codes:
Just4Kira( https://just4kira.com) - Use code notoriousnia for $$$ off
Dossier (https://bit.ly/3qUrvft) - Use code NIAW10 for 10% off your purchase
TTD EYE Contacts (https://bit.ly/3qUrvft) - Use code notoriousnia for $$$ off
My Filming Equiptment
Main Camera - https://amzn.to/3cupIsT
Vlog Camera- https://amzn.to/39laWD1
Ring Light - https://amzn.to/2O0Tlc1
Camera Remote- https://amzn.to/3dhDyhB
Tripod- https://amzn.to/3diB0zT
Memory Cards- https://amzn.to/3rquZWB
Upgrading Soon To...
New Camera Lens- https://amzn.to/3w9hm1y
New Lighting- https://amzn.to/3fmaAjd
New Vlog Camera- https://amzn.to/3rwxnLJ
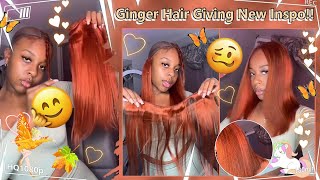
So when was you guys going to tell me that you were out here, cheating like when was y'all gon na? Tell me y'all not really out here paying for these insoles and paying for real human hair? Bundles like when was y'all gon na tell me this was the wave. What was y'all gon na tell me because hello, what's up guys, welcome back to my channel, it's your girl, the notorious and to lie to the A, and today we are going to be installing this quick weave. I have never done it quickly before, but I honestly just realized y'all be out here. Cheating when was y'all gon na tell me that we stopped spending 500 400 on here. We want y'all gon na. Tell me we just do it in our bathroom for less than a hundred dollars like when was y'all gon na tell me this y'all be cheating, so today I'm gon na try it out for the first time I've never done one, but, as you guys can see, I did a little something so yeah. I just basically figured out the cheat code and wanted to share it with you guys, because I know this is what y'all was out here doing. I also did press-ons for the first time. So if you guys want to see that I'll insert The Tick Tock here, follow me on Tick Tock, but without further ado, let's get into how I did this all right, you guys. So, let's start off with this braid pattern, shout out to my girl Nisha, because the one thing that I cannot do is braid and she did that. So I'm gon na put these two black wig caps on my head, and I just want to let you guys know. This is not a tutorial, I'm literally just showing you guys me doing this for the first time. As you can see, I am struggling. So not a tutorial, but if I could do it, you could do it so definitely just pay attention to what I did. It'S pretty simple and next I'm gon na put on that second wig cap. One thing that I did notice: it is hard to line where your leave out is so I did have to line the first wig cap and then put on the second one and line that one I'm gon na use. This weave Wonder, wrap this is to protect my hair. I was very, very, very, very concerned about my hair, because I didn't want glue in it. I didn't want it falling out. I didn't want nothing crazy happening, so I am not using this lightly, I'm using it very generously putting it all over my head and then I'm gon na blow dry that also we'll link all these products in my description box. So you guys can know exactly what I use to get this style completely dry before you move on to the next step. So it is a little tedious just holding this blow dryer. But trust me if it's gon na protect my hair, because it's still my hair as I'm doing it. So I don't know if this works, but I also went in with the got to be for Extra Protection because, like I said you guys, I was not playing. I love my hair, I'm not trying to lose any moving on to the hair that I use. This is the Zuri natural dream, natural Yaki, 30 inches in the color 1B. I honestly wish I would have gotten natural, because my hair was a tad bit lighter than that, and I don't know if I mentioned that I got four bundles of this. I'M just gon na measure out the first piece. I do this for every piece that I put in my head. I measure it, I cut it and then I make sure I go in and measure again for the back. I did double weft it just similar to how you would do a wig or a weave. I cut two pieces that were the same length and then glued those together and then glued those two pieces on my head. I really wanted to make sure that this was thick. I don't like the look of thin long hair. I just don't like it, so I really wanted to make sure if I'm gon na be doing 30 inches, it's a full 30 inches boom. We have the first piece in, as you guys can see how good that looks. Guys do a little victory dance because I'm doing it. Okay, I'm doing I got ta hype myself up and then I just kept on repeating the process. Honestly, you guys had a better view than I even did, because obviously I cannot see the back of my head and I was only working with this one mirror I had in front of me. So what I would do is use my fingers to feel where the previous track was so that way, I'm not just gluing everything directly on top of each other, so yeah, it's pretty much the same process over and over again foreign. Now, when I got to this point in my head, I started to single weft the bundles, because I didn't want it to be too too thick on top. Obviously so at this point I did stop double wefting it and I'm just going in with a single weft and putting those on there. You want to start curving your wefts as well. Instead of going straight across, I actually did end up using all four bundles, but that is a choice. If you didn't want and look as full, you definitely do not have to use that many. So, as I got to the top, I kind of had this a little bit uneven, so we had to make it do what it do. Definitely get resourceful, just make sure that you're not putting it on your leave out, because that will be a problem. But as you guys can see, I'm using all these little pieces to make sure I get that look and by the end of it it looks perfectly fine. You would never tell, and I used all my hair, so that was literally the last piece of hair. I had left, I wasted no hair, it's all in my head. So now we're going to cut off the excess cap be sure you do not cut your hair, be very careful and then I'm just gon na unbraid. My leave out and straighten it, and here you can see that my hair is slightly lighter but, like I said it's not a big difference, so it didn't really bother me too much, but I do want to note that I do have natural and 1B another disclaimer. I did use heat protecting, which is why my flat iron is smoking like this. Also, my lights are very bright, so you can literally see everything, but my hair is protected. I also did not put a whole lot of heat on my hair. After this, I was very mindful, as you guys saw, there's the heat protectant. So I know it looks crazy, but that's just my flat iron being my flat iron and it reacting to the heat protectant that I do have on my hair, and this is what it looks like when my hair is straightening. When that leave out is straightened. It looks so good, and this is the final result you guys, so I'm not even gon na lie to you. This is actually a whole week later, but what I did was I cut some layers in it and that helped a lot. I also snipped the ends of this hair to give it a more clean cut and, like I said this is a week later, I didn't have a chance to film The outro clip to this when I first did it, but I'm kind of happy about that because Now I can give you a full review. I have not had many problems with it. Of course it is not authentic human hair, so it does shed, it does tangle, make sure you keep a brush or a comb on you, but other than that. This hair is beautiful. It matches my hair so well. I know a lot of people use the organic hair and it is cheaper, but this was a better choice for me. I have no regrets and that's so crazy, hello, y'all fire cost me less than a hundred dollars looks like I don't went to the whole salon got my 30 inches laid. No. I did this by myself in my bathroom, with literally no help. Besides my girl Nisha. She braided my hair, but other than that. This is all your girl. Y'All might have just changed the game, but I'm just mad y'all ain't tell me thank you guys for watching. If you try this, definitely let me know if you have any questions, please leave them down below in the comment section, and I will see you guys in my next one bye,


Comments
Jasmine: This will be perfect for my bday weekend cause I want it long but don’t want to make that investment cause it will be a temp thing for me. I’ma glue it on a cap
NiSha da Chef: yea you did that