First Time Installing I-Tips Microlinks Extensions On Natural Hair Using Isee Hair | Mpumeh S
- Posted on 31 May, 2022
- Microlink Hair Extensions
- By Anonymous
Hi huns, so we are finally installing these I-tips. This was my first time doing this and I have to say in the beginning it was not easy but as I got on with it, I got the hang of it.
I hope you enjoy the video.
Contact Info:
Email: [email protected]
Instagram: https://www.instagram.com/mpumeh_shang...
VSG Journey Instagram Page : https://www.instagram.com/k.k_gets_fit...
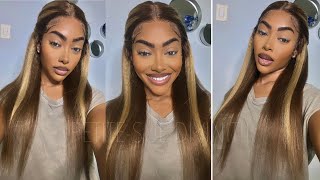
In november, hey guys welcome back to the channel for today's video. We are finally installing the eye tips that we made in our last video, and i've got my beautiful daughter here who i am installing the eye tips on and the hair, obviously as you've seen from the last video is from ic here, and this is how it Came like in the bag and i used two bundles, but when you buy the hair, obviously you get four bundles, but i only used two out of those four, and these are the eye tips that we made in our previous video, which we will be using today. Listen, this child's hair gave me so much stress she had braids before and we took the braids out and we just texturized her hair so that it's actually easy to work with. So what you see me doing here is just sectioning her hair, so that i can have it in smaller sections because to try and work with the hair in this condition was just going to take so long and it was just not going to be manageable. So that's why i'm sectioning it into smaller parts and trust me. You need to do this guys. If you haven't tried the double caramel frappuccino from starbucks. Listen, you need to go and get one right now, because it smacks. It is the best thing i've ever tasted. So anyways back to the hair, i'm using this um, this heat protectant from kanto. This is the best thing ever. I love how it smells. I love just i just i love everything about it, so this i will leave a link in the description box down below. If you are interested on grabbing yourself, one um, i know that you can get this from amazon, but i just got it from monoprix and yeah. I think it was about 50 something categories, so it's very inexpensive. So i just used that on the hair before i actually went in with the straightener, and do you remember the condition of the hair before this is how it's looking like after i use that, and the only thing i did with whitley's hair was basically just texturize. Her hair with relaxer just on the roots, i did not apply any relaxer um to the ends over here so yeah. This is what i always do. I do this, i think about yeah. I do this twice a year, so every i'll say about uh six months. If i'm not mistaken so after six months, i will texturize her hair again so moving on to um trying to section this hair so that we can have some leave out. So you have to have leave out if you want to tie your hair up in a ponytail and in order for the micro links not to show you need to leave enough hair. So that is why i'm using this comb - and you just see me pulling the hair up to see if the comb is visible or not once your comb is hidden away nicely, then you know that you have enough leave out, and that is when i went on And i started planting the hair just to keep the leave out out of the way while i installed the micro links so as you can see from this child's hair. Oh, my gosh, her hair on the side is very damaged, and this is another reason why i don't want her to get braids again, so i just want her hair to actually grow back and be healthy again. So i am treating her here at the moment with as many products as i can, but obviously taking care that i'm not loosening the eye tips. So what i'm doing here is i'm also leaving leave out on the side, because, as i mentioned, she does want to put up her hair in a ponytail. So then, we do obviously need hair on the side to cover the micro links, so i'm just making sure again that i'm leaving enough leave out so that the micro microlinks are not visible. So here i'm just showing you how much leave out i lift for the front and yeah. That'S basically how i sectioned the hair for the hair that we were leaving out and my daughter is very fussy. She wanted options. She wanted a side part she wanted pushback. She wanted so many things she wanted a middle part, so that is how i had to section the hair. The one that's in the middle is for the middle part and the one on the side is for when she wants to have a side part so on to the actual install. So i did section the hair off just in small sections so that i had enough hair to be able to put through the beads. Now it's very important that you don't section the hair in big chunks, because if you do that and you try and loop your hair through the bead this one right here, it will not go through so another tip is that when you are looping, your micro link, Beads on this loopy thing here just make sure that you get as many of those beads onto the loop, because it will make you install much quicker guys. I know that this is not a very good angle for me to show you how to actually um loop. The beads onto the hair, but i do try my best later on - i i think i do show you a better angle. So basically, what you have to do is you just take a small section of the hair, and then you put your your index finger and your thumb through the loop grab, the strand of hair and then just push the bead onto the hair and pull. So i don't think i'm explaining it very properly, but i'm trying so yeah that i think that's the best. I can that's the best way that i can explain it, but basically you just loop, your hair through the loopy thing and push the bead and pull the strand. So, basically, that's what you see me doing here, i'm going to do a couple with you and then i'll be back when we move on to actually installing the eye tip so to install the eye tip. You are basically going to grab your strand of hair. Push the eye tip into the micro bead, but what i would advise guys is that don't push your micro bead too close to the scalp, because it will be very uncomfortable okay, so you want to make sure that you are leaving a little bit of hair from The root and your bead is not touching your scalp basically so then, once your eye tip is securely inside the micro link bead, you are going to clamp using these pliers right, i'm not even going to lie to you guys. This was my first time installing the itips and at the beginning i did struggle because i wasn't quite sure how to hold the pliers, how to insert the tips. How far i should insert it, but trust me once you do this a couple of times. You will get the hang of it and you will know where to exactly place your micro bead and your eye tip so believe me. If i can do this, you can also do it as well. So you just saw me flipping the hair over. That'S when um. I was checking if i'm actually going to be able to put goosey's hair in a ponytail, so you do want to do that a couple of times just to check if the hair is not too tight. Do at this point i was very chuffed with myself. I won't even lie to you guys, look at the blend. The texture of this hair is just out of this world. So after i had gone up quite a bit at the back, i decided to move on to the sides of the hair. This job was very tedious and i did take a couple of breaks when i was installing this hair, but trust me you guys this is going to last a long time and it is going to be so easy to maintain. So anything that's going to make my life easier. I am all for it and this is what we are working with. So at this point you guys i was i was shocked. I was shocked at how this was looking so good already and i hadn't even started. Straightening the hair, look at the back like are you serious? So now we are straightening the hair and of course i did go back and use the same heat protectant spray from kanto, which is like my new fave. I absolutely love the stuff. You guys i am going to get buckets and packets of it, so i am combing the hair through before i actually start straightening, so that i can take out any sorts of knots and this hair from i see here. Trust me, you guys it straightened so well. It took heat so well, and i was amazed i was amazed at the quality and how easy it was to straighten. Definitely definitely would recommend talk about a good blend this medium over here feeding herself, i swear she was flicking her head all over the show so yeah. That is the end of the video guys. I absolutely love love this hair install and i hope you guys enjoyed watching the video and i do show you as well how the head looked like when it was in a ponytail and trust me. She was feeding herself. So thank you for watching and i will see you on my next one. I love you guys, don't forget to tell your friends about julie, abang and bible, to subscribe to my channel. I love you guys and i will see you on my next one bye-bye. Can we just talk figure out where we're growing


Comments
Gugu Xaba: Wow beautiful work, first time seeing this method of installing hair ❣️ laughed the was she quickly covered her ear from heat and it's well done she looked so cute. Thank you Mpumeh for sharing
zingrosa: I'm coming now! They look so good
Elizabeth Gichero: Are you in qatar?? I need this please
Dineo Sekwele: What!!!!!!!!!!!!!!❤❤❤❤❤ No jokes aside when can I book for an appointment ❤❤❤ You are Amazing !!!! honestly look at how beautiful kuhle looks