Microlink Hair Tutorial *No Needle No Thread* | Microlinks On Natural Hair
- Posted on 22 November, 2020
- Microlink Hair Extensions
- By Anonymous
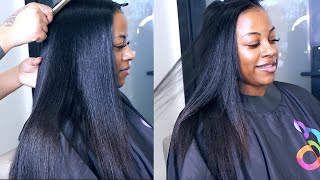
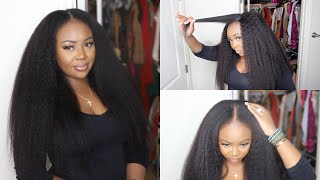
Hey lovelies and welcome back! It’s been a while since I’ve done a hair extension method tutorial so I made sure to film one when I put in my microlinks! This is a more permanent option than clip in hair extensions and less messy(in my opinion) than tape in hair extensions! I’ve been doing a half sewin and half microlinks extension method because having braids and tension too close to my hair line causes breakage so I do this instead!
I only did the top half of my hair because it really helps to blend my leave out with my hair extensions. If you want to do microlinks all throughout your head, use the same method and follow a horseshoe pattern, or v-pattern when installing the tracks. I hope it was helpful! If you have any questions, suggestions, or content you'd like to see, feel free to leave a comment below!
UPDATED MICROLINKS *FULL HEAD: https://www.youtube.com/watch?v=wBAjp4...
DIY Sew In:
https://www.youtube.com/watch?v=g20Kpn...
Which Raw Hair I Use:
https://www.youtube.com/watch?v=7ynKWc...
All About Microlinks + FAQs:
https://www.youtube.com/watch?v=EvhJ3-...
SUBSCRIBE Here: https://www.youtube.com/channel/UCEAmA...
IG: GwenVolo
About me:
My name is Gwen and I’m currently living as a modern-ish day homemaker. Being in a majority 1 income household pushes me me to learn new skills and do things for myself, by myself. Specifically beauty related things, which I really enjoy! I am not quite where I want to be in terms of being the spokesperson for homemaking but decided to share it anyway because I’m sure there are others on this journey as well! On this channel you will find content on beauty on a budget(doing hair and makeup myself), DIY projects of all kind, stay at home wife talks, and every now and then my husband will jump in and we’ll give our opinions on what it’s like to have an inter cultural family. He is Ukrainian and I am African American! You’re more than welcome to subscribe and I look forward to hearing from you:)
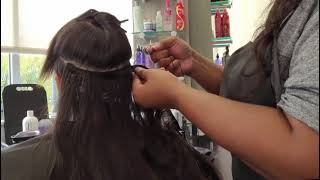
Hey guys and welcome back so today, i'm going to be doing a do-it-yourself video and the video is going to be about how i do this front portion of my microlinks and i think i've mentioned it in the past. Well, i know i've mentioned it in the past um in the back. I have a sew-in from this portion down and up here i put in a few rows of micro links to kind of um make it flow together. My hair is um fairly short compared to the back, so i like to add micro links throughout this part to kind of make it blend um all together. So that's what we're going to be doing today, so you'll need a pair of micro link, pliers or regular pliers. I think these are regular pliers that i have, but the micro links one works just as fine um you'll need these little silicone beads. I bought these from amazon and i think i got this whole jar, which is like a thousand for like eight dollars. You'Re gon na need this micro link tool. So it's a it looks like a wand which mine is pretty destroyed, my dog to the bottom. So i need a new one, but it looks like a wand and then it has this little loop up here and then obviously you'll need your hair extensions. So first things: first, i am going to um, i'm just going to place the beads on here and i just put them around and then you push them down that way. You have a little thing, a beads like this. So let's get started, okay, guys. Hopefully that is brighter, i need it to um, make it brighter. So i put a light right here anyways, so you want to part off a row of your hair starting off and you can do rows like this or you can kind of put it at a little slant which is kind of what i do that way. The hair falls kind of like toward my face, so it's not a huge slant, but it is a slant nonetheless, and then i'm going to take my you can either take one row of hair which is fairly thin if you can see it. So i like to take two first: you want to make sure that it's a good distance and that it measures good. You want to also leave a little bit of hair in the front to cover it in case you decide to put it up. So this is a pretty good size, so i'm going to go ahead and move forward. Okay, now we're going to clip this just so we can have it attached now. I'M gon na take a little piece of this top track and also a little piece of the bottom and i'm going to combine them together. The next thing i'm going to do is i'm going to grab a piece of my hair right where this place is or right where it ends, i'm going to grab a piece, a small little piece of my hair, and it could be above it. It could be beneath it, it works well if it's beside it so now i have all three of these pieces connected. I have my hair and then i have the two pieces from this and i'm gon na hold these together. This is where our tool comes in, so i'm gon na take the opening, and i'm going to put this in between in between that opening. So it looks like this like the hair is hanging now. What i do is i push up the bead and i push it all the way up so that it almost comes over the hair, and i pull my tool. If you can't pull it. Sometimes you just pull the hair, but ideally you can pull the tool out. So now the bead you can see the b is looped on all three strands, and then i normally just take this and i push it up to the root, and this is where we want to take our pliers and we want to just clamp that down. So now you have your hair and the two pieces from the hair extension all looped on here. So this is how i do the end and the beginning. I'M gon na show you guys how i do the two middle beads, because it's a bit different. So for the middle i go over, maybe like about a centimeter, and i part where i want to place my next bead. So i'm choosing to place it right here now. What i'm gon na do is i'm gon na take a little bit of hair below that part, so i'm gon na get a little bit of my hair below it. So this is my hair and this is below both tracks and it's in the same line as where i parted it, and then i'm going to take a little bit of hair right above it, and so now i have almost like a sandwich going on. I have my hair, i have the track and then i have another piece of my hair and i'm going to just sandwich this together, i'm not using any of my hair extensions and so i'm going to again go open. It pull the hair through and then take the bead and i'm going to push the bead up over the hair and then i'm just going to pull this through like this and then i move the bead up so that it's pretty tight, not too tight. Because, again, you want to be able to flip the flip the track over, but i'm going to pull it tight enough to where it's up there and secure, and then i'm going to clamp that bead together that way, it's it's on there, i'm going to do another Middle section on this row and then i'm going to do the front, so i'm gon na part it right here and i am going to pushing it up pulling and then move the bead on up. So you can run into the dilemma if you uh, measured it a little too loosely, which i would say that i did, and so as a result, you can see where my track ends is almost right at my hairline, which to me is a little bit too Long so i'm gon na go ahead and snip the very end. Okay. So now we are on the end piece again and remember with the end piece, we take a piece of the top track, a piece of the bottom track and then a piece of our hair and i'm going to pull from up here. That way, it kind of connects like this. If i were to pull it right here, it would be too close again to my hairline only only leaving this out. So i'm going to pull a piece right here and you guys will notice it once you start to do it yourself, you'll notice, um, where on your hairline, you want to stop it. So now that i have these three pieces, i'm going to loop, this take one bead move, it move it on, and this is what happens. I can't really pull it. So i'm just going to pull my pull the hair strands. When that happens, it normally means that i took too much hair and as a result, it doesn't really want to push through, but you can push it through or you could just take less hair. So now i'm going to move it on up and the way that i move it on up as i pull my hair, because that pulls it closer to the surface and i'm going to take my clip and i'm going to push it on down and clip it. So this is our first row and this is pretty much on there. This is how my first row looks. I have one two three four beads and it's pretty it's on there tight. If i want to flip it up, i can flip it up. So now i'm going to go in and add um two more rows on this side and then do three rows on the other side: big laughs, laughs. Oh, oh down! Okay! So i just finished up my last row on this side and what i did, i'm not gon na straighten it because um i'm going to put some wand curls in it, because i do like the natural texture of this um indian hair. So i do like to uh put some wand curls and tidy it up. I will end up filming like a video on how i do my wand curls, so just be on the lookout for that. So, as you can see, it's like super flat um, the micro links are extremely flat. You can put it up if you want to, even though it is extremely tight at the moment, i can put it up in a ponytail if i want to - and i do like to go in even before i straighten it just to kind of trim. My hair. Okay, so this is the finish look and i can flip it over on this side. If i want to again my hair is currently straight, so i am going to go in and put wands in it, but that is the finish uh process again. Microlinks is a good way to add in volume and link to your hair without the tension of braids and the way that i did, it was again with the bead only i have done the threads before or the one where you thread it with actual needle and Thread and it works just as good. I just prefer this way, because i take them out when i wash my hair, so it's easier for me to put them in and take them out. So i thank you guys for watching this video. Hopefully it was helpful if it was leave a thumbs up for me, and i will see you guys in my next video

Comments
Enjolie L: The tack sis
lovmilife: Gwen you made me realize I can feel beautiful again on a budget! Seriously!!! Girl, after all this pandemic, I thought my weave days were over until you arrived!! You are a complete angel and a sincere blessing! I am going out to get some extensions and microlinks today!!
Aleca Piper: my jaw dropped at this hack! Half and half is the way to go when you do it on yourself! genius!!!! <3
misstownes: Thank you for helping us. The price on this hairstyle in Atlanta is outrageous! I knew there had to be a way I could do this myself.
MomDiva ,: Ingenious!!!! I’m hollering over here, this is so good. Thanks a bunch for this hack. Looks great.
nicole78209: Love it!!! You just gave me the confidence and assurance that I can do micro links myself
Mane_Jewel by Breelikemee: I love that you did this on your own. I plan on doing the same on my hair and was very nervous because you don’t see many doing this type style on their own. Thank you for the added confidence I’ll need to get the job done. Great work darling
Ella: Great! I don’t have a huge amount of budget since I’m jobless so I only have really cheap extensions laying around and I don’t want to put them in everyday so this video is a lifesaver!
TheRoyaltyStar: Genius! I was actually thinking about to use it without the thread & needles , you showed me it’s possible! Thank you sis
Lola anibaba: Yyeeessss thanks soooo much this is the perfect tutorial. I’m trying this today. Your a life saver. How is the maintenance afterwards and how long does it last
clipinqueen: Awesome job. Thanks for showing it done closeup! I want to try this near my middle part. You have given me inspiration.
Tawana BeautyBelief: Great tutorial! Thanks for sharing! How long do you keep your microlinks in?
Slay by Rae: This is the best explanation I've seen of this method
Africa Cupcake: Thank you for sharing this I love doing my own micro links but hated using the thread this method is the best method on Earth
Miguel Sanabria Arroyo: Beautiful hairstyles blessings ☺️
E.C. Does It: Do you have a link for the hair you use? I’m natural and getting links and love how yours blend!
jus Londa: How many bundles of hair do you typically use?
Tiffany R.: So do you only do the ends with your hair and the track hair and then the middle pieces just your hair sandwiching the track?
KeeponlivingintruthKeeplivingintruth Truth: Good job. I don't know if I have that type of time but overall good job.
Kree Norwood: That was a great video!!! New Subscriber
Tiffany Ray: Wow!! Wow!! Wow!!! Thanks for this.
sty ns: You are incredible!
Taliyah Hudson: Do you have links to the items you used? I googled and went on amazon but with reviews being iffy I would rather use The same exact items you used
4theloveofJessica: Great job
YelenaStylz: As a Microlink stylist I would just like to say that you are doing the middle pieces wrong. You don’t take hair below and above the track. But if this works for you with no breakage, hey to each is own
Jade Thv: Can we do several different hairstyles with?
Delilah Jilian: I like your hair curly:)
Taliyah Hudson: Saved my life!!!
Hellena Kara: Did you color the hair yourself?
Rhetta Mcbride: Very interesting
Jhas: Omfg if you aren’t the smartest most creative. I have to try this
Paige Joyner: Those things are slowly pulling your hair out if you notice the parts on your head are wider and wider each time you do it