Loc Extension Tutorial (Crochet Method)
- Posted on 23 May, 2020
- Microlink Hair Extensions
- By Anonymous
This is the process of installing Loc Extensions. Lock Extensions can take 6-8 hours to install, clients must have natural hair (at least 3 inches), and a micro crochet tool (0.5mm) is used to install.
Website: www.theknottyspot.com
To purchase my Loc Tools (Needles): https://theknottyspot.com/shop/ols/pro...
Products: https://naturalhair.org/collections/bl...
For Loc Extension & Instant Loc booking: www.theknottyspot.com
For the latest updates, styles, & techniques checkout my social:
Twitter: @theknottyspot
Instagram: @theknottyspot
Facebook: https://m.facebook.com/theknottyspot
For business inquiries: [email protected]
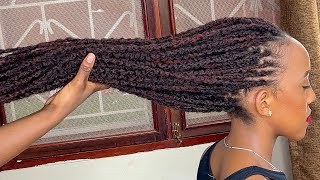
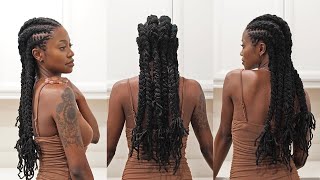
[ Applause, ] hi guys our client today will be receiving the LOC extensions. Her hair is about 3 inches and pre lightened about 2 inches away from the roots. As you can see in the top, she has some heat damage from a leave out with a sew-in, but what we are going to do in the technique, we're going to use isn't going to be a problem. These are the locks that I'll be using in her hair. Today they are 0.8 centimeters around I'd, say about the size of a sharpie marker. They are 12 inches in length. The color is a natural virgin color, but with this client today to get as close as possible to the color that she currently has I'm going to lighten the bundle with this next step to help me move faster in my process, I am sectioning her hair. I prefer to do uniformed parts in a bricklayer pattern, so I start parting, my rows from the back. I know everyone's parting technique is different. You can do this in C parts diamond parts, I've even seen rectangular parts or just free parting. My personal preference is to do the bricklayer pattern, mainly because I like the way that the hair Falls and with a grid pattern styles or more versatile. You can do more define styles, that most people with free parts wouldn't be able to do another important point to parting everything out, so that your client can get a good look at the parts, because, once these lots are installed, it'll be rather difficult to take them Out and repart everything so doing this step is very important. I don't like to say that you know, even though people consider these to be permanent, LOC extensions. Nothing in life is truly permanent, but the point that I'm making is that it can be quite difficult to take these locks out and repart everything. So this step right here is by a very vital foundation, is very, very important. So now that you have everything parted out, let your client take a look at it. My client saw the partings and she's very happy with it. The longer the clients hair is the the more of the end you can leave out. As you can see here in the top, I was still able to coil the parts of her hair that was heat damaged. Now we're ready to begin the installation process here, I'm going to comb out the section only because her hair is shorter than most clients that have longer hair. So I combed this section out just so. I can have more hair available to attach the extension here. I have pre lightened the extensions to get as close as possible to the color that she has lightened with her hair. So our next step is going to be installing what you're going to do is open up or loosen up the loose hair at the top of the extensions and line it up with your clients, hair, I prefer to kind of butterfly or wing the hair over my Clients here before crocheting here, I'm going to try my best to get the best demonstration of how to attach a LOC extension by crocheting. So please bear with me so you're going to hold the hair in place and you're going to move in and out. The needle should always be facing you notice how I am pushing and pulling the needle in and out in, between my thumb and my forefinger of my left hand, and every time that I pull out. I am catching hairs and I'm not letting those hairs go with the needle and then rotating the lock in between my thumb and my forefinger as I push the needle back in and out in and out, but every time I pull my needle out. I am catching here and I'm not letting that hair go with my needle and as I rotate and I pushed the needle back in I'm just slowly, tangling hair on the inside of the lock and pretty much that's how you create a nodding on the inside and That'S what holds the extension and the clients hair together, and this should not come out if it is done properly. So another point that I realized I forgot to make is that I used the double crochet hook only because it's easier for me to move faster and more safely without injuring myself, but you can also install with a single point. I feel like a lot of times. I'M more likely to injure a puncture myself, because these needles are very sharp with the single point, but I usually use it after using the double headed crochet hook, just to get a make sure I'm getting everything in much tighter. Sometimes you don't have to, but it is my personal preference. So that's what I'm doing right now and I'm going in with a single point behind the double crochet hook, just to make sure I get the inside, not it much tighter. Another thing I like to do is I like to pinch and make sure there are no hollow spots, and I like to give them a tug, of course, not hard enough to hurt, hurt or make your clan uncomfortable. But I do like to give them a tug to make sure that they are secure. Now that you have your first row installed. Just take a good look at that row. Go over any locks if you need to and just continue to work your way up, step and repeat, repeat and just continue to do the same process for each section. You now you've completed a full head of LOC extensions. Let your client take a look at them and the next step will be styling. Some for some stylists. Just installation can be enough. It is a very long and tedious process, but it is so beautiful once you're finished, I could never let a client leave without twisting the roots and giving a hair style. As you can see, my client is really feeling herself right here. So let this be your moment to get in plenty of pictures that your client takes them selfies and just have fun right here, I'm just going in and twisting her roots and then once I finished, this process will begin the style, which only takes a few minutes. So this is the fun part for me, and here is the finished product. Everything is very polished, neat and ready for you to style. I know. Sometimes extensions can be kind of stiff when you're, when you're first putting them in but as time goes by and you're, maintaining them more and a while they get washed and conditioned they become softer more pliable. But with this method it looks most realistic, the style I'm giving her right now, our rope twist and I'm gon na style these rope twists. I consider this down a two or three in one type style, because she can always take the style down and she can wear just the rope twist and then she could take the rope twist out and wear a curly or crinkled look. So it's very, very versatile. She'Ll have a lot of options with this type of style. I am just so happy with how this came out. The color, the size of the locks, everything and my client was also very happy with the results. Thank you guys so much for tuning in to my channel, and I expect to have more tutorials coming soon.


Comments
ardentgailla: "They always act up when it's done..." Girl, so would I! Those were done beautifully and I'm sure she appreciated such a fine job.
Juliet Jones: Everything about this video gets 10's across the board for me: you jumped right into instruction, your voice is very soothing, and your explanation was easy to understand. I'm hooked - pun intended! Also, I was JUST researching different loc retwist gels and creams and I caught a glimpse of that Loc N on your backbar which is one of the brands I read so much about. Now I know which product to go with. Thank you.
Flvcko Veli ⚡️🥶: Mad I just found this video after I just fixed my thinning locs today . You’re the second person who actually gave a demonstration that explained it and made it useable
Geraldine Copeland Blackwood: Sweet Jesus I didn't know that this could happen ! I'm soooooo glad that I found this channel cause I just cut my 14 yrs locks and missing soooooo much . I have the locks in a box . I'm surely going to do this . Thanks soooooo much.
Lonnett Johnson: Outstanding. Your explanation of the process is on point and your zoom is on fleek. Like my daughter says to me. Lol Thanks I'm going to practice at home on a doll baby. Stay safe and blessed. It looks great
WWambition: Thank you for this video. After two years, I reattached my original locs that are 8 years old. It’s nice to see the process from your pov. I was half sleep getting mine done lol
C Garner: Hands down, the best tutorial on this subject!! I’m wanting this style done and you made it look SO easy!!
DeShantelle Perry: I wish that I can find someone in my area to install the locs that I cut out using the crochet needle method. Her hair looks amazing.
Valencia Patman: Very beautiful!!! I love the way that you explained and demonstrated adding the loc extensions. Thank you for sharing
Original Storm: Let me just say....you did that! thank you for this.....would have to try and do it myself since it's so much to pay and do. You made it look really doable
Taylor Maade at Home: Please continue these type of videos you did a great job!!!
vanessa shaw: Thank you for posting this. The end results are so beautiful. For some reason it gave me a nice warm feeling just watching your hands move through the process. All I could think about were all those other hands through all those centuries of Black women (and men) braiding and twisting and lovingly doing our hair. As a child I remember benefiting from tha love. Torturous though it may have been. Old folks used to say that you could tell if a child was being properly cared for by looking at their hair. All those little parts...plaits...bows and hair pins meant that someone took the time...patience to make sure that child could leave home with their heads held high. I am glad to see it is the one tradition that we have retained from our ancestors. Through braids...hot combs...perms ...weaves and wigs and now back to our roots. It’s been one hell of a ride. Bravo, baby girl! Bravo!
Rabiia Utsey: Thank you so much very detailed! I've been searching for a tutorial like this for months and none as detailed I finally feel like I can try this now!
Annastecia Salmon: OMG this is absolutely amazing. It look like she grew it, OMG skill advancement. I hope my stylist could do this for me.
Ky & Kae: How many locs did you use ?
Laini D: Thank you so much for clearly showing the crochet process!!! This video was super helpful!
Vasha Vasha: This was extremely helpful for me thank you so much Queen
Sonia Williams: This was beautiful. Lots of stylist just show a piece they don’t show step by step. God bless you ,
vmay84: This was done very neat and professionally. I have learned a lot from watching this. Now to find where I can get the loc extensions and how to maintain them. Thank you!
Jojo Ma: This is gorgeous! I would love to do this omg just GORGEOUS
RaEbony: You explained this VERY well. Thank you so much. Sending love, money and success to you!
Novuyo Duba: Thank you , your tutorial is clear and very informative
TheMelvin742: Beautiful work, please keep them videos coming as you will grow a lot more!
Family Matters: By far the best and most clearly demonstrated and explained video for loc extensions. Thank you ❤️
kiwi: Beautiful color. The loc color was spot on too! Just gorgeous
Walking With The Most High GOD: Best video i have seen so far on the interlocking of extensions. Well done and thank you.
Nikeita Izard: Very beautiful. This was one of the best ones I've seen on here. It was clear! Thank you.
HairBy Shine: Beautiful Love it thank you for sharing
Dana Alana Arynn Donald: This is exactly what I want!! ✨✨
Springtime Mind: You did a beautiful job. The tutorial was also very understandable.
Nyeja Nyeja: Thank you for this detailed tutorial !!
ANFONIE B: Best demonstration (perfect close up) awesome job!
Veronica Mcleod: You did an amazing job!
Feels Mitchell: Thank you soooo much! I have been tryna figure this technique out...You did an awesome job explaining....
Kena Vance: Great job! Very informative
fashionwithoutlabels: I want to experience the entire loc journey with my real hair. But as much as I love color and blonde, I can see the benefit of using the fake hair to bleach instead of damaging my real hair. Great clear instructions and demo!
pink harris: You can also use this same process to lock your hair, when starting your dread journey
The Zakia Show: “ nothing in life is truly permanent” damnnnn we all felt that .
celloconbrio: ABSOLUTE BEST !!! Loc instructional video that I have come across. Wonderful detail and great filming. Thank you.
Demi Bell: Absolutely beautiful!!
Jayme W: thank you so much for this video! i’m looking to start doing locs on people and this was very helpful
Kay Foster: Beautiful work. I have a question for you! If your client hair was longer would you still crochet the ends of the hair? Or bring it as close to the root as you can and crochet down the loc with the longer hair? I hope that made sense lol
Vanessa M-L: Looking forward to new tutorials, I feel like you taught me. I just need to figure out what needle size I need.
Christopher Lincoln: The color and everything is beautiful keep up the good work.
Kenya Allen: So informative and very beautiful!!
elicente: Wow! They are so beautiful
TaraTelling TV: Beautiful! Blessings
NaturalDiamond: New subbie here! I love the knotty spot! Very informative videos! ♥️♥️
Rhonda Thornton: Beautifully DONE♥️♥️♥️I would love to see a video on how to take them out, especially with your use of that double crochet needle to install
The Enochs: New subscriber here ◀️ I really learned something that I didn’t understand but your video was very helpful. Look forward to seeing more
Grace Lee: This was a perfect video. Thank you!!!
Stand For Something Positive: Awesome detailed video! Thank you!
shakeerah: You did a phenomenal job
Andrie Dee: Thank you so much I plan on locking my natural hair and I don't want to face the ugly short dread stage lol Also my son cut HIS dreads few months ago and he already misses them, we kept them in a bag so I will reinstall them lol I'm very happy with this video thanks again.
Tonie J Beauty: Amazing tutorial!
Natasha Hubbard: Would love to attend a hands on class when offered jud saying very great tutorial✨looking forward to more
Shellie Reilley: These look amazing ❤️
Honeydread: Thank you for a very informative video!
True Vibezonly: Thank you for actually showing us
Devon Richmond: I love your work.....you are also a very considerate person, cheers!❤❤❤
Sammiejo Hill: Gorgeous!❤
Baadquality_: Those were beautifully done
MANLIKESHAKE: It looks so amazing
Naturally Bria: Thank you for a great video & details!! Now I’m thinking of trying to install them myself. Wish me luck lol!
Jermaine Hernández: This...Is Amazing!!!! OMG! I Love How U Do Hair..❤
Ariel Bowens: Wow! She looks amazing.
OKUDO OGHENEROBO: This is first time am seeing a very detailed dread making... Weldone Ma,love it
Jessica Johnson: Looks amazing !!!
Akua Nyamekye: Fantastic job (the best out there) on showing the process, and the work itself. Have you tried wearing a thimble on the opposite index finger?
Josalia Hayes: Thank you for this video omg! No one shows this like you did
cexs: Wow this came out perfect!!! I love it Just curious what the name of the tool your using? I like that it’s a two for 1
A R: Awesome job. Thank you so much.
DANA williams: That’s so pretty
Stephanie Hall: this is beautiful!
Gabrielle Ivie: I would just do something like this as a way to transition into all natural locs to avoid the ugly stage aka short stage
Amelia Phoenix: Great video. Most helpful one I’ve seen.
st.best 89: You did such great job.
Sarah Stone: You did a great job with this video and you weren’t long winded beautiful job…
Gina W: Beautiful!
Thspecial Th: THIS IS SOO BEAUTIFUL, I NEED MY HAIR TO BE DONE LIKE THAT. IM IN CANADA .
Volupess: Nicely done! How do you deal with the frizz on permanent loc extensions?
c1peewee: Beautiful hands .. they need to know that if they don’t feed their scalp they will have breakages.. locs is no joke being natural is no different from weaves we have to take care of our hair , especially our bodysuits
Janae Jones: You did a wonderful job and your client is beautiful. I use to hate my hair growing up most likely bc I grew up as the only black girl in my school at times however we can do so many wonderful things with our hair. I regret I ever thought like that. Anyway bravo. Black women are just so beautiful and talented and artistic. ❤️
OldSoul: You r so clever.. this was amazing❤ .you ha've the craft hands
Girlie K: Beautiful!
Driven G: Beauuuuutiful!!!!!! Exceptional work
Chem Sigma: This tutorial just made me $250 last night! I love you for that! My results were impressive! i, myself, couldn't believe how tight and secure this method was! I'm ready to do more of this!
Kim Holmes: Hi, beautiful work!! I was wondering where you found your crochet needle?
rasheika brown: Beautiful work
tee smith: your method seems very simple. love it
Adrian Green: Love it
Mrs Williams: I love them u did a great job
Karen Carter: Thank you so much for this video!
RILLA MAN: That’s dope. I’m planning on growing mine back it’s been years since I’ve had them, but I still miss them . I have a LONG ways to go before I could even get my hair twisted. Maybe January, or February. I have a waves right now♂️.
Nia Nia: After a year of chemotherapy my hair is growing back and I’m reattaching my locs. This was so helpful
Queen Mia: Wow! Very creative! You did an AMAZING job!!!
Certi Bantz: I always wondered how this was done. Nice
Karmesha Mason: Beautiful installation
Chuck Jacobs: AMAZING.. I LOVE THAT COLOR
The Locssmith: You have no idea how much you helped me with y first loc extension install