Detailed Hybrid Hair Extensions Installation By Dreamcatchers Head Educator Dorothy
- Posted on 16 September, 2020
- Microlink Hair Extensions
- By Anonymous
In this beautiful transformation, you will see all the steps for a complete hybrid installation (including both I-tip and Tape hair extensions) and also learn a few tips for easier application and better blending. Enjoy!
Become DreamCatchers Certified Stylist: https://bit.ly/34Vp6ZQ
Find a DreamCatchers Salon: https://bit.ly/34KPpSJ
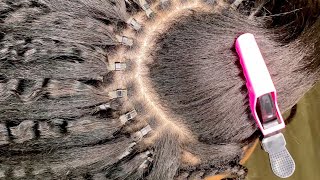
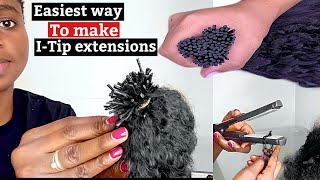
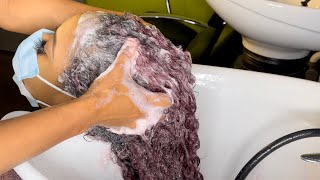
Hey everyone today, i'm here with my model yenni and i'm going through her color matching as i'm going through, i'm taking my dc swatch and you want to break it down to the size of a cylinder or the distribution weight that a tape might have. So, as i take my hair swatch right through here, you want to check the dimension. That'S on the underneath, as it could be different than what's on top. So what i'm doing is i'm pulling out her underneath hair, i'm spreading it out and then i'm also doing the same thing with the swatch as i go through, you want to lose the swatch within her natural hair and that will help define exactly what shades you Might choose when you're doing your install for your client. I will be purple shampooing yenni's hair just before install, because her hair is a little bit warmer than what some of the extensions are. So i'm going to shampoo blow dry hair with purple shampoo and then i'm going to start my full install of our application. So what i'm doing right now is on yenni's hair she's got more of a square blunt shape for her natural haircut, so with extensions you're. Putting in a vertical shape so if they already have an existing horizontal shape, it doesn't blend very well so without taking any length off of her natural hair, i'm just going to diffuse her ends. It'S called carving so typically when you're cutting hair with a razor you'll. Generally, go on top. You don't want to do that when you're about to put extensions in because all that's going to do is create more layering, which could add more problems in the end. So what you're going to do is you're going to grab the hair you're going to have firm tension on it. You'Re going to take your feather razor and you're, going to go from the underneath you're going to use little seam motions to take out some density and release that structure that's put in down at the bottom. So when i take this, the higher you go up the more weight removal you're going to get the lower. You are the less weight removal you're going to receive. So as i go through, i'm going to go up about two to three inches from her length and just put a little bit of pressure on the underneath and you'll start to see that weight removal come out from the underneath and the back. But it doesn't remove the length that she initially has. So as i do this, i'm going to just start from the nape working my way up until i, like the amount of d construction that i did down at the bottom from her previous natural haircut, you want to try not to elevate too much as you're going Through you want it to be very low, where her hair naturally is going to sit so very little elevation as you're going through within that haircut. So on my model yenni today, i'm going to be doing a hybrid application. So what that means is i'm going to be using both tape, ins and eye tip to give her maximum density? So what i'm doing is i'm starting down on the nape section? I have a horizontal section because i'm going to be putting tapes down in the nape. So since i just freshly washed her hair, she has a little bit of flyaways. So what i have is the dreamcatcher velcro tape, which is going to help tape down and take away those flyaways for a clean, precise application. So what you want to do is you want to clip up the hair? So it's mostly out of your way, but sometimes there's still going to be those little flyaways, so how you use this, is you want to put it down at the bottom of your section, you're going to place it and then you're going to pull it upwards? Just a little bit and press it in that way, it makes it nice and neat very precise down at the bottom of your section. So i've now completed my first section of my tape, ins, i'm on the second row of my tape and extensions right here. You see, i have a horizontal line. You always want to work with horizontal lines with tape ins, because the tape is also horizontal. It keeps the even weight distribution, especially as it grows out. If you put it tilted or diagonal, you could have more strain or pressure on certain areas of the head. You like to keep it consistent as you're going. So what i'm going to do is i'm going to show you how to put in one of the tape extensions. You want to take a tail comb here and you want to do a small slice of hair. You want it to be no bigger or thicker than the extension you're putting in you then want to dwindle down the size to the same width of the extension that you're going to be installing. Sometimes you can use different combs to adjust your width this way to make sure that you're putting enough hair in but not too much make sure you don't have any cross hairs as you're going through holding nice firm tension and not high elevation so holding this hair. I'M going to grab my extension when you're grabbing your tape in you want to try your best not to put your fingers on top of the tape as your fingers do contain oils, especially if you put anything on your client's hair, so i'm going to grab it. Just below the tape, i'm going to just slightly lift my hair up, i'm placing the hair right at the section, not above or below so directly, at the line that i created my section and then you pull down the hair to create that tension and the hair Will stick to the tape. You can then take your tail comb and press it onto to ensure that all of the hair is stuck. You don't want to take your fingers and do it because again your fingers contain oil. One thing you will notice is: i do have little areas on the side of my tab that do not have hair to it. That hair is creating a diffusion in between the two tapes sticking together, so by leaving a little bit of this excess right here. That has no hair to it. It'S going to ensure that your tapes stick completely together and increasing your longevity. As i grab my next tape in i'm going to grab it and you want to make it the exact same flush as your last one once you've placed it directly on top, you can then grab it and press it down. You don't have to add any heat or anything like that. Enough of your fingers is going to be the amount of heat that you need, and now you can see the tape end is installed a little bit away from the scalp to where i still have some movement so now row two of my tapestones is completed as You see, i have a full size tape in right here in the middle, but on the two sides i didn't have enough space to completely add a full tape in here. You always want to leave space on the edges so that, as your client wears their hair back, they don't see any tape, ins or any extensions perium. So what you'll see is, i have my full one here and then what i've done for these side sections is. I'Ve cut the tape in half because we do have a double mesh netting on the dreamcatcher tapes. So, as you cut it, it's not going to create any shedding so that double mesh netting is keeping it connected to where i can create smaller tape ends or still use. My large tape in on my first row here i place two full tapes right here as you're doing your tape and extensions. You always want to bricklay, so i cannot have my exact same tape in the same area. So right here, where my fingers are, is where the underneath my row number one tapes are and then so my row number two i've placed three extensions or two technically one cut in half right above it, but i've brick laid it to create that even density. All the way through as you're looking where her natural hair stops here and then her extensions continue when you're working with your velcro strips to remove them, you always want to go with the grain of the hair. So if you just stick your finger underneath and go upwards because that's how i've clipped the hair, so i'm just going to take it and i'm just going to peel it up and then it comes right off. So now i'm on my third row. I'M about to add my eye tips into here. So when you get your dream, catcher's eye tips, you're going to have this silver binding on here. We do always recommend, because this is 100 human hair. Sometimes it will have a slight tone difference than these swatches. You may have ordered so we always recommend before you take the silver binding off to double check the tonality that you're working with to ensure it's exactly what you need, if it's not the exact tone that you wanted or needed, go ahead and just roll this back Up put it into the baggie and we can exchange it for you for your ideal color result, but with my model yenni, you can see that i am overpowering what she has through here. She has that depth in up here at the top and we're creating that lighter dimension, something kind of like a balayage down through her extensions. So, as you see here, my extensions do not match her natural hair. I am overpowering it giving her that lightness, but what does match my natural hair is going to be the cylinders. We have those six different colors and you want to always match your cylinder color to the regrowth color, so that you don't have any of it. When the wind may blow or they move their hair whatsoever, so match your cylinder color to her natural. So i've got my black full point, cylinders here and then i do have my dc4 right through here. Creating that highlighted dimension through the back. As you see i'm about halfway through installing my first row in the back with my eye tips, you can see that i have more of a quote-unquote creative application of my colors, i'm working with the two different colors omo, which is an ombre and then dc4, which Is a medium to dark blonde, so, as you see, i wanted to create an a balayage type of effect, but i am using more of that dark towards the back and the underneath and as i go towards the face, i am going to start a little bit. Lighter when you're looking at my application here, you can see that it is a little bit more difficult to see the cylinders, which is your ideal situation, because you want the cylinders to match that natural hair. So if anything, it looks like maybe a shadow or a dark regrowth. If they do get seen what you will also notice. Is you don't see the tip of my extension outside of my cylinder? You want to always make sure that the tip of your cylinder is just flush with the top of it, so that the top is not coming out breaking down that hair as you're wearing and using the extensions over the six to eight weeks or, however long you Wear it up to a year year and a half, you will also notice. All of my cylinders are side by side no natural hair in between with doing that is you're going to create that maximum density, not allowing that natural hair to diffuse through, as i go up i'll explain when i start adding space in between my cylinders, which we Consider a layering row which is going to allow that natural to come back through because you're working up towards the head here, i'm still creating that density, trying to create a new look. A new outline for my client, so you'll see side by side. No natural hair in between the tip of my extension is not outside of my cylinder and also the width of my section is the exact same size as your cylinder. You don't want to have triangles or over direction or elevation coming through. You need to have zero degree, elevation, laying nice and flush with the client's natural hair, and i'm not pulling anything from a different direction. It'S going straight down just like it naturally would so as it grows. It'S just going to go down you're not going to create any new growth patterns by creating triangles and over direction. So i've just completed row number three, which had the tape ends on the sides and the eye tips in the back. So now, as i'm going up towards the head, i'm transitioning out of tapes, because i want to create that natural movement so on row, number four, i'm still horizontal on the side horseshoe in the back. But this row is going to be entirely all eye tips to give that maximum movement as i'm going up towards the head so on yeni, i'm just about finished with her fourth row. So when you look at row number three, it's my tape. You can see that i'm one to two fingers away from her front hairline to ensure that when she pulls her hair back you're not going to see it. So, as i'm working on row number four, i'm going to use that exact same area going alongside her tape. Ins to ensure that i'm staying away from that front hairline so that when she has that movement you're not seeing her extensions, especially because we are adding a little bit lighter around the face to give her that sun-kissed look around the face. So here is row number four just about finished all the way through you can see on this other side. Here i've stopped one to two fingers away from the face allowing that movement as she pulls her hair backwards. So i've now completed row number four and you will notice that there's a lot more lightness now on this top row from our previous rows. The reason i'm doing this is because again we want that sun kissed type of balayage look, so i created that depth in the back here. As you can see see, we still have this omo ombre right through here, but then i have my dc7 right through here. So there's a large transition, but slowly transitioning through those different colors. I have four different dc colors going throughout that transition, keeping it darker in the back getting lighter towards the front and then also on these underneath rows again creating that depth underneath here. So i do know that she likes to kind of curl and style her hair, a lot so within having that movement from the curls. It'S going to give that dimension so having the darkness here and then always lighter and brighter right around the face. So now i finished row number five. You will notice a little difference in the back here. I have created a cylinder space in between my hair. What this does is it allows the natural hair to migrate through the extensions instead of the extensions over powering. The last couple of rows: i've done side by side, no natural hair in between, because i want the extensions to overpower her natural because i'm trying to create a new result. But with this one, i'm transitioning out because i'm at the top of her head, you never want to put extensions through the crown. The crown is where the hair distributes evenly throughout the head. So it's going to get a little bit more sparse up towards the top. So you want to create more space here, allowing that natural hair to migrate through. So it does look natural again. Our results trying to be no extensions, even though she's got a full head as you're looking through the sides. Here, you will notice. I still have been side by side. No natural hair in between the reason for this is everybody, is a little bit more fragile and a little bit more thin on the sides, because the hairline pops up through here, whereas in the back the hairline, drops down a lot further. So on the sides, you still always need to do that building. So i stayed side by side, no natural hair in between so here horizontal still side by side building in the back. I'M a horseshoe shape going with the rounds of the head and i space it out to allow that natural to fall through and then again transitioning over to the other side side by side. Staying away from that front, hairline you'll see she has a very nice blonde. Balayage type of effect, we're gon na go, do the styling next, so now i've completed her install. So what i'm going to be doing is i'm going to be cutting the extensions. You always want to cut the extensions, because you want them to have that natural movement. Just like your natural hair would so there's going to be a transition where her natural hair stops, which is right through here and then her extensions start and continue down to where her length is, even though her extensions and her natural hair are really meshing together. Nicely you want to create that movement because there's her ends right here and then it's just stick straight all the way down. So i'm really going to be creating that movement down through here to ensure that the natural hair blends, exactly with the extensions. So, as i'm determining what i want to do for my haircut with my client, you want to go over the length because this length goes all the way down to her lower back and that might not always be suitable. So determining what length is going to be ideal for her, we put the dc 20 inches in on her, so i am just going to be taking off the tip right through here to even out and give that density right in that outline through here. So a couple of things you want to take into consideration most of the time you want to work with a feather razor. The reason being is, the extensions are technically little clumps of hair, whether they're distributed horizontally or distributed vertically, so it is going to be a little bit heavier than what your natural hair would. So, if you're using a feather razor, it's going to give that automatic feathered end and that kind of shattered look just like your natural hair would versus. If you use a scissor, it's going to be too blunt, especially if you cut it typically how you would with a regular shear, you can use scissors and shears and slide cut down the hair. That'S not wrong! It'S just a different way of doing it. I always prefer to use a feather razor. It'S going to get me my end result a lot quicker and a little bit easier. So in the back, i've established her length and then i went through the front and where her natural hair stopped. I then did some face framing around the face, so then, once you've done this in the back and then you've cut that off of the front on the side here, you're going to have a corner and a large peak of weight. So, to make it look the most natural what you want to do is grab from the center back of the head and then from the front of the face, where you did your face: framing and you're going to see a corner and a peak of weight. So to relieve this peak of weight and make it look the most natural what you do is you're going to hold it with that low elevation, using your feather razor walking around the client's, shoulder rounding off that corner to give it more of a uv type of Look versus a heavy end result. So now you go through here and you're going to have a softer huge, so we've already finished the straight end result that we were working on so now. What i'm doing is i'm throwing in some beachy waves into her hair, to show you guys the dimension that you can receive, because again we used five different colors within working on her hair extensions, her hybrid application so really giving those curls and the placement that we Did is really going to show off the amount of color that she has in her hair. You
Comments
Infinite Beauty: ❤️❤️❤️
Sallie Hawod: ❣️❣️❣️❣️