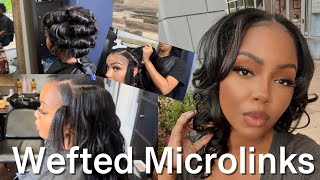
Micro Links On Natural Hair- Step By Step
- Posted on 23 March, 2022
- Microlink Hair Extensions
- By Anonymous
Sharing how I use micro links as a low maintenance hairstyle on my natural hair
#mircolink #naturalhair #naturalhairmicrolinks
Timestamp
0:00 Intro
0:32 Disclaimer
02:34 Tools
02:30 Install
08:49 Closeup Install
09:48 Finishing Install
16:15 Redo Links
16:48 Final Outcome
Products mentioned may include affiliate links
Micro Link tools: https://amzn.to/3u3WN6L
Aliexpress hair: 24" Clipins: https://www.aliexpress.com/item/328087...
Amazon Kinky bundles: https://amzn.to/3qcPJ6AAmazon
Thanks so much for watching!
INSTAGRAM: ThisisZipporah
For Inquiries: [email protected]
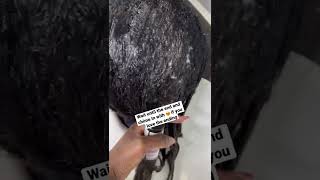
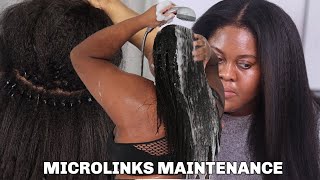
So here is the finished product. Hey guys, welcome to my channel. This is your first time being here. Welcome! Welcome if you've been here before, welcome back it's good to see you. My name is sephora, and this is my channel. This is zapporo, so today i thought i'd do something a little different and i want to share how i put micro links in my hair. So let me just put a little disclaimer. I am not an expert um. I'Ve done this about three to four times. Three. Four or five times one of those, this is something i really like to do just to add some length to my hair, and so i would do this every once in a while when i just get tired of wearing wigs, and i want to wear my hair Long without having to wear wigs or to have um to have weave in my hair and to have my hair braided up and dealing with that, so this kind of gives me more of like freedom in my hair. I'M able to do different styles with my hair with this in my hair and it just i don't know it's just more freeing having my hair out along with the microwaves in my hair, so yeah. So i'm going to be walking you through how i do it. I am not professional mine is me. This has not that i've seen damaged my hair, but again you can work with professional. If you are too scared to do it on your own again, i'm just sharing my technique and what i've been doing and y'all know. I like to keep it easy, i like to keep it simple. So that's what we gon na do and if you want to know how i did these heatless curls, because, as you guys know, i only like to put hair heat in my hair once a month and that is on my wash day make sure to watch. My next video should be coming right after this video and i'll be showing you how i got these loose waves in my hair, so be on the lookout for that video. Without further ado, i'm just going to walk you into my process, i'll try to be as detailed as possible once you get the hang of it, it's a little tricky in the beginning, but once you get the hang of it like it's simple and it makes sense And you'll be able to easily do it so yeah. This is a great alternative. I like to use kinky straight hair, just keep it as natural as possible, because my hair is not always going to be slick straight, and i want hair that is going to. You know work well with my hair and still look natural, so so yeah. So without further ado, i am going to show you guys my process so keep watching. If you want to make sure you have a three-hole hair plier, it's very important that you have this type of plier and i'll explain a little bit more a little bit later, you're going to want to make sure that you have your bag of micro links as Well, as a loop threader, and this all came in a kit that i got from amazon, so i'll make sure to link that below you're, also going to make sure that you have some hair clips. I utilize, i would say about two to four hair clips, as well as a ragtail comb, and then, of course you want hair um. I definitely recommend getting one to two bundles of hair. This was actually some clip in hair that i had and um before i used it. I made sure i washed it and dried it and straightened it, but i use this hair because i just love this hair and how much it mimics my hair. I don't necessarily recommend clipping hair, but i can give you the link to the hair i use because i love it so much, but definitely you want to make sure you have some weaving type hair once you bundle should be good and then here i'm just demonstrating How you want to get started so you're going to want to take your loop, threader and you're, going to take your micro links and you're going to be putting the micro links inside that loop threader. So i put enough to make sure i have enough for one roll, so it's almost kind of like when you're weaving your hair. You want to make sure that you have enough to finish that line. So i kind of utilize the same thing and i usually add a little bit extra when i am looping the microlinks into the hair loop and i will be demonstrating how i will be using that in the technique. So i put about five to six to start off and that's usually good enough for me to get started all right. So i have my hair parted and i'm starting with my first section so because i use clip-ins they're already pre-cut, which is why i love ins. Um and so i'm just starting off with the first line, and so i have um it's kind of like a medium sized. You want to make sure that the hair that you have is it doesn't cover your whole line, because you, you want your hair, your real hair, to be showing on the side. So you don't want this to be going from end to end necessarily because you do want the track to be hidden in your hair. So i use my clips and then i clip in the piece onto my hair for stability so that when i am looping it doesn't move. So now i'm taking a piece of the weaving hair and i'm starting on the ends, and then i'm taking a piece of my own hair right underneath it so directly. Underneath it, you want to make sure that you're grabbing just a little piece of hair. Again the micro links are small, so you don't want to grab big chunk. Otherwise, it's just not going to go through, so i make sure just to grab just enough where it's not causing too much tension in my hair, but also enough that it's um, you know grabbing a good amount so that it's not pulling out my hair. So that's about as much as i grabbed from my hair and from the with the weaving hair. So i'm taking the loop threader and i'm putting both of the hair through the loop threader and then i'm taking the micro link and i'm pushing it all the way up so that it loops into the hair. And then i pull that marker link up to the top. You don't want it too, tight, because that will pull your hair. You just you, but you want it up there, but just not super tight um and then once i feel like i have it in a good spot, you're going to take that plier and then you're just going to pinch it in so that it stays right in There, nice and secure, and so now i'm going to do the same thing and get another piece. So i'm taking again a piece of the weaving hair and then directly underneath it. You want to make sure you're getting directly underneath because you don't want to be getting hair. That'S all the way to a different side, because that's going to pull your hair, so you want to make sure you're getting something directly underneath again, i'm just making sure to get a smaller piece, so i'm making it a little bit smaller because i realized i grabbed A little bit too much so you want to make sure you grab just a nice piece that you know the link will go in through and then again i'm taking that loop threader putting my hair through it. Taking that micro link pushing it all the way up. So that my hair can get through it and as you can see, i realized that i had just grabbed too much hair. So now i'm gon na try to get a little bit less, because i could tell that the micro link was getting a little stuck. So i'm like: okay, that's not good, so i went ahead and grabbed a smaller piece of both my hair and the weaving hair. I put my hair through the loop threader again trying this again putting the bead through, went in a lot easier and then you're just going to push it all the way up to the top again, not too tight, though you don't want it too tight and then You'Re just going to pinch it down and i am going to keep doing this process throughout my hair. I usually um. You want to try to do at least maybe five for like like five six for, like the medium large sections of your hair, you want to have just a good chunk where it's just stable, and so i'm just going to keep doing this throughout this row and Then i will keep going and adding another line so keep watching. So so i wanted to show you guys just a little bit of close up of what's actually going on as i'm doing the hair loop. Just in case you couldn't really see so here is the weaving hair, and so that's about the piece that i would take out, maybe a little bit more and then underneath it. You'Re gon na have a piece of your hair coming out, so you're gon na be taking the weaving hair as well as your hair through the loop just like that, and then once you have it through you're gon na pull the micro link through, and so it's Gon na pull right on through and then you're gon na just take that micro link and push it up to the top. But again you don't want it too. Tight, you're gon na push it right out up to the top and you can use the plier. If you want to help push it to the top as well and then you're just going to pinch it in to secure it, and i am also going to show you guys what you can do, if you made a mistake and you need to re-loop something i'll, Be showing you guys that videos to show you it's really really easy, and this is where it's really important, that you have the three plier to be able to do this. So now, i'm doing another row. I probably do maybe about like two inches apart of a row so starting another section. This section is a little bit bigger and what i'm going to be doing in the back, i'm going to be doing three rows in the back of weaving hair and then i'm going to do one row on my right side and one row on my left side. So all together i'm going to be utilizing about five pieces of my clip-in hair. Where again i remove the clip-ins and then that's about it. So i'm just doing this to add more volume to my hair and to add more length to my hair. So now i am at the side of my hair. I did three rows in the back and now i'm just literally just doing one roll on the side of my hair. I already did the left side so now i am doing the right side so again, using that same technique, trying to find a piece of hair that will fit in this section, but also leave just like about an inch of hair in the front that has no Weaving track on it so that i'm able to hide the track so right here, you're just going to see me place it measure it out, make sure that it's going to fit and then i'm pulling out that inch away so that that does not get included. As i am doing, the micro link, so i'm just removing that away from my hair and then i'm starting back here and i'm pinning this with the hair clips down again utilizing that same technique to keep it sturdy, then i'm going to grab a piece of the Hair and a piece of my hair right underneath it good job, it's slipping, so i'm grabbing a piece of the weaving hair and now right underneath it i'm grabbing a piece of my hair again directly. Underneath you don't want it to shift too far there we go. Then i'm going to take the hair loop put that through again right on through take the micro link and just pull it on through. Just like that push it all the way up, making sure it's not too tight, then i'm just going to go ahead and use the plier to cinch it now. The only disadvantage of using clip in hair is that i'm not able to get all the way to the top of the the clip. The i don't know what you call it like to the top of the weaving hair, because it's a little bit thicker. So i definitely do recommend having weaving hair, weaving, hair or bundles, because it'll just help you just get it closer to the root and it'll be more stable. But i haven't been able to find the weaving hair at a price that i want to pay that mimics. What i have right now, so i do utilize my equipment, hair and it's easier because it's pre-cut for me already - and so i love it in that way. But um. If you want to practice, you may want to try practicing on bundles, maybe a lot easier to get started with and you'll be able to get. You know as close up as possible, but um, but if you're interested in having clip-ins the clip-ins, i have i'll definitely make sure to link them below. I got them from aliexpress and i've had them for a while, and i just i like - i just love this hair and every time i wash it, it just goes back to just the same state and it's just so natural and it blends so well so yeah. So i'll make sure to include that in description box and if you guys know any great bundles that are yaki, let me know let a girl know that, are you know, affordable and i'm sorry y'all, my camera cuts off. So it's not going to show the all the way to the end, but you guys get the gist. So i hope this was helpful for you, guys and um feel free to ask any questions. If you have any questions, i don't mind answering them again: i'm not professional. This is just what i've been doing and how what's been working for me, so you can just you know, go around. Ask your hair stylist. They may recommend they do it for you, you so it's another option, but just an option. If you want to do it yourself, you can go ahead and try it out and see how it goes. So i just wanted to show you guys in case you make a mistake and you need to re-do um one of the links, i'm just going to show you what you can do so, as you can see, i had smashed the link on the long part and So this is why it's important to have the three hole plier, because what you do is you take the link and you try to feel around it so that you're able to get that link into one of the three holes and then you're, just gon na gently. Very gently push it in and that will release the link and release your hair so that you're able to take it out easily. So here is the finished product. What it's looking like after the initial install just like i just love this hair, it's just so natural um, so yeah! This is what it's looking like down to here, get back, so i love that it's so versatile! You can have it in a bun half up half down curled um, depending on how you put the links, you can have a side, part or middle part. I kept it. So it's more so middle part, but you know that's freedom of these. You can kind of decide how you like it, how you want to do it so yeah, so i am excited. I'M gon na have these in for probably a few weeks, and it's just a great easy low maintenance hairstyle. That, literally, like your hair, is good to go and it just blends so well with my natural hair, which is why i love it so like sometimes my natural hair isn't slick like straight. So that's why i always try to go for more of the kinky hair. Textures, so that's not slick straight, it still blends and still looks natural, so yeah. So let me know what you guys think feel free to leave your comments below. If you have any questions, i know your first time it can be a little challenging, but after that, first time after you kind of get the hang of it like it's it's easier, it gets way easier and it's so worth it because you can keep the hair Cell in for a while, so so yeah, so one other thing is that you can always retighten. If you need to wash your hair, you can just take out the links and just put them back in easy, breezy. So yeah. Let me know what you guys think. Thanks for watching

Comments
Shawn Allisha: I like this. Do you wash your hair with them in? How do you care for it?