Hand Tied Extensions [Easy Way To Install Hybrid Weft Extensions]
- Posted on 23 July, 2021
- Microlink Hair Extensions
- By Anonymous
In this video, I show you how to use and install hybrid weft extensions. They are the perfect marriage between traditional machine-sewn wefts and hand-tied wefts. The beauty of these is that you can customize density and cut them without worrying about them unraveling.
Using @donnabellahair 22-inch Hybrid Wefts in color 6/10 with dark brown silicone beads
#handtiedextensions
For more education visit http://mirellamanelli.com
Instagram: https://www.instagram.com/mirellamanel...
Facebook: https://www.facebook.com/MirellaManell...
TIKTOK: https://www.tiktok.com/@mirellamanelli...?
Pinterest: https://www.pinterest.com/mirellamanel...
HairB&B IG https://instagram.com/hairbnb_podcast
Learn how to upstyle in 7 days course: https://mirella-manelli.mykajabi.com
Rebel Femme https://rebelfemme.com
Model Call https://mirella-manelli.mykajabi.com/p...
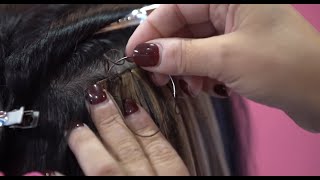
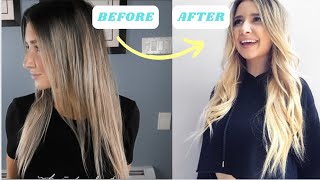
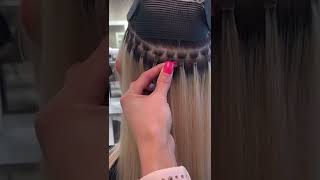
Hey it's marilla monnelli and welcome back to my youtube channel today, i'm going to show you how to do a weft installation using donabella's, hybrid, weft, extensions, it's the perfect marriage between hand-tied and machine weft and it's a quick way to add volume without the bulk. But before we move on make sure you hit that subscribe button and turn on all notifications, so you don't miss a tutorial. Now, let's go ahead and get started. My model was looking to add some extra length and volume to her overall look. So i went ahead and color matched her with the donna bella hair swatch and the best way to determine the color. That'S needed is you're going to want to use the ends of the hair and find the best color that's going to match you're not going to want to put it towards the top, because that's not where you're going to see those extensions blend so make sure you Use a swatch towards the ends. Another thing that we want to color match are the type of beads that we're going to use. So we decided to go with dark brown for the thread and bead, so i decided to go ahead and order. A full pack of 22 inch, hybrid wefts from donna bella hair in color 610. Some other things that you're going to need to do a weft install are some needles and a quick pick, your lux tool, your loop tool, as well as some added clips and, of course, a brush. So you can get this nice and organized to get started. I'M doing a tea party right down the middle and then right on down behind the ear and then starting in the back from the bottom up. I'M taking really clean sections, it's very important to have clean sections when doing extensions, to make sure that you're far enough up on your first section, just take the hair and wrap it over a rat tail comb, and if you can see the tip of the comb, You need to go in a little bit deeper. I do the same thing for the sides, just to be sure exactly where i need to start, because the overall goal is to not be able to see the weft or the beads now to get started. I take my loop tool and my silicone beads and i start to feed the hair through these silicone beads. The reason why i'm using silicone beads is because the only thing living inside of the bead is going to be her natural hair. So it's really important to use this type of bead, so that way it's providing cushion and you're making sure that you're keeping the integrity of her hair in mind. So i really stress that when doing weft install that you are using a silicone bead once i get the entire first row in, i then take the weft of hair and start to measure. So i lay the end of the hair right a little past. Each of the beads and for this first row i'm actually going to double up this weft and then just cut it so always double measure just to be sure, and then i'm going to take my clips. I usually clip the ends first and then start to clip towards the top, and i start in the center and then work my way towards the outer corners honestly, the more cleaner. Your sections are, the better you are when doing a weft install a little added tip is. If you want to know how much string to cut. I usually do about four to five widths of my section measuring out with string and then feed it through my needle and then tie a knot about two to three times on the end to secure it now to get started. I usually go two beads in and then feed my thread all the way until i have about an inch or two left over that i can visibly see, and then i loop it through again and then this is where i create my first knot. Now it's not 100 secure yet so i do this two times in the same area, just to make sure that i have the thread secure and then i start to work towards the outside corners. So keep in mind that when you have a bead, you want to thread it through each side so on the right side and then loop it through and then loop it through the left side of the bead and the way i usually figure out exactly where i Need to feed my needle is sometimes i will put my finger right behind that weft, so i can feel exactly where i'm putting that needle through now. Once i get to the very first bead, i actually loop it through one time on the right hand, side and make sure to pull right on up to secure. And then i loop it two times on the left and then one more time on the right and then i start to work towards the center and then to the very end of my entire row and the reason why i do this method is so that way. I ensure that i get a nice secure, fit and snug feel on the very very end, so that way these wefts actually stay in place for the duration as she wears them until she's ready for her next appointment. I keep my knots very simple. Throughout this entire service - and this ensures that i'm moving swiftly throughout the entire appointment and to be honest, i don't really think it's necessary to do any fancy types of loops or knots. I find that just doing a simple loop through the weft and pulling the thread through the center is enough to ensure that this weft is going to stay in place. I find that the most important part is making sure to anchor it properly on the very ends and sometimes when the section gets a little extra long like towards the top. I do add a few more loops towards the center of my weft. So i just continue on until i have a loop on each side of each bead. So again you can stick your fingers right underneath that row, so you can feel exactly where you're feeding that needle and thread and then when i get to the very very end on the very last bead i loop it two times on the left and then two Times on the right, and then i secure it with a knot now to fully secure your very last section. You can tie a regular knot, but what i find is i actually take my needle and thread and then i loop it two times through the same hole and then i just pull it right on up nice and snug and actually that knot kind of secures itself And then i'm able to get really close and go ahead and cut that thread out now. Moving on to my next section, i'm going about two inches above the last row that i did and again you want to make sure you take really really clean sections. I usually use my brush to make sure it's nice and organized clip it up with my claw clips and then i'm using these hair grippers that are also from donna bella. You can buy them on their website and they actually keep the hair in place and usually when i do this, i go through and final detail as much as possible, but my particular model had lots of little baby hairs going on and i'm not quite sure you Can see that even through the camera, so a little pro tip is to use some hairspray and spray that down lightly and then just comb it down. So i got a nice clean section going on and i'm going in about three inches from her hairline. So just kind of keep that in mind where your starting position is at and you can even see my section is slightly rounded as well, so i'm going to start getting more u-shaped as i move right on up, i'm taking my loop tool kit with my silicone Beads and then just installing this entire row with nice, clean sections, the more organized and clean your sections are the easier your work's going to be so. For the second row, i ended up adding three wefts total, and so these are hybrid wefts. So what that means is that the hybrid weft is machine sewn but they're as thin as hand tied. So that's why they're called a hybrid. So what i love about these weft extensions is that you can really double and triple, and in some cases for really thick hair, you can even quadruple them up for the density that you're trying to achieve for my particular model's hair. She is pretty much on the medium side, but we wanted to add a little bit of extra density for this mid zone here, so i did add three full wefts and then sewn it completely the same just like i did for the first section for my third And final section, i went up a little bit more horseshoe shaped and you can see how far up i went now something to keep in mind when you start to get towards the top. You want to make sure you cannot see your comb through that hair. So i find a lot of times. I start a little further back, so just double check and make sure you're in the right spot, because it is a little deceiving. Sometimes, when you see the section you think you can go in a little bit deeper, but i find that when i get towards this area, most people are a little sparse towards the temple area. So just keep that in mind as you work through. So i finished installing this entire row same thing with my loop tool, kit, lux tool and silicone beads, and then i take the weft and i actually measure it from end to end and i'm going to apply actually three rows for this final row. So what that means is i measure out and then i fold over the weft three times and then i cut it and then secure it with the clips, and i want extra density here. So that's really the primary reason why i like putting three rows for that middle and then for that very top. So here's a little bit of a closer look into how i install the thread and feed it through. So you can see i'm on that. Second bead on the right hand, side and i'm actually taking the thread all the way through until a little bit just shows through and then a great little tip is to take the end. If you're having trouble securing it at all and take it and clip it right on up with a clip, so now that i have my first feed through, i'm then going to go one more time in that same exact section, and this is where i'm going to Make my first knot so i'm taking the thread and needle and then just securing it, nice and snug, and then now i'm going to cross over and go towards the left hand side of the bead feed it right on through and pulling that needle and thread right On through the loop, so once i get these two sections in now, i'm gon na move on that outer corner and i'm gon na put in one loop through the right side and then i'm gon na put two loops through the left side and then one more Loop on the right side of that very first bead and then start to work my way towards the center. This is going to give you the most secure and snug fit possible and still make it very comfortable for your client. So now i got that entire row in and to do my final knot, i'm going to loop, my needle and thread through and then loop, the needle through the loop two more times, making sure that i have a nice secure knot, pulling the thread completely up and Now it is secure and i can go ahead and cut it and it's not going to go anywhere now i let the rest of her hair down and it's time to cut and blend, but you can see how beautiful this color actually matched her extensions. It'S amazing! So i'm just slightly trimming it and shaping it up. She wasn't looking to lose too much length, so i just took a few inches off of the back and then blended her hair into the extensions towards the front. An added tip when working with this length is to make sure your client is standing when you do your cut and look at how beautiful these blended. This is her hair completely straight, and now i'm going to get ready to do her final style and here's. The final result of my hybrid weft installation using donabella's 22 inch hybrid wefts in color 610.. So i really hope you enjoyed this hair tutorial and if you did, please give this video a thumbs up and make sure to subscribe and comment down below what your favorite part of this entire tutorial was and i'll be sure to respond. You can also find me on my other social channels like instagram facebook, tick, tock, all under marilla manelli and be sure to check out my other hair tutorials right here on this channel, and i will see you next time.
Comments
M H: Thank you for this! I always wanted to learn how to do this an easier way.
rubidi15: Your videos, tips and tricks are beyond amazing and helpful .. i appreciate you!! ❤️ When you cut the weft did you have to put glue on the end so it doesnt fall apart?
Pattie Nootens: Great work and so informative! Was this just one full pack of hybrid weft for this install?
Alina Tullius: when sewing through, i wanted to clarify where you thread through. So it is still through the hair in the beads but not under the bead?
Nebo Allen: This was very informative!
Sophia: Any feedback regarding head pain from the beads pressing against the scalp whilst laying down? I'm looking for an alternative to tape ins. Thanks so much, cheers!
Danielle Mendoza: i love it!
DaraShaye Hales: If you were doing this for fullness, how many rows would you do, and where would you put the rows?
Ashley Olson: Do u go under through the bead or on top of the bead through the hair. If that makes sense