Microlinks Diy | Trust Me If I Can Do It, So Can You | Mpumeh S
- Posted on 24 May, 2022
- Microlink Hair Extensions
- By Anonymous
Hey huns, so listen this is by far the most difficult. video I've had to make. These I-tips gave me so much grief but I managed to get it right in the end. I hope you'll enjoy the video.
Items mentioned in video:
ISEE HAIR 14A Grade 100% Human Virgin Hair unprocessed Kinky Straight Bundles Deal
U Tip Pre Bonded Hair Extension Iron Gun Connector
5 Wooden Hair Extensions Loop Needle Threader Wire Pulling Hook Tool for silicone microlink beads and feathers
Lavenchi Hair Extension Beads, Micro Rings Microlink Beads, Silicone Lined For Loop Hair, Micro Ring Beads Hair Extensions (1000pcs/pack, Black)
Italian Transparent Fusion Keratin Glue Tips Pellets Granules Beads for Making Wigs Nail/I Tip Hair Extensions(50g)
Check out my Amazon store for more of my favourite things:
https://www.amazon.com/shop/mpumeh_s
Contact Info:
Email: [email protected]
Instagram: https://www.instagram.com/mpumeh_shang...
VSG Journey Instagram Page : https://www.instagram.com/k.k_gets_fit...
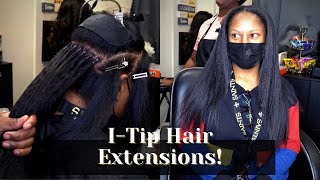
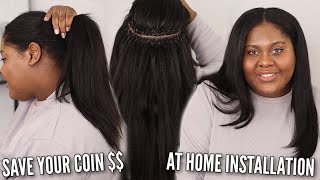
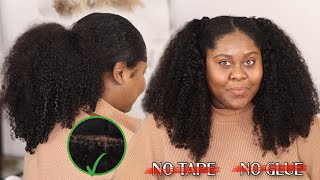
In november, hey guys welcome back to the channel for today's video. We are finally getting to making these eye tips, and here i'm just showing you all the tools that you will need to make your eye tips. So this funny looking um gadgets, you will get from amazon and i will have the link in the description box down below and i hope you guys can hear me because of there's so much noise in the background. But i really needed to record this video for you guys, so it is what it is. So i will have all the different sections that we have on this tool on the screen, so that, if you are interested in getting one for yourself, you know exactly what to do now for our eye tips, we are going to be using these beads. These are called the keratin beads. Basically, we are going to be using those to bind our extensions, so these are our micro link, beads, which we will use for the install. Now, let's get into this here, you guys - i got this here from ic here and i got 20 inches in 22 inches two bundles of each and i just loved how soft and lush this hair was the pattern of the curls. It has a slight curl. This is kinky straight brazilian hair, and you guys i don't even i don't even have words to explain how easy it was to work with this hair and in your package you will get um eyelashes as well as a wig cap, and this lovely, pink, scrunchie and Girl, listen, they gave you false nails as well as well as these butterfly clips. So after watching countless youtube videos, you guys, i finally think i have gotten the hang of how to make eye tips. Now i did make a few mistakes in the beginning of this. Video - and i will tell you um as i make those mistakes so that you don't make the same mistakes as me, but listen. We all learn by doing - and this was my first time making these i tips. So we learn together. So here you will see me unraveling the bundle and, as i said, this hair was so easy to work with, even though it's kinky straight hair, you would expect it to tangle as i'm working with it, but not this hair, not this hair at all. So here i'm just um trying to figure out how i'm gon na go about doing this whole thing. It did take me a while to actually figure it out, but here's mistake number one. So i should have cut the hair in an upward motion. I should have actually cut from the sewn area going down and yeah. That was mistake, number one so here i've just asked quickly to help me out to cut um the sewn bit off, which was a mistake number two, because by doing this i actually did lose um a big chunk of hair, so the strands were actually falling on The floor and i did lose some precious precious hair, but it was okay, as i said to you, we all learn by doing and we all learn by making mistakes. As i went on, i realized that listen. This is not going to work for me. If i want to preserve as much hair as i can for the eye tips, then i will have to find a different way of making this. So this is where i realized that listen. I am making a huge mistake because, as i am trying to put this hair in a big bunch, so i can start working with it, i was losing some hair. So this i had to scrap the whole idea. I had to put this bundle to one side and work with the other half. This is the second method that i tried and again this is not the best um. I am still cutting in the wrong direction. So but i did do this for a couple of pieces and it was working, but then i thought, okay, let me just try and fix it. You will see this later on in the video, but just what i'm doing here is i'm just measuring each piece so that i do make the the eye tips the same size. So, as i said you guys, i was just trying to figure this out. As i went along so at this stage i thought: okay, we can proceed by cutting off the sewn bit and i can work with smaller pieces which obviously, in turn will mean - i lose less hair. So here i'm just showing you um how the head looks like once i cut off that sewn piece, and these are the keratin beads. I just put them in a container because it was easier for me to actually grab them from the container instead of the packet. So moving on to the next thing, so i used the k tip. No, i'm lying. I used the eye tip groove on this tool to actually melt the keratin beads. So in the beginning i just placed three and then i let that warm up and melt the keratin glue. So that's what you see me doing here and then once i was satisfied that the glue was actually melted and hot enough. That is when i go ahead and i place the hair. One thing you need to remember is that each bundle of hair does have shorter pieces at the top, so you will have to take those out if you want uk tips or your eye tip to actually last a long time. So here you see me taking that short those short pieces of hair out before i actually bind the hair using the keratin glue, and this was so easy. It didn't take me a long time at all. All i'm doing is just passing the hair through the keratin glue and then just using my fingers to wrap the hair together and we're done because i wanted my tips to last a long time. I did go in the second time just to make sure that everything is glued together and the hair is not going to be falling out as we tie it up in a ponytail or whatever. So that's why i went in with the glue again for the second time and just like that we have made our very first items. I was so happy at this point. I was like yay, so watch me make a couple more with you and i will be back in a while do so. This is our bundle of hair completely done. Can you look at how full this hair? Is you guys - and this is just one bundle and um to install cortis hair? I actually did not use both of these bundles. I used one and three quarters because the hair is so full and it blended so nicely with the own natural hair. So i will definitely recommend icy hair if you have kinky hair and you want hair that is actually going to blend with your own natural hair. Icy hair is the way to go, so that's it for this video. You guys. Thank you so much for watching. Don'T forget to tell your friends about jayla, abang and bubble to subscribe to my channel. I love you guys and i will see you on my next one bye out where bye growing

Comments
clipinqueen: I love how honest you are with making mistakes! I wish more people were more upfront about making mistakes. I learned a lot from you and this video. Thanks so much.
zingrosa: Ooooh I can't wait because this will definitely be my next style since I relaxed my hair
zingrosa: I thought you were installing them I'll have to buy the itips done already lol
Jacklin: promosm