Easy How To: Beginner Friendly Natural Sew-In With Leave Out Tutorial
- Posted on 04 June, 2022
- Microlink Hair Extensions
- By Anonymous
Hey! I've been wanting to film this easy natural sew-in tutorial for the longest while! Here it is! It's beginner friendly so it should be easy for anyone to their own sew-in.
https://amazon.com/shop/byshello
Follow ME!
@byshello, @shellostyles, @shellotoons
Check out my mom's channel; She does easy and affordable DIY Crafts.
https://www.youtube.com/channel/UCJ6Hp...
Check out my shop! (Currently under reconstruction)
Byshello.com
For business and collaborations;
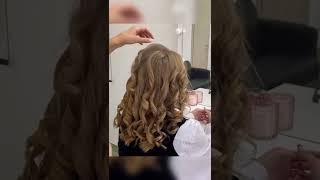
Okay, we have some length here guys. We have some light to pass. My collarbone, oh my gosh past my collarbone. We have some light really. Oh, my gosh, hey guys, welcome back to my channel and in today's video i'll, be showing you guys how i did this hairstyle right here. Many of you guys thought that it was my actual real hair in my previous videos that i had it in, because that was the aim. I wanted it to look like my natural hair and that's what i did, but i the last time i did. I had like a full 360 lead boats, but this time i'm not gon na do a full 360 levels. I'M just gon na do the front and the middle, which i kind of already started right here. So that's what i'm gon na do and i'm gon na show you guys it's pretty simple. It doesn't take a lot of hair, so i already have this section parted over here and instead of going like this, i'm just gon na have it curved, because i also want this one whatever here, i'm leaving note to fall back on whatever track. I'M passing through here and i'm gon na also have the center part in the middle, but based on how long or far back you want your center part to go, you should go a little bit farther than where you want the center part to be so. I'M just gon na wrap this up right here and for the front now what i did last time i did like straight, like i did straight lines going all around, but this time i'm not going to do that, i'm going to i'm going gon na kind of Make it a little bit messy, i want it to be like not uniform. You know like a zigzag form, so if you want you can use your comb, but i'm just gon na use my finger and do that, and that should be fine right here. I think i'm gon na add some more so now that we have our pieces at the front secured. What i'm gon na do next is just braid all the way back: okay, no corner or whatever all the way back, but i'm just gon na finish the rest of my head and then i'm gon na come back to you guys when i'm actually doing the sewing. So i have my clean bundles right here. I wash them so since i actually want to accommodate when i do a high ponytail or anything, i'm gon na try to sew the bundle underneath this thing going on right here and i'm gon na sew through the width. So it has more of a little bit. It has more of us, it has more stability per se, so i'm just gon na go through the width and under the braid, through the left and under the braid, and for the back. You don't really have to take up that much of the braid when you're going underneath it. You just need to take off enough, so it has something to hold on to, and please note that i'm using a curved needle, which is the right needle, not just any needle. So now that i am ready to like bend it i'm going to make sure that the bend is flat. I'M going to make sure that the weft is not, on top of itself, i'm going to make sure that it's flat on the braid and then sway down on the braid and go across because you don't want it to be bulky so any opportunity to not make It bulky that's what we're gon na do. That'S the part we're gon na take so just gon na. Do that and, like i said, through the width under the braid strongest okay. So now i finished one bundle this is it and you see you can hardly see the bump right there, which is what we want, and now that everything is leveled now that it's all level, what i'm gon na do now is get the other bundle and just Continue going up, oh okay, so i'm back and my hair looks big and puffy, but we're gon na start it out, but not tonight, because it's late and i wan na go to bed. So what i'm gon na just do is sort of the leave out and what what i did the last time when i had it in, i just did like a regular wash and go style, leaving damp hair gel moisturizer. That'S it to like. Let it blend in with this, but this time i'm gon na do all that plus i'm gon na twist it just to see how it will come out just to see and then i go from there. But until i define this, i'm not gon na do it tonight because i don't want to go to bed with wet hair, so this is going to be done in the morning when i am getting ready. I got the bumble and bumble baby curl, defining cream blond bomb, baby curly activator, so i'm gon na use both of these. In conjunction with my extreme wetland gel. This is my go-to and yeah. I have my spray bottle here and i'm just gon na get started. Okay, so i went ahead and cleansed shampooed, my liver and my hair is actually feeding a little bit but the well not that literally much better and you can actually see the difference which i'm really not mad. At honestly, my hair is kind of a little bit more defined, so it won't be harder for the products to penetrate the strands. So, as i was saying, i um first since my hair is wet. Damn i'm not gon na get the spray bottle, but i'm gon na use the curl reactivator me. Yes, um! I'M waiting on you seven o'clock in the morning in the morning in the morning now,

Comments
DIY Craftaholic: Love it. That is really a beginner-friendly hair tutorial. Thanks for sharing.
BaBsie7 Davis: Great job. Very pretty.