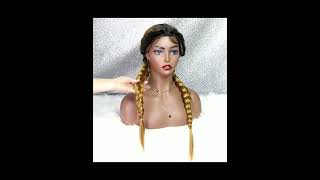
How To: Knotless Box Braids For Beginners! (Step By Step Tutorial)
- Posted on 17 September, 2020
- Sew-In Hair Extensions
- By Anonymous
JOIN MY ONLINE COURSE YOUTUBE UNIVERSITY! https://www.BreannaRutter.com
HAIR PARTING BRAID PATTERN FOR BOX BRAIDS (TUTORIAL) https://youtu.be/4C568d3X9sg
Have you tried Knotless Box Braids on your hair before?
The knotless technique is very similar to doing feed in cornrows but you are actually braiding away from you scalp!
To do knotless box braids, you need to already know how to braid traditional box braids since it is literally the foundation to doing the knotless box braid method.
You hair needs to be at least 4 inches long to do this hairstyle so that you can actually grip your hair and prevent your braid from slipping.
I only used 4 packages of kanekalon braiding hair to braid my knotless braids.
To prep the hair, I cut each package of hair in half since I was going to extend the length of the braids with curly crochet hair.
I only used 1 package of water wave crochet braiding hair to make the ends of my knotless box braids curly.
Cut each curly ringlet in half, then divide each half in half, you should have 4 curly pieces sectioned from each crochet ringlet.
Each crochet ringlet will be used for 2 box braids, 2 curly pieces will be used for each box braid.
WHAT TUTORIALS DO YOU WANT TO SEE NEXT? COMMENT DOWN BELOW!
MY BEST HAIR TUTORIALS!
BOX BRAIDS TO THE FLOOR https://www.youtube.com/watch?v=pnJNT_...
How To: CROCHET BRAIDS For Beginners! (Step By Step) https://www.youtube.com/watch?v=NAmSn1...
How To: Senegalese Twists FOR BEGINNERS! (Step By Step) https://www.youtube.com/watch?v=4bcHBF...
How To: INVISIBLE PART SEW IN For Beginners Step By Step! https://www.youtube.com/watch?v=AZEjsF...
Partial Sew In Weave Tutorial IN DETAIL! https://www.youtube.com/watch?v=vHlyF9...
How To: Senegalese Twists FOR BEGINNERS! (Step By Step) https://www.youtube.com/watch?v=4bcHBF...
How To: Tree Braid Cornrows FOR BEGINNERS! (Step By Step) https://www.youtube.com/watch?v=ZMi96-...
KNOTLESS BOX BRAID TUTORIALS!
HOW TO DO KNOTLESS BOX BRAIDS | BEGINNER FRIENDLY | VERY DETAILED | Tiffani Renae https://www.youtube.com/watch?v=eS64yo...
Knotless Box Braids // EVERYTHING YOU NEED TO KNOW // SLOW MOTION https://www.youtube.com/watch?v=LI2bEp...
Knotless Box Braids Tutorial https://www.youtube.com/watch?v=PBTA4S...
Learn The Simplest Knotless Braid Technique || THEBEAUTYJENERAL https://www.youtube.com/watch?v=UKDzSw...
Easy KNOTLESS Box Braid Tutorial https://www.youtube.com/watch?v=NOxqEc...
________________________________________
Business Email [email protected]
________________________________________
DISCLAIMER: All suggestions, tips, techniques and advice given are for informational purposes only and should be used at your discretion and best judgment. I highly recommend conducting strand tests when trying or using new products, hair appliances and product mixes. I am not responsible or liable for adverse or undesirable effects including hair loss, hair breakage or other hair/scalp/skin/body damage as a direct or indirect result of the suggestions, tips, techniques and/or advice given.
FTC: I am not representing, being paid by, or endorsing any of the product brands in this video & I purchased everything with my own money - UNLESS OTHERWISE STATED in video/blog content.
Hello: everyone, my name, is brianna rutter and i'm back at it again with another braid tutorial in this video. I'M going to be showing you how to do knotless box braids so be sure to turn on notifications and subscribe and follow for more because i got more amazing tutorials coming on the way. So, for starters, i went ahead and washed and blow dried, my hair, so that i can begin parting for my braids. As you can see, i already parted a middle part, but i'm gon na further clean it up the number one most important thing you want to keep in mind when doing any type of box, braid or individual braided style, is to make sure that your parts are Very neat, so, as you can see here, i'm using the end of my rat tail comb to actually part my sections. The reason why i use the pointer end of my comb is because it allows, for the part to be a lot more sharp and precise when you use the teeth of the comb to part your hair is usually not as neat, so i have the first two Sections parted in the beginning and i'm gon na go ahead and begin parting, the back of my head. So i already did a couple of rows, but i'm gon na go ahead and show you how you want to begin sectioning so that you can already have pre-parted areas when doing your braids. When you pre-part your sections, it allows for you to do your box. Braids a lot faster, so if it typically takes you about five to six hours to do your own box braids, then this will definitely help speed up the time anywhere from about three to four hours now. This also depends on the size of your braids as well, but when you pre-section your parts, this allows for you to move a lot faster as a braider, because when you actually part individual boxes, it usually takes longer. So, as you can see here, i parted a new section and each of my sections is about an inch in width, because i wanted my box braids to be about an inch by inch, giving me that typical medium sized box braid. So i'm going ahead and i'm actually just braiding my own hair, there's no braiding hair, i'm adding i'm just braiding my own hair, going from one side to the next and i'm braiding very loosely. I don't have to braid tight because these braids are going to come back down anyway. You just need to braid them firm enough so that there's no loose hairs, but you don't need to break them tight at all so so far. This is how the back looks. So now i'm going to go ahead and begin parting, the front. Now i stopped when i was halfway done with the back, because i want to make sure that i didn't go too far back on my top sections. As you can see here, i went ahead and i parted on my right side and now i'm braiding going towards my face. You can braid going away from your face. If you want to it really doesn't matter, you just want to make sure that your parts are neat and clean and that you use clips to keep each section out of the way from other sections. So, after parting, all of my hair, this is how my pre-parted braid pattern looks for my knotless box. Braids, now don't be scared by all the clips they're just placeholders for your sections, you're only going to be working on one section at a time. This is how the very back of my head look. I went ahead and did about three sections of box braids that you can get a visual of how you should be progressing so now i'm going to go ahead and begin parting, my square, so that i can show you how to do a knowledge box. Braid also you're going to be using some edge control to keep your parts neat and smooth. This helps to give you lasting power with your braids now pay close attention. Everyone, because i'm going to be showing you multiple examples. You can pick, which example works best for you, so the first example i'm going to show you to do the knotless box braid is to divide your hair into three equal sections. As you see here now, you're just going to begin braiding about a couple of times until you free your left hand you're only going to braid about four times max. So i'm going to take a little piece of hair and i'm going to put it between my index and thumb and then i'm going to braid a couple more times until i free my left hand again, i take another small piece of hair pinch it between my Index and thumb - and i do the same process - i make sure i'm just braiding it in now. You do not have to complicate this. This is extremely easy. All you have to do is follow along with what i'm doing, and you will see that doing these braids is as smooth as butter. So i like to do about three to four sections of hair when adding it into my knotless box braids, because i, like the size box, braids that i have here now, if you like your box braids with the knotless method to be thicker or thinner, you're, literally Just going to add more hair or less hair, depending on your taste. So now i'm just going to continue braiding, but i'm not going to break all the way down. I'M going to leave about two inches of hair at the bottom, because i'm going to add some crochet hair, this hair is from a brand called lulu dress that i purchased off amazon, and this is a water wave, textured crochet hair. So each lock is individually crocheted. If you want to do a crochet style or you can use these pieces of hair to add to the end of your box braids, it gives more of a goddess or a boho type look, but i didn't want the curls to be all the way up. The braid, so i'm only putting them at the bottom, so i cut one of the locks in half and then i'm going to make two sections out of each side. So each lock gives me enough hair for two box braids. So we're going to take one of the sections here and we're going to add it to the middle leg as you see here, and then we're just going to simply overlap and continue to braid after you braid a few times you're going to lift one of the Locks up onto your clip and then you're going to continue braiding a few more times and you're going to release the next one. Once you release the next curl, you use your clip to pin it back up on your braid so that the curl does not fall back into your box braid. So once i'm almost to the very very bottom, i'm gon na add another piece of hair. So this is only the second piece. Remember the lock or the curl is cut in half and it's actually created into four pieces, but we're only going to be using two pieces per braid. So, as i'm braiding, i do the same thing. I release one of the curls and i use the clip to keep it out of the way, so it doesn't fall back in now that there's one little curl left, i'm literally gon na continue to braid. Until i run out of kanekalon braiding hair. Once i run out of kanekalon braiding hair and it's just a curly end, i'm going to do my knotting technique to seal the end. So i take a very tiny piece of hair. I wrap it around the end and i form a knot. Now i take an even smaller piece and i do this again - i wrap it around the end of the hair and then i form a knot and i tighten it real tight. I just yank on the so it's super tight. I usually like to do this about three to four times and trust me. The braid will not unravel because the knots are so small and so tight. You don't have to worry about it. As you can see. This is how the braid looks and i'm going to show you another technique so continue watching for now. I just want to move the braid around just to give you a visual of how it looks coming from the scalp. It looks very seamless and neat if you like your box braids to be bigger or smaller, then you can choose to add more or less hair. So now i'm parting, my next section directly over the previous braid of my previous section. This allows for you to do the brick layering method, so that way, each braid falls into the space of each section, allowing for your brace to look fuller. If you want more details on why i do that particular pattern when braiding check out my previous videos. So i divided this section here into two pieces and i'm going to start braiding that first piece with a little bit of braiding hair just a little bit. Then i grab the second piece and i feed it into a leg that does not have my real hair. So right now, two legs of the braid has my row here, and one does not so now. At this point, i'm gon na go ahead and feed another piece of hair. I like to make sure that i braid about three to four times to free my left hand. To then add the braiding hair between my index and thumb. The reason why is because you want to stay consistent when you're doing this technique, so your braids look very smooth and consistent with the other braids. So if you're always going to, for your left hand to add more hair, continue to do that with all of your braids, don't go back and forth with your right and left hand because it may make the braid not look as smooth. So now i'm just continuing to braid until i have about two inches of kanekalon braiding hair at the very bottom before adding my curly crochet pieces. So, as you can see here, i stop about right here and if the hair extends just a little bit too long, i trim the ends, but for now i'm going to take one of the curls, i'm going to add it to the middle leg and side leg. As you see here and then just keep braiding, if you like doing this technique, let me know down below and if i make this super easy for you to understand. Let me know in the comments, because i want to continue to do styles like this y'all just got to. Let me know how much detail you want to see when doing these types of looks so now, after braiding a few more times, i'm going to grab another piece of the curl and i'm going to use my clip to hold it out of the way so that It doesn't fall back into the braid now that i'm at the very end of the braid. I add my last curly piece. Remember each braid only has two curly pieces so now, as i'm braiding, i'm going to braid a few times and then i'm going to grab the curl and i'm going to pull it out and i'm going to use my clip to prevent it from falling back. In now, i'm left with the other half of that curl, i'm going to continue braiding until i go past the kanekalon braiding hair before i knot it. So i take a tiny piece of hair. I wrap it around the end of the braid. I pull it super tight. I divide that hair literally so small. You can barely see it and i still form another knot. This is very important in preventing your box braids from unraveling. When your style is done, you don't have to dip these braids in hot water. You don't have to burn seal these braids at all. You just use this knotting technique to prevent your braids from unraveling, as you can see here so now. What i'm going to show you is: i'm actually pointing to the techniques. So these two techniques - i actually divided. My hair into three when i braided and these two braids i actually added braiding hair. So as you can see when you're super up close, it's really hard to tell the difference. But the proof is in the longevity of your style when you braid your real hair. First, before adding braiding hair, the braids tend to get a little bit more fuzzy at the roots. But if you add a little bit of braiding hair, when you immediately start braiding, it makes the braids last longer. So if you like that type of tip, let me know in the comments so now at the very front of my head, i'm going to show you how you want to braid your braids, we're going to divide that last section into two pieces and we're going to Pre-Section our curly crochet lock, so this curly crochet was already cut in half and now i'm just dividing it into two further pieces. Remember each curly crochet is served for two braids. Now i'm going to go ahead and begin pinching, my braiding hair, so that i can start braiding my knotless box braid, i like to keep the size of the braiding hair very similar. Now, when i first add my first pinch of braiding, hair is usually just a little bit smaller, so that way it's a gradual increase in size when i'm braiding. So this is how the four pieces of hair look, as you can see here - they're very similar in size, so we're going to go ahead and begin parting for our final two braids and i'm going to show you how to do in the front. If you want to see any other type of techniques and detail tutorials like this, all you got to do is drop a comment, and let me know what you want to see next, so now, i'm just dividing that in half and i'm going to use a clip To keep the other section of my hair out of the way so that i can begin braiding go ahead and add any edge, control or gel you want this step is a must. You want to add some type of edge control because it helps to keep the roots of your braid very neat. With this technique, i only divided my hair to two and i'm using one piece of hair and i'm using my real hair as a third leg. So, as you can see here, i'm just braiding it with one small piece of hair. This helps the braids to last a lot longer when you start with a little bit of braiding hair. I prefer this technique when doing knotless instead of braiding on your real hair. First so i like to add a little bit of braiding hair at the very beginning. It makes the roots a little tighter and it prevents the style from looking as frizzy during the duration of wearing your braids. Now we're going to grab another piece of hair, we're going to pinch it in between our index and thumb to feed it in. As you can see, i pushed one leg to the back and then i just continued braiding we're going to add our next piece and you're doing the same technique when you're braiding your hair, it's very important that you're consciously smoothing your fingers every time you go back And forth from one side of your leg of your braid to the next, when you make sure to give a conscious effort to continue to smooth your hair as you braid, it makes your style look a whole lot better. If you've ever had issues with frizzy braids right after braiding your hair, it's because you're not smoothing your fingers on each leg as you braid, you want to smooth as you braid down. It prevents you from having flyaways and it also prevents your braids from looking frizzy. Also, if it helps you, you can use a little bit of edge control on your fingers and continue braiding so that you can smooth the ends of your real hair. So now we just trim the end of the braid, and this is how you want to look before adding your crochet curls. So i'm going to start with one of the curls and i'm going to go ahead and put one of the curls in the very middle leg and off to the side. So that way, i can easily incorporate it into my box braid, as you can see here, and then you just continue to overlap one leg over the other, extremely simple and easy to do so after overlapping just a couple of times literally about two times. I just pull one of the curls out and then i continue braiding make sure that you don't pull both curls out at the same time, because it will literally fall out of your braid. You want to pull the first one out after about three rotations, and then you want to pull the second one out after about three or four rotations. So now that i'm at the very very bottom of the braid, i'm going to add my second curly crochet piece to the ends now adding curly hair to your knotless box, braids is totally optional. I just like this look because it kind of almost looks like a beachy type style, something you wear on vacation and you know we all cooped up in the house sometimes, and i figure i need to make my style look a little bit more luxurious than just Having the ends without any curls, so when you add crochet curls, it definitely adds to the look of your style and i only used one package of curly crochet hair to do all of these braids. You do not have to add a lot of curls, because if you do it can make the bottom of your braids look a little too heavy. So now i'm doing my knotting technique in order to seal the end of the braid. That way, i don't have to burn the ends or hot water seal or anything like that, and it makes it look super seamless when you do these really small knots. So now i'm going to remove the clip and show you how the ends look. So pretty give me a big thumbs up if you like the way this style is looking so now we're going to focus on our very last braid we're at the home stretch. Ladies okay, so i need y'all hanging there. So now we're going to go ahead and divide our hair into three sections and begin braiding. Then we add some braiding hair. Remember you can alternate both back and forth between these techniques, depending on whichever one is easier for you. When adding hair. I like to pinch it between my index and thumb and feed it underneath my hand, so that way, it's easy to add to each leg of my braid, so make sure you pinch and open your fingers and then just scoop it right under your index. When you scoop it on your index, it seamlessly adds into each leg of your braid. You don't have to over complicate this. You ain't got to think too hard about it. This is super simple and easy to do and when you actually do this style on your hair, i highly suggest that you come back and watch this tutorial and do it with me so that way, you're following everything to the t. So now i'm just moving the braid forward, so it's a little easier for me to continue braiding my hair and i leave about two to three inches of hair at the ends and i just trim off the very bottom. So this is how it should look right before adding your curly crochet pieces. How do you, ladies typically like to wear your box braids? Do you like to add curly pieces to the bottom, or do you like to leave it in straight? Sometimes i like to actually curl the ends of the braiding hair, and sometimes i also like to add crochet. It really really depends on the size of the box braids for me. So let me know in the comments also, i typically like to braid my braids with the black hair color, because i know most of us love to wear our box braids in a dark color. But if you like to do other colors, let me know whether it's an ombre brown or blonde. I would love to do those looks as well. So i only have a little bit of hair at the very bottom of my last box braid. So i'm going to go ahead and add another curly piece. Each box braid only has two curly crochet pieces added. So after braiding about four rotations, i then grab one of the curls and i move it upwards and i use my clip to keep it out of the way. So it doesn't fall back into the braid. Now you only have one little curly piece left, make sure to braid past the braiding hair. Once you do, you form your knots by constantly tying around the bottom of the braid. This is so easy to do so. There you have it. Ladies. This is the final look to the braid, so we are almost done, but i have to clean up these ends to make sure they're, even and consistent. So after brushing out all the hair very evenly, i'm then going to take some scissors and trim the ends of the hair. You don't have to use your best scissors, because this is not real human hair, so you don't have to have like amazing, hair cutting shears. You just use any old scissors. You got to trim the ends. Now, i'm going to make sure to put some hair styling gel on the ends of the curls. That way the curls won't get frizzy and it allows the crochet hair to last. As long as the box braids, if you've ever done, crochet braids before with crochet hair, you know that sometimes those curls be getting way too frizzy when you're not even ready to take down your style. So i always suggest that you use styling gel on your curls to make them last so now we're going to use a little bit of edge control to just style up the little bit of edges. To sticking out, i did not purposefully leave out my edges, but i do have very, very fine edges on my hairline, so i'm just using a little bit of hair gel or some actual edge control to style it up. And then i want to make sure that the braids match the little bit of shininess that the curls have. So i didn't use a lot of oil sheen. I just used a little bit to smooth it in so now i'm going to show you how you can style your knotless box braids, you can wear this style up or down. You can wear one ponytail, multiple ponytails, i'm just doing a really quick speed through just to show you how easy it is to put your hair up into a ponytail with my technique, because some of you, ladies know, when you get your hair braided, your scalp, is On fire and it's hard to do anything with your hair because your scalp hurts. But when you do my technique, you don't have to worry about that, because you literally feel no tension on your scalp. You can wear your hair up and down on day one whenever you want and, however you want so this is just a few little cute ponytails that you can do with your knotless fox braid. If you don't want to necessarily wear it all down, you can wear half up and half down so then for the last style you just put into one big old ponytail. Now this braided ponytail kind of reminds me of something i can't quite put my finger on it, so let me know down below if you know what that braided ponytail reminds you of so. This is how the knotless box braid look all completed. Also, if you're interested in becoming a full-time youtuber like me, then i made an online course called youtube university, where i teach you all the ins and outs of how to become a full-time youtuber if you're interested links are in the description below and i'll catch y'all. In my very next video bye, bye,


Comments
Breanna Rutter: BRESQUAADDD! We had soo much fun watching the LIVE PREMIERE! Turn on all notifications if you don't want to miss out! My YouTube University Course https://www BreannaRutter.com
Dawn4j: Breanna was the first youtuber that motivated me to Do my own hair, and the only one that explains So well i understand the techniques. Now... I had to practice because i've never touched my hair before. But now i do my own hair. I'm not a professional but hey it saved me some coins. Good job! Years of whatching you
The Kandie Shop 🎀: You’ve explained this so excellently. I’m confident that after watching this tutorial that I can achieve this look. Thank you
Cheryl Ardis: I am hooked on your videos. I just took in a 12 year old female as a foster mother. Her hair is a hot mess because nobody took care of it. Her social worker wants to take her to a salon next week and have it all cut of. After speaking to foster daughter she told me she's been bullied for years because her hair has never been cared for. Today I decided to look at how to care for, style and fix years of hair neglect. I'm determined to save her hair. I've been taking notes. So many children are in the foster care system who are sent to parent like me who has no clue how to do her gorgeous hair. You are so detailed. I am going to ask you, if you have time to maybe make a video for people like me who don't have a clue and use tags that make it easy to find. These children shouldn't have to have hair chopped of because people like me don't know how to care for it. I'm sure I can't be the only white person who has come to YouTube for help. You'd be doing a great service
MAKE WAY FOREVER: Who else is loving this look?! ♀️
Panda Panda: THANK YOU! This is the level of detail I need I’m an older man with clumsy butter fingers but I’ve got 3 daughters. You made this easy for me to understand. I like how you showed up close, worked slowly, and you spoke clearly at each step. You are so amazing for spending your time teaching beginners like me. Thank you so much
Josiee Mariee: I recently found you and I must say that your videos are amazing and they are so easy to follow, you give so much explanation and honestly it's truly helpful
Paula Henry: The way you explained DIY knotless braids was EXCELLENT! I will subscribe. Can't wait to see/learn more
E.A. Harris: You are so consistent with your content! Lord knows its not to stay motivated when it seems others are pushed ahead of you, with crappier content. Keep going!
Cierra Scott: I recently did an ombré from black to yellow and it was so nice! It was very different for fall but I felt it was fitting ❤️
Felicia Bell: Great technique altogether...LOVE IT!
Lexi B: Love the hair ! And you are a beautiful ebony queen !!! Slay girl! I just purchased my hair, and I will be following your tutorial. You made it simple, straight to the point and address many of my questions. Thanks sis!!! ✨
bina M: You made this seem so easy and in detail. It came out so pretty and healthy looking and shinny. I can't wait to do my daughters hair and maybe mine because i need to leave it alone. Lol
Syreeta Bedford: I have been watching your videos for the last 6 years! Thanks to your easy to follow, very informative videos I am a great braider! Thank you!!!
Shadé Harriott: Okay I feel like I can do this!! I’m gonna do it!! Thank you for this videos!!!
P O: I also love the Pre parting method it does take so long as you part as you braid thank you for showing us
Priscilla Harvey: Awesome job! I love this hairstyle...thank you!
Chrissy Punch: These are the best tips I’ve seen on the internet. I deffo needed a simpler method due to my hands being super numb. Protective styles are the besttt for my 3a hair! 3c near my edges tho Thanks beautiful queen!!
FlyingMChicken: You always do a wonderful job!! ❤❤❤
Lovingwhat Wisdombrings: Thank you for including the number of packs of braiding hair you used in the description
Achundris O'Kain: I'm glad you Posted This Because I been wanting to Try to do me Some Knotless braids on My Own.. I'm definitely going To try this technique. You did an Amazing Job ❤❤
P O: Thank you for showing me how to part hair before braiding you made it look simple
Tanya Hicks: Thank you for this tutorial. I'm encouraged and I'm going to give it a try.
Wilhelmenia Ferren: This seems easy to follow thanks for sharing.
Mélinda V: Hi! Thanks so much for these technics and for the hair parting section before! You should show us more often! I'm gonna keep this video preciously. Could you please show us these technics with an other color so we can see better how to do the beginning ?
Danielle Davis: I am almost 45 years old and have ALWAYS done either my hair or Everybody else, however, the ONE THING (my Achilles heel sorta speak) has been box braids with extensions WHERE HAVE YOU BEEN ALL MY LIFE (you know, other than not born yet) This Was Amazing!! You have Not only made it possible, but gave me confidence, because you broke it down and made it seem So Simple. I Thank you you and my hair thanks you And your tips and suggestions are EVERYTHING!!
Jezz Morris: And your explanation of doing goddess box braids is awesome keep up the good work
Stacy Coleman: Bre Tfs!!!!Your tutorials are sooo detailed!!!
Real World Realty Group LLC: Brilliant! Absolutely Brilliant! Keep up the good work
Krystal Clear Learning: I love your page!!! Very clear
A Day in the Light: I just stumbled on your videos today. They are awesome. It makes me want to try it!!
Anon Doe: I need as much detail as possible! I love this information thank you!!!
Kindy Ngode: I really love your tutorials already bought my braiding hair I can't wait to try this
Chyna White: Definitely going to try this!!!
La_dweng: Looks cute can we also have a straight up tutorial with feed in braids
Tessarr: Beautiful ✨
Felicia Bell: LOVE IT!
bishopl: I didn’t realize this was that easy to do I just found your channel
Felicia Bell: I will be using this technique going forward ❤
karen horton: I’m wearing jumbo box braids that I installed and I’m thinking of adding some curly pieces. I’ve also done them with color #30. I’ve had it done in the past with #350 and another with wavy #30. If you would do a video crocheting curly pieces to existing braids that would be helpful. Thx
Sue S: I appreciate your videos so much, you're so talented!
Jae Bea Blessings: I like the curly look at end of braids...and you makeup is Beautiful! ❤️
Valorie Rice: Theanks Breanna, I love the tips. I just wish my arthritis would leave me alone so I can try this. Perhaps doing it a little at a time for me.
Gerald Warren: Cute❤ Great Job!
Nichelle Loh: I would love grey and black breads. That ponytail to the side reminded me of me in them 80's as a teenager on my way to a Salt n Pepa concert! U did a beautiful job! Ty.
M Bell: Good job..very detailed..i like color 27 also..thanks for sharing
Wilkins Soto: loving it very much.
L'JENITA ANDERSON: Hi sis I love watching ur videos can you do color 27,or 30,or 33 thanks for showing me how to do the single knotless braid also can you show me how you do the feed in French braids thank u very much
Jezz Morris: The first time I saw your channel I subscribed to it immediately because I lovvvvvvveeee❤️❤️❤️ your vids.
Ivete de Oliveira Teixeira: Minha linda amo seus trabalhos quantas tranças tem
Mamisa Lumiere: The best teacher ❤ ever
Dawn Zeendoll Winston: Love this
Insatiable Ladii: You the real MVP in this hair game. You started this YouTube hair care stuff.
Mekastayfab Steele: I would to see the ombre look
Vanessa Trotter: SO BEAUTIFUL I LOVE YOUR CHANNEL
MsMondey: So helpful
Yolanda Wright: I always like your technique
Betty Johnson: I like this as beginner I will use this video from start to finish. I will make my braids much shorter don't like long braids.
Rachel R: Which way to twist?
Jezz Morris: I'm looking forward to your other vids
Felicia Bell: CAUUUUUTE!
Monica White: You have done it again!
Vida Amon-Kotey: You have very beautiful skin and you are very skillful
Mel John: Thanks for the tutorial. Can you go a bit slower on future videos?
Mekastayfab Steele: Very nice btw
Par Biomagnetico Clima Clima: Que sonrisa más hermosa tú tienes pareces #Ochun
QBee240: First channel I sub’ed to when I started watching YT
Nadrae Gass: Can you do the black to blonde knotless for beginners
Judith Gragirena: Hi Breanna...I love you turorial....how i can learn with you?...k hope you can contact me...thank
IAmTorii: I need help growing my hair thicker
whereisgamoraaa: she ate this!!! <333
L'JENITA ANDERSON: Please show me and tell me how pleased thank u in advance
Tabitha Mitsanze: Whaaaat...this is cute
The Raptor's Nest: Eye liner on FLEEK BABY!!!!!!!! Damn you're pretty!
MsLavelle76: Shaneanea from Martin. Her braids was tight. Lol
Breanna Rutter: CLICK SET REMINDER RIGHT NOW! MY YOUTUBE UNIVERSITY COURSE! https://www.BreannaRutter.com
Amber Joshua: Can we get a baby update?
Kasia Sosnowska: I thought you are Nicki Minaj at first.
Tina Marie: Good morning to you
Tina Marie: My name is tina BROWN
Banika Goodall: Banikagoolla