Full Sew In No Leave Out - (Full Dvd Tutorial)
- Posted on 30 July, 2015
- Sew-In Hair Extensions
- By Anonymous
Buy My Books, DVDs, and T-Shirts at http://www.howtoblackhair.com
Facebook: https://www.facebook.com/OfficialBrean...
Business Email [email protected]
________________________________________
Check Out My Other Tutorials!
Lace Closure Sew in NO LEAVE OUT!
Invisible Sew In NO GLUE NO LEAVE OUT NO CLOSURE!
How To: Rope Cornrow Braids FOR BEGINNERS! (Step By Step)
Tree Braids Cornrows FOR BEGINNERS!!!
How To: BOX BRAIDS For Beginners!
________________________________________
In The Full Sew In DVD, you will learn;
• Hair Supplies
• Braid Pattern
• Sewing Extensions
• Creating Full Sew In Closure
• Cutting Chinese Bangs
• Full Sew In Finished Look
• Removing Full Sew In
________________________________________
The Best Full Sew In Tutorials On YouTube!
FULL SEW IN NO CLOSURE / NO LEAVE OUT / DETAILED TUTORIAL https://www.youtube.com/watch?v=XOytqy...
HOW TO DO: Full Sew In WEAVE No Leave Out Tutorial Video For BEGINNERS https://www.youtube.com/watch?v=8vEXuc...
FULL SEW IN NO CLOSURE / NO LEAVE OUT / DETAILED TUTORIAL https://www.youtube.com/watch?v=Eh9e26...
How To do Full-Sew-in in 10 Minutes Beginner Friendly https://www.youtube.com/watch?v=nhvZtf...
Detailed: How to do sew-in with a closure/HJ Weave Beauty https://www.youtube.com/watch?v=cthbGJ...
Prettyhairboss How To Do Lace Closure Sew In https://www.youtube.com/watch?v=f6Jyyo...
LACE CLOSURE SEW-IN | ELASTIC BAND METHOD FT KLAIYI HAIR BRAZILIAN CURLY https://www.youtube.com/watch?v=1PZVQC...
SEAMLESS LACE CLOSURE METHOD| The Avé Lure Collection https://www.youtube.com/watch?v=zp9G3D...
Detailed:how to do a side part lace closure sew in with bombshell curls| Hairbyerickaj.com https://www.youtube.com/watch?v=cxPrj3...
________________________________________
DISCLAIMER: All suggestions, tips, techniques and advice given are for informational purposes only and should be used at your discretion and best judgment. I highly recommend conducting strand tests when trying or using new products, hair appliances and product mixes. I am not responsible or liable for adverse or undesirable effects including hair loss, hair breakage or other hair/scalp/skin/body damage as a direct or indirect result of the suggestions, tips, techniques and/or advice given.
________________________________________
FTC: I am not representing, being paid by, or endorsing any of the product brands in this video & I purchased everything with my own money - UNLESS OTHERWISE STATED in video/blog content. There are links to products that might be helpful based on the content of this video/blog. Each of your purchases via our Amazons affiliation links supports our cause at no additional cost to you.
Music "Easy Lemon" Kevin MacLeod (incompetech.com)
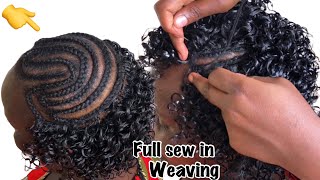
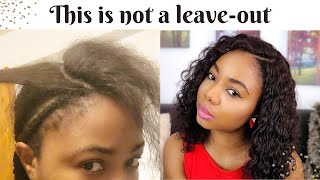
Hello, everyone: this is breanna rutter, author of over 14 haircare books and founder of howtoblackhair.com. For this tutorial, i'm going to be teaching you how to do a full sewin hairstyle using mrs. rutter's hair extensions from mrs. rutter's calm for the following supplies. You will need to do. This look will be three bundles of mrs. rutter's hair extensions in the length 24 inches, 22 inches and 20 inches. You will also need nylon, sewing thread, weaving needles, a weaving net, a little bit of braiding hair, a rat tail comb. A wide toothed comb, a dry towel, haircutting scissors, rubber bands, duckbill clips and heat protectant, as well as a flat iron. So once you have all of your supplies and your hair extensions ready in the very next step step number two: I'm going to be teaching you! How to achieve your braid pattern, as well as how to sew down your weaving net, welcome to step number two of the full sewin hairstyle in this step. I'M going to be teaching you how to create your braid pattern, as well as how to slow down your weaving net when you're, creating your braid pattern, you're going to need some braiding hair and then your rat tail comb, and why tooth comb to assist you operating With slowing down your weaving net make sure that your weaving needles are prepared and you have your net on hand. So, as you can see, my braid pattern is almost finished, but I have one last final braid to sew down, which I will teach you now. The reason why I went ahead and braid it all of my hair is because the process is very repetitive. If you don't know how to cornrow braid your hair, I highly suggest that you visit howtoblackhair.com to purchase the cornrow braiding DVD, in that DVD you'll learn how to braid with extensions and without extensions. So for doing your braids. You have to use a little bit of extension, hair to braid your cornrow braids, to make your braids a little bit more firm and to also limit the frizz underneath your install. So what you want to do is braid two braids on a very perimeter of your head and make them go all the way around your head and connect them in the back for the rest of your hair. You are literally going to braid it straight to the back and cornrow braids with each two cornrow braids that come to the back you're going to connect it to turn them into one. So you're going to see that, as I am stitching down the final braid to teach you how to sew down your braids for your braid pattern. Also, when you're braiding, your hair, make sure that the extension hair exceeds about three inches past your real hair and then tie it with a rubber band. So that way, when you're ready to take down your style, you just got cut above the rubberband to safely take down your braids. So, as you can see, this is the very back of my head and, as I explain each two cornrow braids, you braid, you have to connect it until one final braid and put a rubber band at the end of your braid. Now the size of the braids will depend on how thick or thin your hair is and, as always, no matter your texture. I suggest that you use small to medium sized cornrow braids, so that when you're doing your full sewin, your install is very flat. If your braids are too big, your style will look bulky, so the smaller your braids, the better. So now that your braid pattern is fully finished, as you can see, most of the braids have already been sewn down, and then this braid back here in the back was sewn just straight across onto itself. So now I just have one final braid here and when you stitch down your braid, what you want to do is: grab your braid open up your two cornrow braids and lay your braid right in the middle. So it's as flat as possible stitch down your base. Two times and then stitch going all the way up by putting the needle underneath both cornrow braids and underneath the braid here in the middle until you work your way, all the way up to finish sewing down your braid. So now, with your needle and thread prepared. You'Re going to lift the braid up, so that's so right between the two cornrow braids and you're, going to go ahead and begin stitching, you're going to go underneath all of your braids at the very base. Once you pull the needle through to the other side grab. One string and wrap it around the needle twice and pull straight through to create your knife. You going to do this one more time. Grab your string wrap around twice and pull through to create your knot, you're going to continue to do this knotting technique throughout any stitches. You do when you're stitching down your braids and also when you're stitching down your extensions, so make sure you locate where the braid is and always keep it nestled between your two cornrow braids and continue to make stitches going all the way around. All of the braids pull the needle out and then create your knot, keep working way all the way up to your braid until it's all the way sewn down. So after you finish, braiding your hair and sewing down the rest of your braids. This is how your final braid pattern should look when doing your full sewin hairstyle. So now that your braid pattern is finished, I'm going to be teaching you in detail how to sew your weaving net onto your braid pattern base. So, right before I actually begin stitching on my weaving net, I'm going to briefly explain to you the process that you want to do from start to finish. What you want to do is make sure that you have the weaving net stretched a long way and you're going to place it over your head. So the sides are literally going to be very short against your braids and you're, going to have most of the net hanging down in the back, which you will see in just a minute. Now, as you're sewing down your weaving, it start in the front and you're going to sew going all the way down to the side. I like to start on my left side, then you're going to take another needle and thread and start at the front again and you're going to stitch all the way over to go all the way down to the side. So that way, as you're finished, stitching you're keeping the weaving net stretched, and even now you can take your last needle hold the rest of the weaving net down. With your other hand, keep it stretched and then make your stitches and you're going to stop a little bit past here here, you're going to let that needle hang down and you're going to repeat the same thing on the other side, you're going to keep your weaving Net stretched, so that way, it's flat to your head as you're, making your stitches all the way past your ear. Then, when you finish, the back still keep it stretched with your hand and continue stitching until you stop at the very back of your head and then repeat the same process until you stop at the back. When you're finished you're going to cut off the needle and thread and cut off any remaining net, that's hanging past your braids. The most important thing to remember is that you have to go back and forth to keep the tension even on the net. So it's not shifting and you also have to keep the weaving net stretched. So that way, when you're done it's flat to your braids. So now I'm going to begin sewing down my weaving net. Make sure that you unravel your weaving net and you place it on your head, the long way, which means that when you put it onto your head most of the net hangs down in the back. And you have just a short amount of net here on the sides of your head. Now you want to put it in position evenly and make sure that the beginning of the net is going right over your perimeter, braid, which is here in the front. Now, as you position, it you're going to begin making your stitches you're going to start in the middle work. Your way to the side and let that needle hang like I've, told you before you're, going to start with another needle go through to the side and let it hang down at that point and then you're going to go back and forth one side to the other Side to the other side, to the other side, to keep the tension, even so that you can finish sewing down your weaving so now make sure that you have your weaving meals prepared, make sure it's placed over your braids and you're going to make your first stitch In the middle make sure to go through the net under your braids back out through the net and create your knot, you're going to pull straight through, keep repeating this process throughout braiding. Your perimeters, until you finish, sewing down the weaving net through the net under your braid and back through the net and then create your knot. Go around needle twice and pull through once you're finished sewing down your weaving net make sure to trim off the excess netting. That'S left behind, so I'm going to start at the very middle of my head and I'm going to work my way all the way to the back and then I'm going to do the same thing in the middle and working my way. All the way to the back, on the other side, to finish removing the net, as you can see, creating your braid pattern is an extremely easy process, just make sure to slow down the tail ends of your braids and so you're weaving that onto your braids. So now that your hair is prepared in the very next step step number three, I'm going to be teaching you how to sew mrs. rutter's, hair extensions from mrs. rutter's calm on to your braid pattern base. Welcome to step number three of the full sewin hairstyle in this step. I'M going to be teaching you how to so mrs. rutter's hair extensions for mrs. rutter's calm on to your braid pattern base. So, for this step make sure you have your weaving needles prepared and your hair extensions on hand as well to do this process. So in this step, I'm going to be teaching you how to sew your hair extensions onto your braid pattern base. The hair that I'm using is mrs. rutter's, hair extensions from mrs. reuters.com and I'm going to be doing my full sew-in with three bundles of hair. The bundle links are going to be 24 inches, 22 inches and 20 inches. Also, the hair comes in a natural brown color, but I decided to dye it black. If you want to know how to dye your hair extensions, then I suggest that you visit howtoblackhair.com to check out that coloring tutorial. So to begin, what you want to do is first begin sewing your extension anywhere on your head, wherever you want at the very premature of your head. So what I mean by that is, you can start in the front. You can start on the sides of the back wherever you choose, I'm going to start on the perimeter of my head here on the side. Once I begin stitching, I'm going to go in a continuous circle which my circle is going to start here and it's going to go all the way around my head back to that point. When I close off that point to make sure there is no gap there, I'm going to continue to stitch in a circle throughout the entire process, so for your 24 inches 22 inches and 20 inches they're all going to be sewn in the direction of a circle. So I'm going to begin by showing you how to stitch your extensions onto your braid pattern base. Now what you want to do. First, before you begin sewing, your extensions to your braid pattern base is to secure your needle and thread at the very beginning of your web. What you see in between my fingers is the actual hair itself, and what the hair is coming from is what you call a weft. So now, what you want to do is take your needle, insert it through the weft and pull it out to create your knot. As always, you have to do the same knotting technique whenever you need to create knots, which is by taking the needle and pulling it through the string twice and then pulling through to create your knot now, if your second knot go around the weft to create it, So now that your string is secured, it's going to help you keep track of where your extension is, as you begin stitching it down to your braid pattern base. So now I'm going to stitch about here at this point and as you make your first stitch, you're going to go underneath or actually you're going to go through the net underneath the braid and then pull straight through. This is to bring your extension up exactly where you want it sewn down so now for your second stitch, you're going to go through the net underneath the braid and then you're going to go around the weft to create your knot. Locate your string wrapped around needle twice and pull through do this once again: go through your net and under your braid and also under the weft, make sure the needle comes through, and then you create your second knot now, if you create your second knot, you're going To continue to stitch going alongside your perimeter so now readjust your fingers and you're going to go over to a space. That'S about here and you're, going to create your next stitch when you're stitching along your perimeter make sure that the track is laying right against your skin so that it's as flat as possible when you're sewing it down. So now just continue sewing until you go into an entire circle and keep stitching your extensions to go into a circle. Here I am at the point where I fully sewn down a 24 inch bundle and, as you can see, this is how much space it takes up. So far now, when you're sewing, your extensions make sure that the space from each track you're able to slide your index finger through. You don't need the extension so close together, because you don't want your full sewing to look too thick. So a great distance to use is to be able to slide your index finger in between each of the areas that you've sewn a layer. So now I'm going to show you how you go onto your next set of extensions, which is the 22 inches and to make this process easier when adding in your extension, you simply want to leave your needle and thread intact to begin sewing in your other set. So I've left my new and thread in and you're simply going to grab your new bundle of extensions and you're going to insert it through the weft of the extensions once you insert it through the weft. You just draw a string all the way up and it's going to go exactly at the point that you stop. That now, at this point, you're just going to create two knots there at the base of your extension and then continue to sew when your bundle ends at the very end, where you're closing off your 22 inches you're. Also going to secure the last point that you stitch down with two knots as well so stitch the beginning with two knots and then also always stitch the end of your bundle with two knots, but throughout the process do one knot at a time. So now, as you can see, I've completely sewn in the 22 inch bundle and what's left is so now is the 20 inch bundle? So, as you can see after sewing in all of your extensions you're, going to leave a very small space at the top to create your handmade closure that I will teach you in another step to make sure you have enough space left just take two of your Fingers and place it right at the hole if in all directions it's about the space of two fingers. That'S the perfect amount of space you want. If it's too small, your closure may not be able to work properly or if it's too big, it will look very obvious that you've created a closure. So once you get to this point, you should have a little bit of hair left over from your 20 inches to now create your closure later in this step, I taught you how to sew your hair extensions onto your braid pattern base be sure to keep in Mind that you want to continue sewing in a circle and also you want to start with the longest length on the bottom and then work your way up to your shortest length. When you're done, you need to leave a small space at the top, because I'm going to teach you how to close off your full sew-in in the very next step step number: four: I'm going to be teaching you how to create your handmade closure. To finish off your full sewin hairstyle, here we are in step number four of the full sewin hairstyle with mrs. rutter's hair extensions. In this step, I'm going to be teaching you how to create your handmade closure to close off your full sew-in look now here we are at the point where I'm going to be teaching you how to make your handmade closure from the space that you left on. The top of your head, you want to make sure that when you place your two fingers on a space and go in any direction, it's about the space of your two fingers for me, that's about two inches wide. Now, when you create your closure, I suggest that you use your hand as a guide to make sure that the length of your wealth is long enough, so literally make sure that the width is from your middle finger. All the way down to the bottom of the palm of your hand. For me that would be seven inches at this point. What you want to do is make sure that you have your needles and thread prepared your hair clips, a rubber band, haircutting scissors, your comb and your flat iron with a dry towel, because we will have to flatten out the closure after you create it. So when you first begin, what you want to do is take your closure. You want to insert your needle and thread right at the tip of it and create two knots and when you create two knots, you're going to fold away and you're going to sew it with two knots and then continue to fold it into a circle which you Will see in just a second so take your needle and thread and go through the weft once you go through the weft, create a knot and then you're going to do it once more to secure the knot by going through the web. So now, after you've done that you're going to roll the weft into a circle after you create a circle you're going to secure that circle with two knots, so you're going to go underneath all of the wefts create your first knot and then your second knot and Then you're going to keep doing this process by creating two knots along the fold of each circle and when you reach in you're, going to go through the very tip of the weft twice to create your knot, just like you did at the beginning. So what you seen at the beginning at the tip of the weft, is what you're going to do at the end on the last tip of the weft, so just keep rolling it into a circle and create two knots along the way you you you so now, As I've stated before, when you reach the end, you want to go through the tip of the weft, once create your knot and then go through again twice to create or not. This will prevent the edge of your closure from unraveling. Once you finish, creating your two knots leave your needle thread intact. So that way, when you're sewing it at the top of your head, the needle is already connected to your closure. So now that you finish sewing down your closure and your needle and thread is still connected. What you want to do is turn the closure over. You want to comb all of the hair down evenly and then flatten it with your flat iron. Make sure that the setting is on three hundred and fifty degrees to make the hair as flat as possible. You, after you finish, flattening down your closure. I will then show you how to sew the closure at the very top of your sewing. After you finish, flattening your closure, this is what the underside would look like now, the other side won't be seen at all it'll, be right against your net. As you saw your closure down, when you saw your closure down, you want to take your needle that you left connected. You want to go through your netting and then hook through the side of the weft to pull out and create a knot. So, as you're sewing around your closure, you're going through your weaving net through the edge of the weft, come out, create a knot. Do the same thing go through your weaving net. Go through this edge here, come out, create a knot so you're going to do that. All the way around until your closure is fully sewn down. Also what you want to do to prevent these hairs from getting stuck. Is you want to put a rubber band on here and our sulfate helps use clips to hold the hair as well to keep the hair out of the way? So now, at this point, you're just going to use your hand to just place your closure, where you want it to sit at the top of your head and then you're just going to grab your needle and thread and begin stitching it down. So this is what I'm going to place it now, if it's hopeful use a mirror to to make sure that you can see the top of your head. So what you want to do is grab your needle. You want to go through your neck, then you want to go through the edge of your closure. Then you're going to pull through to create your knot now just work. Your way, going all the way around in very small increments, to create make sure that you're not fully sewn down. So we're just going to go over just a little bit of space, insert your needle into your weaving net and then go through the edge of your closure and then create you're, not so just as I've stated before, keep repeating this process to work. Your way, all the way around your closure and then to come back to your starting point and secure your last night, where your first night was created so, as you can see after you've, completely sewn down your handmade closure. This is how your hair should look at this point, with your full sewing style, use your flat iron to press against your closure once you've installed it. If you want it to be just a little bit more flatter so now that you're at this point in the very next step, step number five, I'm going to be teaching you how to create bangs with your full sewin hairstyle, welcome to step number five of the Full sewin hairstyle in this step, i'm going to be teaching you how to create your chinese bangs with your full sewin hairstyle, using mrs. rutter's hair extensions from mrs. rutter's calm at this point now that you've sewn in your closure, you can now begin styling your full Sew-In and what i'm going to be teaching, you is hard to create bangs for your style. Now, whenever you're cutting virgin hair, you want to make sure that you are already experienced with doing a particular cut or with cutting hair in general. If you aren't sure or you haven't had much experience cutting your own hair, then I suggest that you practice on maybe some cheaper hair to make sure that you're used to the motions and that you can perfect the cut before you do it on more expensive hair. So at this point, what you want to do is make sure that you have your scissors on hand. You want to make sure you have your rat tail comb and your flat iron on your temperature of 350. The first thing you want to do is section off the bang area that you're going to be cutting now it's high or as low as the goals will depend on your taste, but mine will fall about where my eyebrows are now. As far as how wide the bangs will be, I like to make sure that they're past my eyes, because, if they're too far inward, they get in the way of my lashes, and I have to constantly move here out of the way. So that's the way you want to section your bangs and I'm going to walk you through how you want to cut your bangs as well. So first section your hair and when you're combing, your hair down, make sure that you're not forcing certain pieces to go a certain way, because if you cut that hair, that piece that you forced to lay a certain way will constantly cause problems. Let your hair flow. Naturally, and just keep it sectioned off how you want it to be before you cut it, you you so now, once you have your hair section, where you want your bank to be go ahead and use your comb to comb down all of your hairs in a Direction and naturally wants to lay for the last time to make sure that, if there's any hairs that are forcing them a way to be away from your bangs that you move those out the way and other hairs. That may seem to fall more. In line of your bang, you can move those hairs into the section that you actually want to cut. So, just comb all your hair down to make sure that you're not forcing any hairs in a certain way so that you can make sure you're only cutting the appropriate hairs. You want for your Bain, so now for one final check, you want to make sure that you drop the bangs and check that it's going and laying down exactly how you want your bangs to be so now that we're right before cutting make sure that you gather All of your hair in a ponytail, so none of your hair comes down and then use these clips to help keep your hair section layers at a time. The best way to cut your bangs is to make sure that you're doing so in small sections. At a time, you want to make sure that you section off your first track to make sure it's combed all the way downwards and then you're going to cut exactly how long or short you want the bank to be once you do that that will serve as Your guide for how far you're going to cut each thin layer so that when we go to the second layer, you just comb the hair down very softly, allowing it to lay exactly how you want it to lay and then you're going to slowly trim across to Make sure it's going to be even with your first layer, you you, after you finish, cutting your bangs. This is what your full sewin should look like now, as I've stated before before you actually cut your extensions. You have to make sure that you know how to cut your hair appropriately by practicing on cheaper hair, because if you accidentally cut your hair too high or mess up your cut in any way, you will have to start all over and take the hair down. Because the style wouldn't look right when you're cutting your hair, you have to first establish a guide. That means that you're going to take your first track, that's closest to your hairline and you're, going to comb it down gently and let all the hairs lay exactly how they want to lay by doing this. You'Re not forcing your hair to be a certain way so that when you cut it, it still lays exactly how it should lay once you establish where your guide will be by making a small snip at where the area you want it to be, then you're going To finish, cutting off both sides of that section of hair, that section of hair will guide exactly where you will cut each layer as you work on each section of extensions at a time. So after you do that, you go on to your next section. You let down a track of hair. You comb it down without forcing hairs to lay in a certain way you just comb it down and wherever they lay you're just going to cut and use your guide that you create it. So that way, the hair is exactly where you want it to end. As you do this, of course, you keep working your way all the way through and then once you're done, just use your flat iron to lightly flip the ends just a little bit. To give you that little bump for your Bain, so now that your bangs are finished in the very next step, step number six, I'm going to be showing you the finished result to your full sewin hairstyle you here we are in step number six. The finish results to the full sewin hairstyle, with mrs. rutter's hair extensions have fun enjoying your brand-new look. So now that your style is done in the very next step step number seven, I will be teaching you how to safely remove your extensions after you're done wearing your hairstyle. Here we are in step number seven of the full sewin hairstyle using mrs. rutter's hair extensions from mrs. reuters.com in this step, I'm solely focused on teaching you how to safely uninstall your full sewin look. So here we are in the takedown process. First, I'm going to explain the process and then I'm going to go ahead and uninstall my hair. The very first thing you want to do is to use your haircutting scissors to remove your handmade closure. When taking down your hair, you have to work your way backwards. That means you're going to take down your closure you're, also going to trim off your extensions and then take off your weaving net and then cut the thread holding your braids to take down your braids. So if you remember the order of doing your hairstyle you're going to work your way backwards to take down everything so to begin, I'm going to be taking off my closure and then I'm going to go through the process of doing each of those steps. Taking down my extensions and then the weaving net, and then my braids you, as you can see, the extensions are almost removed and I wanted to make sure to point out the fact that I believe a weaving. That is a necessity when you're wearing a sew-in, especially also with a four. So, in the reason, why is it's going to protect your hair and make it super easy for you to take out your extensions also throughout the duration of style, because you have a net on top of your real hair when you're combing, through your extensions on a Daily basis and things like that, the teeth of the comb aren't rubbing against your hair, which could cause breakage on top of your braids, because you have a barrier due to the weaving net. So now I'm just going to finish taking them down and then I'm going to start removing the weaving net. So, as you can see, I've already begun taking down my net and I'm just going to go ahead and finish clipping. So, as you can see, taking down your install is a very simple process. If you're having trouble seeing the back of your head, then I highly suggest that you use a second mirror to help you to see those hard-to-reach areas. Also, if you need a little bit more help, have a friend assist you as you're taking down your style, and that is it for the full sewin hairstyle tutorial for your hair extension needs be sure to purchase mrs. rutter's hair extensions for mrs. rutter's calm. Also, if you want to learn how to do other styles and learn other tips and tricks with your hair as well be sure to visit howtoblackhair.com. Thank you so much for watching this tutorial. You

Comments
Kat Jones: This is one of the most professionally produced hair tutorials that I've seen on You Tube! Very impressed!
demetria young: I knew you were Mrs. Rutter herself! congratulations first of all and thank you for what you do to help a woman in our culture stay looking sharp and well informed. second thank you for showing me something I had too much fear of asking for. its really hard to get fluent help from some of the videos others upload, that wasn't meant to insult anyone! anyways I just wanna thank you for what you do. I have a great respect and liking for what you do! congratulations again on your success and the video was well filmed great lighting makeup wonderful and all together one of the BEST VIDEOS I'VE SEEN ON HERE BY FAR! THANKS
Gail Yarbrough: This is so detailed and informative. How you can sew the braids and bundles in the back without seeing it beyond me. Wow! Thank you!
Delana Morrissette: I think that your video is thorough. You make it very easy for someone to do their own hair and others. Its long but, you are going to know what to do. I thank you for your free class. You used the proper terminology, you were very clear and understandable. Great Video! Hands down.
Taylor Branche: You are very clear, informative and professional. I am learning so much from you. Thank you sooo much from all that you share with other sistahs. God Bless you lovely lady!
Chanel Banks: You explained this so well. Very professional and informative!
joanne hurt: Very well instructed. Great eye contact, comprehension checks given after each step, reviews given often, voice inflections where needed, and kept me interested. Additionally, engaging presentation which piqued my interest and topic was relevant and up to date. Enjoyable.
boujshay: Awesome I am surely trying this. You explained so good!
Jessica Biggins: Omg I love your videos!!! You explain things so good!!! :) &you get straight to the point!!!
Inga Adkinson: Thank you for making this video. I have learned so much.
Rae W.: You're so detailed. Thank you!
Princess Todd: I really appreciate you for breaking it down from start to finish
Alexia Bobah: I love this hairstyle!! You're a very talented and amazing tutor! Thanks very much. OMG!! Did you just take the hair down already ???
Tee Lagway: this looks cute you make this look so easy thanks
sibongile soko: thanks to your videos now I can do any hair style I want myself ,God bless you.
sibongile soko: thanks to your videos now I can do any hair style I want myself ,God bless you.
sibongile soko: thanks to your videos now I can do any hair style I want myself ,God bless you.
sibongile soko: thanks to your videos now I can do any hair style I want myself ,God bless you.
Lady Invy: This was a great detailed video. Thank you
pricy girl: I love the way ur teaching so simple and easy. thanks
See Why: Your bang tutorial was The Best out of all the many i came across. clear, concise, careful and straight to the point! Thanks so much. it was a great help
Valerie Howard: How long did you keep this in? Did you wash hair ? And did you reuse hair? Just curious. Never had a weave is why I'm asking. Thanks. You look beautiful and your video is quite informative.
Wendy Gabriel: hermoso trabajo
drkkwrld: I love this! This is something I'd definitely try
hernandez Zenia: Te quedo espectacular , desde Venezuela !
Ambria Alexander: that looks sooo good!
Ty Ty: I LOVE this hairstyle I'm just scared it may not look right on me. Maybe I should try a wig first.
Wendy Gabriel: hermoso trabajo
K Supastarr: do you have to sew all bundles in circles or can you just do it at the top?
bolaji amodu: Sweetie you are the best teacher l have seen so far! Thank you , thank you and preety too.
OurBest ForHisPraise: Thank you so much for: your patience in your teaching, how you are clear and precise, I have tried to do this and have found some struggles. I am going to order some of your vids as I believe I can learn this process. The music is quiet enough that I can hear you. You have good video quality. I am so happy that I found you. Where have you been? Thanks
Colleen McBride: Thank you for this very informative video. I do have a question. will this method work on European hair?
SaBrionna Bell: I was trying to learn how to do a sew in with an invisible hairline. There are a lot of videos on You Tube just showing the end result, but not the actual processes. I guess that's what I'm expecting because I watch your videos. So, if it's possible could you do one? Please!
pamela turner: awesome tutorial
IWANNALAFFF: Your so bomb! Great job on your instructions! !!! #Guruuuuuuu #OW
Melanie Martinez: Your eye makeup and hair looks like Cleopatra here. Stunning.
Julia {love}♡: Impressed one of the best teacher thanks
Valerie Howard: Lovely!
bricbrac28: the closure part was the hardest of the video, other than that,very good
Positive Talks With Tee Tee: I love your videos! I know some people leave comments and say they don't like that you repeat yourself but I personally love that you do! Some people don't know how to do these things and it's nice to have these step by step tutorials. Ive only been doing my own hair for a couple months now and I've learned a lot of techniques from your videos and I'm definitely doing this style the next time I do my sew in! Thank you Breanna for what you do and keep up the good work!
Glory Pretty12345: Beautiful
Like 7 Oranges: has anyone ever tried reusing a weave that had bangs?
imagine that: Thank you soooooo much this video
Cute Intellect: very well spoken ☺
mzunique27: Arnt u supposed to split the weave for the closure so it's not bulky? Then sew?
Dominique Jones: How long would you recommend leaving that style in? @HowToBlackHair
Regenias Hair Salon Houston: beautiful
MzzSophisticated: that weave still looked good... I would've kept in awhile longer
pamela turner: how do u wrap it?
Hannah Funmilayo: I love dis thanks alot
Debra Carrier: prefect!!!!!!
#layslay Everything: you are amazing
Esthy Anaz: how did u braid it
Charlene Quick: Love all your videos and would like to know if you have a shop
Jessica Norman: does she put the hair in and take it out just to show us how to do it
C.A. M: and am stighting my wig the same way like your.
The Master Diamond of My Life: In the past I did make my ruby closure but now if I use them I purchase them.
Kikiope Abaniwonda: Am speechless, you are excellent, how try this on my sista's hair.m sure how get it, do i did same thing lastweek, for someone, but hw try this straight weavon, to see how perfect and nice, i could do it. tnks dear. Godbless.
M Michaud: I couldn't do step 7. She did it so nice just to take it down. ughhhhh lol
Kodoku.senpai: When you showed the supplies it made me dizzy asf
BiBi. S: j aime tes Tuto pas ce tu explique bien
Aadrianna Usilton: I love how she sews it in.. the bang is a little off..
Kat Smith: it looks cute why dont you use a closure
elizabeth meeks: 35:28 i thought she was cutting her eyebrow off
فاطمه آل سويد: طيب شعرك جميل ليه هالباروكات والتوصيل⁉️
Midnight London: I like your hair
G L: Will you show us how to take them out I did this and could not take it out and I still can't please help and show is I can't get it out
Lorraine Wade: you are the best teacher on YouTube
O C: gurl you a pro.
Juglar Loco: You are so beautiful. my princess . I luv U Greetz from Chile.
Anonymous Ok: Omg did u just do your hair & took it off the same day?! Smfh
wanda smithpage: Bob weave
bolaji amodu: I meant pretty, get it
loving hard: U kinda look like nikki Minaj
HowToBlackHair: Video To Long? If So Watch The Shorter Condensed Version of This Whole Look By Clicking Here https://www.youtube.com/watch?v=BEuo7RsSyOc