Best How To Crochet Braid Method For Alopecia, & Hair Loss
- Posted on 24 November, 2022
- Sew-In Hair Extensions
- By Anonymous
THE BEST METHOD FOR CROCHET BRAIDS WITH ALOPECIA HAIR LOSS & THIN HAIR TAP THIS LINK TO OUR WEBSITE: https://tsbraidsweavesgandghairgrowth....
PLEASE SUBSCRIBE, GIVE A THUMBS UP, HIT THE BELL SO THAT YOU CAN SEE NEW VIDEOS EVERY WEEK, SAVE & SHARE THIS VIDEO!
For More Information About Our Services, Hair Growth Products,
Hair, Wigs, Videos. Pics Etc. PLEASE VISIT OUR WEBSITE & PAGES:
https://www.facebook.com/TsBraidsWeave...
https://www.youtube.com/c/WestCoastFin...
https://tsbraidsweavesgandghairgrowth....
DONATE TO MY CHANNEL IF YOU WISH TOO:
CASHAPP: $TsBraidsWeaves
VISIT OUR SITES FOR MANY BEAUTIFUL STYLES & HAIR GROWTH PRODUCTS..
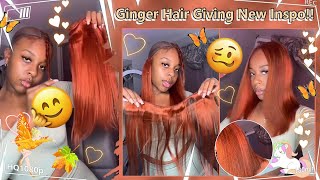
Foreign welcome to West Coast Finance. Please Subscribe and hit that Bell, so you do not miss any of our new videos. Yes, click the link below to visit our website and get your order in for our gng hair growth butter. Yes, it is made with 100 all natural ingredients. And yes, it's me, your girl T drop in another video, yeah peace and blessings. Fam. Welcome back to my channel yesterday I am bringing you a beautiful crochet hairstyle. Yes, my client has some severe frontal, hair loss and hair loss at the top and on the sides, but when we are done with this spell, you will not know that she has any hair loss anywhere. So yes, of course, I'm starting with our gng hair growth. Butter, hair and scalp massage. Yes, I am massaging her hair in her scalp deeply with our hair growth butter. Yes, I'm stimulating her hair follicles with this massage. I always start off like this with my clients, because, unfortunately, most people are not massaging and moisturizing their hair. On a regular basis, ladies, this is essential. We must get back to moisturizing our hair and massaging our hair in our scalp as often as possible. Moisturizing your hair and your scalp helps stimulate those hair follicles and that's what we want to do so here. I am starting her braid pattern. I am starting from the strongest strands which are in the back, so yes, I'm starting in the back, and I'm going to bring this braid around to the front where she has hair loss. So today I am giving you the best braid pattern for anyone who has hair loss in the front or what we call frontal, hair loss or frontal alopecia. So yes start in the back and bring those braids around to the front. So I'm going to show you how to do the best braid pattern, the best foundation for this beautiful crochet style. Yes, this is a style that you do not want to miss. You do not want to miss these important tips in these essential methods and techniques that I show you when you are dealing with someone who has frontal hair loss or frontal alopecia, so it continue to keep watching foreign. Thank you. Thank you, foreign okay, family. So, as you can see, I am bringing these braids around the front and I am going in a circle, but I am making sure that I get these braids really close together. That'S what you want to do. You want to get these braids close together, because this is going to build the foundation. When you have someone who has hair loss in the front, you have to make sure that you have a secure Foundation to be able to create the style that you are trying to get. So again. I am doing a crochet style. Yes - and this is going to be the best braid pattern to make sure that she has a sturdy, secure foundation and that's what I'm doing here so again continue to keep watching and see how I finish off this foundation and also, I am making sure that I'm Doing what's most healthiest for her hair, because that's the ultimate and the most important thing is to make sure that I'm not creating any more tension, stress or pulling on her natural hair. I do not want to pull out any of her strands and, yes, I am doing my brush process. Yes, ladies, we have to get back to brushing. That is one thing that we've gotten away from. No one is brushing their hair anymore, brushing stimulates your hair follicles. It'S another way, so, yes in those hair loss areas that she has, I am brushing in those areas too, because you definitely want to stimulate those areas as well. So not only am I massaging and moisturizing her hair in her scalp, I'm also using that brush to stimulate those hair follicles. So again, ladies, don't forget about the brushing the brushing is very essential. Even when we have our protective styles, you can still take that brush and brush over your braids brush over those crochets brush over that weave or that uh braid style that you have so again. I am continuing this braid pattern in a beehive, but I'm also making sure that I get these braids as close together as possible. Look at that massage that I'm doing for her hair, I am showing her hair some love and affection. Yes, ladies, that's what we have to do, let's show our hair. Some love, give our hair some love so that it can start growing back so again continue to keep watching. I'M almost done with this part of the step of this crochet pattern. So again, thank you. So much continue to keep watching and you do not want to miss what I'm going to do next, yes right here, I am sewing these braids close together. Why? Because this is going to give me a more sturdy and a more secure foundation and that's what you want with someone that has hair loss in the front. You want to have something to sew down to if you're doing a weave or you want to have something to crochet to so. Yes, this is very important to make sure that these braids are together that they're, nice and tight, and that you have a secure Foundation. Foreign foreign foreign, so I have just installed a durable stretchy net cap. Yes, I put this cap on for two reasons. The first reason is to protect her natural hair, because I don't want to crochet on all of her natural hair, because I don't want that weight to be on her hair. Her hair is very fragile and very thin, and at this point I want to relieve as much weight on her hair. So I'm going to be crocheting a lot on the net, so I'm also using this net. For that specific reason to have something else to crochet to and I'm crocheting the net down to that Foundation that I made those braids, because that is going to be her hairline, the net band is in front of those braids. I am not going to cut that. Neckband I'm going to leave that net band on, because that is going to be the extra net that I need to crochet on. To make sure that her front and her sides are nice and full. Because what I don't want is any of those areas to be exposed and that anyone will know that she has hair loss there. So, okay, so this method right here this part right here - is my signature method. My 4x4 closure elastic band method. Yes, I am going to tint this lace closure for her and I'm going to do my signature patent pending closure method. Yes, you can get this 4x4 closure on my website. It is not sold in stores. You cannot get it at any Beauty Supply. So yes go to my website now so that you can get your order in, and this is amazing. This is one what is going to make this crochet style. Look so natural! Yes, it's going to look like her natural hair she's, going to have natural Parts she's going to be able to wear a left side right side or a middle part. Yes, you can only get this on my website. The just the link is in the description below so yes go down below this video click on show more, and you will see the link to my website. There go on my website and you can get this closure so that if you have any hair loss in any areas of the front, the sides, the top the middle. This is essential. Yes, oh my God. This is the game changer right here and again it's patent pending by me. Yes, I'm getting a patent on this and it is only sold on my website again. You cannot find this in any stores or online. It is only on my website. So again, the prices is very affordable and you can reuse it. I use a special material that this does not shed. It does not get holes or gaps in it like some closures, and there is a special material that I use to make sure that it is reusable. Yes, you can reuse this over and over again, so again, click the link to our website below and watch How. I do this method. Yes, it's going to look natural, it's going to be Simply Beautiful. You do not want to miss how I create this beautiful crochet style on her foreign foreign foreign. Thank you, foreign is something foreign foreign foreign foreign. So now I am crocheting around her sides and around her edges. Yes, I'm going to give these edges a nice full look because again when the wind blows or she wants to pull it back, I want it to look as natural as possible, so I'm going to crochet her a nice hairline, yes, she's going to have some edges And a hairline on this side so that she can be able to pull this back if she wanted to, and it looks like her natural hair or her natural braids. So again this is going to be nice and full on the edges. She will not be able to see any hair loss areas so continue to watch, because this is a very special and important part of this style is to make sure that you are having some edges and that you can pull this back and it looks natural as Possible so again, please continue to watch this part. It is super important and I'm going to show you what it looks like when her edges are pulled back or when her sides are pulled back, but first, let's lay her some baby wavy hair. Yes, I do wavy hair and I love this process, so let's do this first and then I'll get back to showing you what these edges in this hairline looks like this is. Thank you. Oh my god, did you see how natural looking that ponytail was looking? Oh look at that. It is just superb and she can pull it up into a ponytail and you would never know that she had any hair loss on the sides in the front or at the top. So yes, now I'm going to be filling in the top up here where her closure is yes, this is going to look so natural. Oh ladies, this is going to look like her natural scalp, her natural braids. You will not know that she even has a closure up here and again. You can order this on my website, so yes, click the link below in the description and get your order in today. So, yes, if you have any hair loss in the front at the top around the edges, if you just have thin hair, even if you have healthy hair - and you just want to give your natural hair a break and protect it, this is perfect. So, yes, I'm going to continue filling this in and you're going to see how this style? Oh, my gosh, look! How beautiful this is! Look how natural it's looking look at that part she's going to be able to wear a left side, part a right side, part or she can wear it in the middle. Oh, my gosh, it is coming out just simply beautiful. So again you continue to keep watching uh. You can get this on my website again. The prices are very affordable. Again, it's reusable - and yes, please subscribe to my channel support me by giving me a thumbs up. Please hit that Bell, so you do not miss any of my new videos because, yes, I upload new videos every single week, bringing you valuable content on every single video. So yes continue to watch to the end and see how this beautiful style was accomplished. Thank you. So much stay safe and stay blessed. Foreign foreign foreign, I'm just talking about


Comments
Shana Pembrick: Wow, this is awesome I was wondering how you was going to stop the braids in the front from sliding back. I attempted this this same method across the front of my hair where it was breaking off, but the braids kept sliding back lol. Next time I'll know to sew them together.
Cheryl Fenton: Wow!! You never fail....wonderful work... Enjoy your Thanksgiving ❤️
Mona Chinn: I love your work. Some of the videos are too blurry