Super Full Bundles Thick Hair , Flat & Natural Sew In | Curlsqueen
- Posted on 07 December, 2022
- Sew-In Hair Extensions
- By Anonymous
▬▬▬▬▬▬▬▬▬▬▬▬▬▬▬▬▬▬▬▬▬▬▬
Use Code YTIB to save $$$ OFF
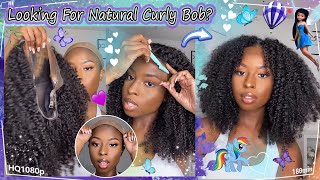
I am wearing 20 inches weave bundles in light yaki texture from CURLSQUEEN .
Shop the same #lightyaki #bundles #weavebundles #extensions #leaveout #sewin for #naturalhair
https://www.curlsqueen.shop/00354C18
√ Luxurious Upgrade 150 Grams/5.3 ounces per bundle
√ Easy styling & Hold curls very well
√ Longevity: at least 1 year with proper care and maintenance
√ Hair can be colored and bleached
√ Double wefted hair extensions
√ Tangle free and minimal shedding with proper care
Connect with Curlsqueen :Instagram: https://www.instagram.com/curlsqueenof...
Tiktok: https://www.tiktok.com/@curlsqueen.com... limited time free tape in / microlinks install now : https://www.curlsqueen.com/find_top_ha...
▬▬▬▬▬▬▬▬▬▬▬▬▬▬▬▬▬▬▬▬▬▬▬--
Welcome Beauties to IambeautifulhustlerTv ✨
Be sure to THUMBS UP THIS VIDEO✨
Leave a COMMENT BELOW✨
And most importantly SUBSCRIBE TO OUR CHANNEL✨
To Purchase Hair & Products Www.ibhslays.com
Allow 3-14 Business Days For All Orders!
CONTACT & BUSINESS INFORMATION ✨
Instagram:_Beautifulhustler
@thebhslay
YouTube :IAmBeautifulHustlerTV
✨For Sponsorships ,Reviews,& QuestionsEmail:[email protected]
786-571-1313
#miamihairstylist,#miamihair,
#browardhair,#browardhairstylist, #Atlanta #atlantahair,#atlantahairstylist #reels, #explore #trending #tiktok #viral #miamimakeup #miamimua #miaminails
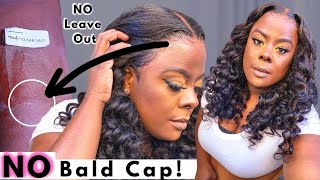
Thank you, hey Beauties and welcome back to I'm beautiful, so TV. Today we are back with another video and instead of this being a wig install, it will be a super flat and natural uh sewing install using two bundles from curls, queen hair and yes, I said two bundles y'all, so down to the bottom left, you will see The unboxing of everything that comes inside the packaging and y'all listen as y'all can see from the beginning of this video. My client hair is super thick super long and full okay. So we're going to be doing a simple sewing. Look with a very, very natural leave out, and as I mentioned, this is two bundles of 20 inch from curls, queen hair y'all, and I know y'all like how the heck you did a full sew in with just two bundles. Listen curls, queen hair comes super super super thick super full and they give you so much hair in just one bundle and with these two bundles I use all of the hair and the install was super full okay. So today um, I went ahead and showed you like the before um with her hair out, and I gave you guys a preview of the braid down and all I did was just braid, the hair uh. You know the braids just away from the part um connecting them to get a nice and flat foundation, and just starting from the first weft I am going to double weft. The first bundle um simply because I want that bottom to be really full, but when it does come to the top, I am going to single weft it just to ensure that her sew in is super super flat. Okay, so um all I'm doing now is just taking that first bundle and it is double wefted and I'm just stitching underneath the braid and once I get to the end, I'm just going to fold the web and secure it on the ends and just continue to Sew back and forth, and with this video it will be a lot of repetition. So I won't do too much talking and I'm just going to let you guys watch and just go with the Vlog, but I hope you guys enjoyed this tutorial and let's get to it foreign foreign foreign. So one way that you can actually um speed up your process a little bit with a sewing, install it's just having a bunch of needles and having them threaded that way, when you finish with one needle, you can just pick up the other one and continue where You left off because having to keep stopping and threading needles does add more time, and another reason why I like to do the flip over method is that it also makes the sewing process much faster versus cutting and, like measure cut measure cut like first of all, Most people like to reuse their bundles so um. It'S not always the best idea to cut them up, but if needed be, if you need to cut it just to ensure that the sewing is flat and not bulky, then do what you have to do, but the less cutting honestly, the better so um. I will be doing the flip over method to prevent cutting the bundles so much okay, so, like I mentioned it will be a lot of repetition in this video um we're still on that first bundle and I'm gon na. Let you guys see how full it is. Just with that, first bundle before we begin to start sewing in that second, one in the single weft method, foreign foreign foreign. So now we're gon na go ahead and take um. This short weft, because I end up cutting the wealth um because um it was only a little bit left if I would have left it double so I decided to just cut it and make it a single weft, um and just finish sewing that little piece that Last little piece of that first bundle, but, like I mentioned from here on now I will be single wefting. So I started from the corner that I ended on um and when it comes to tucking down the corners, you want to go through the weft on the corners um. You know at least two to three times just secure it on the end and make sure it's in place, but when it comes to the actual stitching throughout the wig, I just you know: um go underneath the weft and I wrap the thread around the needle two Or three times and just pull it that way: I'm creating uh creating a knot with every Stitch that I am doing and the uh sew-in is super secure. So it won't unravel or anything like that, because between each Stitch will be enough. Foreign foreign foreign foreign with that second bundle and I will be single wefting, as I mentioned and like I said, everything is repetition. So I'm not going to show the whole thing minute for minute, but I will be showing you bits and pieces as far as me, starting from here kind of like more than a little more than halfway and just single uh single wefting and just stitching through the Braids underneath the track um and you know double knotting it as I go along, and I will also show you the most important parts with just the closing of the sew-in, like our single wealth, especially that last track. So I can lay super super flat. So there's a smooth transition from um the braid down and, of course, your clients leave out and um. I chose to use a model today who had healthy, hair, um nice full thick hair, so I can get the full effect of the natural look that I want, especially because I did not add any Spritz or holding sprays to her install at all just heat protected. In the waxed it to give me a nice, Sleek look and it came out very natural, as you guys seen from the beginning of this tutorial, and you will see again at the end. When I do a recap. When I drop the real stock I created when I'm making this um, you know while doing this style, so I'm just going to continue to single weft um, all the way to the top of the leave out area. And you know, as you get higher, you don't see much of that braid, so you're a little bit stitching like through the hair strands, so just make sure you um stick the needle through the hair still and continue to stitch and be mindful and careful that you Do not um stick the needle through your client's scalp, but still you know tack down those ends going through the weft on the ends and just underneath the wefts um. Once you secure down the ends, foreign foreign of where we're closing up the sewing. I already finished the style where her side part um, hair behind the ear Pargo already stitched all the way up to the very top. So for this part here at the top, you just want to be very Mindful, and I actually have to sew from the opposite direction, just to ensure that I lay the tracks Down super flat, but I'm still going to continue to do that flip over method. Once I get to the end, take it down Stitch through the web, make sure it's laying flat before I move on, and I will just keep going back and forth until I get to like less than an inch space and then I will cut the weft and Just sew that last single piece going around and I just sold that last track to go with the same float that my part is so, whether it's a straight part or a curved part. I make sure that last track lay the same exact way that my wig I mean not the wig y'all, but the leave out is going foreign foreign foreign personal view, we're going to go ahead and begin to stitch. The very last track right in that little space right there. You want to make sure you get that last track as close to the leave out as possible, so starting from the back part where my um leave out is going kind of like in a round motion. I'M going to stitch that end down and then just bring it all the way up, it's close to the track as possible to ensure that it is super super um flat. So once I do that, I will go ahead and um Stitch, that last thing and then we'll get into um flat ironing and blending in the leave out foreign. So now that we have everything stitched on and I will be using for the very first time um, this silkening straightening mist - and this is from I'm - the miracle - touch on Instagram, one of the hair stylists down here in Miami and when I tell y'all, listen just Goddamn Miss smell, like strawberry lemonade, like the real juice and it just get the hair so straight, and so silky y'all, listen. Okay, I just be so proud of my stylist down here in Miami like everybody, just bosses and just dropping raw products, and I'm just here for it like. I love this flat ironing um this flat iron spray from I'm. The miracle touch down here in Miami y'all got to get y'all some head over to her Instagram. She does. She does bomb work as well like, and this product is giving and do y'all see the shine and the silk that is giving this yucky straight hair. Like get into it, okay get into it. I am loving it I'm here for it and it smells so damn good. Okay on the bottle, it says shake and activate and baby once you activate it, it is the T okay, so I will be using this sickening Mist to a flat ironing the two bundles - and this is like a Yaki texture. That'S why it blends perfectly with her natural hair, because it looks very natural: okay, not extra silky, but very natural and super super soft and super full like a person's natural, thick long and healthy hair. So I we'll go ahead and flat iron. Her whole wig up keep saying wig y'all. This is how y'all know I'm used to doing wigs, but I will go ahead and continue to flat iron, both of the bundles out to the tee and then we're going to get into the leave out. So now I'm going to take the wax, stick and apply it on the leave out and also take my hot comb and just kind of like pre uh stretch the roots and the hair out, and then I'm just going to take my little um flat iron that I usually do to um curl up my baby hair edges. I'M going to be using my tiny flat iron today to press out all of the leave out um simply because it gets closer to the root and it's perfect to grip like the edges and because this is not a wig. I don't want to burn my client and I want to get as close to the roots as possible and that's why I'll be using um, this skinny tiny flat iron to press out all of my leave out into all your hair patrols out there. Oh all that heat all that heat, listen, my clients, don't care, they just like to get their hair laid okay, and this is not like to say everyday things. So don't try to kill me in the comments about how many times I passed through her leave out. Um, I don't know about y'all, but we don't like our leave outs, rough looking and crunchy, and all of that okay, we like our smooth and press the hell out. So that's what I'm gon na give my girl and, at the end of this video, is going to be all Blended, all straightened and just laid okay without the extra products and spreads and and got to be, and all that other stuff. Okay, that y'all usually put on y'all leave out, so it's gon na be soft natural and it's going to be giving fresh out the scalp because it is period foreign. So now we have this front section here complete now we're going to work out what um work. Our way off to the side and just doing the same thing, um heat protectant, wax stick hot combing it through first, like with the first few passes to just um, flatten out the roots and then we're going to go in with the tiny flat iron and press. It out just to get everything super Sleek super flat and super neat. My client hair is extremely thick and it is very, very natural to us the roots. So that's why I had to do so much to really get her hair to press out all the way to Perfection. So every client is different. Some clients, hair get. You know perfectly straight. The first pass, for example, like myself when I fly on my own hair um, just one or two passes, my hair would be bone straight and there's people with thicker textures that you're gon na have to take a few passes to really get. You know the hair super silky and straight and not so frizzy. Looking and everything like that so, like I said, every client is different. Do respect. You know what works best for you or you know, what's best for the client's hair and just keep it moving. But that's also another reason why that for this video today I chose somebody who has healthy hair full thick long, hair, um and not somebody who has you know damaged or brittle hair who don't really need to put in. You know too much heat or anything on their hair, like she was the perfect candidate for this sew-in, and she will also be my model that I will you know, consider using for tapings as well, because her hair is so super full long and pretty foreign foreign Foreign foreign side is complete, super nice flat, smooth and Blended, and we're just going to quickly do the same thing here to the left side as well. Um, I'm just going to get straight to the point same thing like once again: hot comb um. He protecting wax. Stick and mini flat iron and yeah y'all gon na see how late it is. Foreign foreign sections that you do, the better results that you would get um, don't try to grab too much hair at a time, just take little sections and really press them out from the root, and it will give you the best straightening results as well: okay, so Um yeah, I just see I added my wax and went in with that hot comb and I'm just going to go in one more time and press it out um to get it nice, sleeky and shiny and um. Once I finish out the leave out, you guys can see the finishing touch foreign now, what I'm doing here? The reason why I'm going in with the big flat iron is to just blend everything together. Everything that I just pressed out was my clients leave out on its own. I'M like y'all hair is so freaking long, and I just love it so much, but I'm taking um her real hair and a little bit of the bundle, hair and pressing it together. That way we get a nice seamless Blends because I know sometimes but I'm leaving so like leave outs, sewing leave outs. You can see the difference between whether client hair stops and starts, but because her hair was so lengthy and full and pretty, and because I press it and Blended everything together, you will not be able to tell what her hair stopped or you know starts. So I absolutely love that, for this install so um I'm going to go ahead and just you know finish our curved part comb and smooth everything down and pretty much that'll. Be it so just stay tuned, because the finishing look is coming up in a few minutes, and here is the finishing look super pretty okay laid. It'S definitely not giving sewing at all. Y'All know people so miss people you're bumpy, but not over. Here. The sew in this laid is giving quick weave it's giving her natural hair it's just giving period, but I hope you guys learned a lot from this video and I thank you beauties for watching, don't forget to like comment, subscribe thumbs up and check out the description. Details down below shout out again to um curls Queen for these beautiful luscious Yaki bondos, see y'all next time.

Comments
SlayedBy Jordan: Baby this sew in is giving her natural hair . I love it
J Nevé: Praise him a traditional sew in
Sammy Da Goat: Lovely Bundles Pretty Face Loving This Stay Safe Have A Wonderful Week
Slayedbynnenny: The sew in is giving ❤
NemoTheGreat !: You don’t know how calming this video was I luv you so much
L. B: That looks really good
Michelle Junior: Beautiful!!!
kayla thurman: Gorgeous ❤
lneal2800: Gorgeous
SimplyAtia91: Yes!!! So pretty!❤
Alisha Shelton: I keep telling yall my girl Beautiful Hustler is the BEST
clarissa howell:
Tenisha Stair Praise God: Wow
deseraymiles87: