Traditional Sew In Wity Leave Out Beauty Supply Store Hair
- Posted on 25 August, 2022
- Sew-In Hair Extensions
- By Anonymous
Traditional sew in with beauty supply store hair
Tutorial
Follow my social media
Facebook shanequa oliver
Instagram hairstylesbyshanequa
TikTok itsallaboutnequa
For hair bookings
Www.StyleSeat.com/shanequaoliver
#traditionalsewin #traditionalsewinwithleaveout #silkpressmasters
#sewintutorial
#gluelessinstall
#versatilesewin
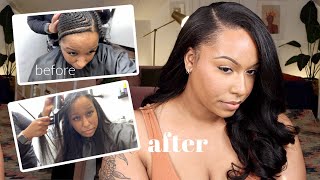
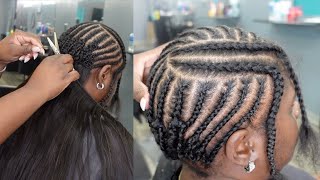
Hey guys and welcome back to my channel, i'm coming back to y'all with a new video ain't. Y'All proud of me put a video up this week and i'm just coming in to do a traditional sewing. I know y'all like these type of videos and everybody's getting tired of lace. So i'm just this was an impromptu kind of recording. So i didn't get many pictures. I didn't get any pictures at the end we just recorded while i was doing it, but i'm going to show you how to do everything from start to finish in this super detailed. I just shampooed and conditioned her hair and was just about to go through and blow dry everything, so i'm just using my little paddle brush to kind of detangle from the ends of the roots and the video is moving a little bit fast. So it may seem like i'm pulling her hair, but i'm not just cause. The video is sped up and then here i'm going in with my blow dryer and my um uh comb attachment from sally's and i'm just getting the hair dry thoroughly and straightened out as much as i can with the blow dryer. So you're going to see me doing that and i'm just going to continue to blow dry until it's all dried and and straightened out stretched out. I want to say, stretched out, so this is how it looks when it's blow-dried and stretched out. She has like super thick, a lot, a lot of hair and it's super thick, so yeah, okay, so here is the part where i'm going to be sectioning out her leave out. Y'All know, i am middle part deficient because i can't part a middle part to save my life, like even the um after looking at this, the leave out that i pointed out was was off center, but i mean it was enough hair, where i could make the Part in the exact center of her head - i don't know what's wrong with me when i do that, but that happens but anyway, i'm just parting a section out and you want to do it about a fingers. Width um, two fingers width. So you just part that out and then tie it back or braid it down or anything like that, and then i also braided down the little hairs on the side that way she'll be able to have a little versatility with the sew in so i braided those Areas down down on the side and then i'm about to start braiding y'all. So i'm just sectioning off her first braid and i do the the first braid or two in like a, i want to say a u-shape. So i just take one braid from this side and one braid from the other side, and i connect them and also i'm going to be using hair and these um two braids. So the first two braids. I call them my anchor braids, so i use hair for them and y'all gon na see me doing that coming up. Next, look like that! Look like that: okay, y'all y'all! If y'all been with me for a while, you know that i use shining jam to secure my braids uh, because my hands are so old and tired. I can't totally grip the hair that tight anymore, so i have to use something to help me secrete a braid. So i find that the um shiny jam - if you put it on there and kind of come through a little bit, it will help you get like a really secure braid and then, if you um pair it with some braid hair you're, going to have a really Good foundation for your sewing so um the first couple braids on each side. I usually use a little bit of braid hair to like really make sure that the foundation of the sewing is secure and those braids are not going to move or start unraveling in the process, even though she has a lot of hair. I still want to add just the tiniest bit of braid hair into the um braid, just to make sure everything is secure and when you're doing the sew in that's like one of the main things you don't want to um be wearing the sew in and then The hair starts to come loose or the tracks are not staying on to the braid. So i want to use that shiny jam in conjunction with the braid hair, and then you get a tight but not um, painful, like braid, so you have a braid that will sustain the life of the sewing, which is about for my sew-ins about two months. So, six weeks to two months after that, you should be getting ready to get a new sew-in. But anyway i just braid it down. I braid the first two braids uh into a u-shape, so y'all gon na see me braid down and around halfway on the the nape of the hair, the back and i'm just gon na stop in the middle of the back of her hair and then i'm gon Na do the same thing to the other side, if y'all don't have shiny jam and all that you don't have to use it. I just i that's what i use in order to keep the braid tight for me, because i know i don't braid. Braiding is not my strong point anymore so and then i just did the same thing to the other side, and i connected that braid. The first braid i did to the second braid - and there is your first u-shape okay, so i'm gon na do the same thing again. Only this time, i'm not gon na go into a u-shape, i'm just gon na braid straight down and we're gon na start connecting all the loose ends of the braid. So i didn't use any braid hair for this braid. I just use the shiny jam and i'm just braiding really thoroughly making sure that the hair is braided, making sure the hair is braided really well, so that it will not unravel and she just didn't need any braid hair. She has a lot a lot of hair. If you want to use braid hair throughout the sewing, you can, but she didn't need braid hair for all of the braids and see i'm just going to connect that last braid i just did to for the u-shape i'm going to connect it to that braid. So, on the back you're gon na have it's gon na, be like two braids going across the back, and that is uh the bottom of the foundation so yeah, it's super easy to do if you doing it on somebody or you're doing your own hair. It'S easy to connect that braid into the other one, and i'm not gon na, do a whole bunch of braids. I'M gon na do probably about 10 braids. I believe, because i do not believe in doing a whole bunch of braids on the client's hair. I just like to get the braids secure enough for them for them to last through the sew in, but i want to make it easier for them because most of my clients, they take their own sewing down at home. So i just want to make it easy, as i can for them to remove it without damaging their hair or cutting out any of their hair, or anything like that. So y'all see what i did there we're just gon na lift the next braids up and that's all you have to do just connect the next braids and this how it looks: y'all yeah, i'm using that beauty supply store here. I think it was called queen. It came from the beauty supply she bought it. I think it was like 18, 18 and 20., so y'all don't have to go out and break the bank to get hair. Just go. Get you some hair from the beauty supply. If you don't or you're not able to buy any online or from any of these hair, boutiques or anything, just go to the beauty supply and get you some beauty supply hair, it will last you at least once a week and um this braid here, i'm just Going to tuck it i'm not going to sew it, because i do not like doing all of this sewing and it makes it harder for the client to take the hair down, especially if they're taking it down on their own. So yeah, that's the braid pattern. I don't know if you can see that good, but that is the braid pattern and then here i'm just going to attach the first track and i'm just going to start at the nape and i'm gon na go side to side and i'm gon na be in The back for the first couple rows and i'm just securing the track on there. Just do it, and then i don't know what that knot is called. I think it's like a slip knot, a fisherman's knife, something like that. You just want to do like a little knot. You see how i'm doing it. I should have slowed it down right there. I didn't, but i'm just um crossing the um thread and twice and then pulling it and it'll stay secure for you. If you don't know how to do that, little knot that i'm doing um just do over and under or under and over it works just the same just want to make sure your ends are secured so that nothing is coming to loose, and that's all you have To do you just do it, you know, what's easiest for you to do, because you don't have to use my exact sewing technique, you can do your own and in here we're just going to flip over the the whip in the back. I do i do a little different. I just flip it over and i secure the ends really well, and i just do that little knot that i do i do it a couple times and then, once you run out of thread, i don't cut that thread right. There i don't end that thread right there. What i do is i put another thread in and i tied those in a knot about two to three times and then i cut it to make sure that nothing is going to come loose. And so that's all you're going to do, and so i'm just continuing to sew side to side and once you get up about the occipital bone around there. That'S when you're going to start to move towards the front the sides in the front, you can bring the hair up a little bit further and then i don't know if y'all can tell how i'm doing this sewing. I pull one of those tracks back and i'm only sewing on the the bottom track right now and then i'm gon na sew that other track down too just to make sure that it's flat and seamless right there, like it's, not gon na, be bulky at all. So i pull one the the top track, i pulled it back and then i sewed a little bit further and then flipped it over. So that's what i did and you just want to do that to make sure that it is not bulky at all. Okay see and then she can kind of pull it back and then what i'm going to do is use a little bit of the got to be spray. Just make sure everything is laying down well in a duck bill. Clip i'm just going to put that duck bill, clip there just to make sure that the tracks are not bulky or not. Ain'T no, like uh the beard of the hair, make sure it's not sticking out and all this, so it's um nothing crazy, sticking out or anything but yeah. I don't know y'all can see the braid pattern just a little bit better. Now i believe, and i'm just going to continue, sewing from side to side and i what i do is i put a clip in on the other side to keep the hair where exactly i want it to stay, and so that's what i was doing over there. Adding one of those duckbill clips on the side just to make sure that the hair does not move and i can sew in a straight line and um so yeah, i'm just going doing the same thing. The same thing, i'm just doing side to side like that, then, and and okay after you're done, sewing um, all the other parts of the hair, all the way up to the part um. This is the only place that i actually cut a track. Everything else. I sew and fold sew and fold, but this right here i measure out a track that fits around the leave out area and on the top part of the braids, and i do a little seamless method. So the first um time i sew the track in i just kind of loop it around with the little lock stitch that i usually do and then on the rest of the tracks, i'll just go through the braid and under the threads of the track on the Bottom of the track, so you will never see the thread on top of that track at all, and it's going to sit really close to the um to the part and the leave out. It'S going to sit really flat and flush with the um part. So it's not really bulky in that area at all. It'S going to just sit really really flat and i think y'all can see i kind of tried to put the camera over the top. Where you can see how flat is laying and also i took the flat iron - and i just kind of like - ran it across the track part of the hair, the the width part the track. I guess that's what it is just so it'll be extra flat and not bulky at all, and then i'm just going to continue to get it do that over uh around that whole track. So i'm just going through the braid and under the track through the weft under the track, not over the track at all. So you won't see the the thread on the top of that track at all. It'Ll just be laying flat, and the only parts that'll have thread is the very end you'll just loop, um just loop around, and do that little lock stitch at the very end of those tracks, and it won't be bulky at all. Y'All gon na see how it is uh, when i finish okay here, i'm just gon na start, taking all the leave out hair down so that i can straighten it with the flat iron and y'all see she had color. It turned out really cute um the way um laying in the uh sew in after it was actually styled. She had just like a little street color in there already, so we just work with it and y'all. She got like super super thick hair. So if you have a client like that or if your hair is like that, you want to use a good flat iron so that in some heat protectant, so that oh there's the heat protecting this the silk elements, i believe that's the coconut one yeah coconut and You want to use like a good heat protectant like a wax stick and a good flat iron. This is my um tool, size, flat, irons, it's old, but it's still working and it says sale. Is this like one of the best flat, irons out and uh, but i'm just using that one to straighten out her hair and i'm just gon na get all the little pieces i can get that i can get with it because it's a bigger flat iron! It'S like one and a half inch. I think, and it's like extra long on the um barrel parts and i just um, i'm doing the middle part. Y'All know i got a problem with making middle parts, but i think i got this one under control and i did spray a little bit of holding spray just to kind of hold the the um flat iron. So it'll stay straightened because um she has a super super thick hair, i'm just using that even wax stick and y'all i'm my shop is missed because i was moving this week. So that's why i'm throwing stuff back in a bag after i get through using it, and all that but yeah, i'm just going through with the person come and i'm going to just press out her the rest of her edges. This live and press out the roots of the um leave out just to make sure everything is laying flat and looking really nice and smooth, and then here y'all, i'm going with those same curling, irons, the tool signs and i'm just going to do like some little Barrel curls y'all know i do these all the time with the flat iron and you just put the hair and flip it over and pull, and you have a nice little cute cute curl can y'all see that yeah. That'S like super cute, like that. That'S easy to do. You can do that on your own self and you just want to get the hair straightened really good, so this is um the hair after i um after i got through sewing it in and curling it and everything. So i'm just gon na pull it to the front and i haven't styled it out. Yet that's just the hair with the curls in it and yeah. We didn't get any good pictures, so i just kind of had to slow it down so y'all kind of see and i'm just using a three-way claw comb and i'm just going to comb through her curls. You definitely can leave the curls in tech and just kind of like mess with the front like frame the front part. I didn't cut it or anything like that. I left the hair, the lint that it was. I think she had 18 18 and 20. and it was so cute with that little stripe. She had a color right there on the side. It was really really cute and different and i'm just clawing it out with the claw comb. Of course, you can leave those curls in there, especially if they're going to school. If you want to you, can leave the curls in and let them just comb them out once they um get ready to go to school, but she was starting school the next day. So and um yeah this is it y'all, y'all um, don't forget to like comment and subscribe click that notification bell so you'll be notified whenever i post a new video, because i haven't had a lot of engagement, but i know a lot of that is my fault. Share the video with y'all friends and on other social media sites - and i have all my social media in the bio leave a heart in the comments. If you like this video, if you loved it and um y'all, have a great rest of y'all day, hey


Comments
camara pope: This came out really nice. What product do you like to use for the edges when you lay the baby hair?
Alexis G: You did that and I didn’t think to get beauty supply hair for one install, I’m scared to try it.
Natasha Hamilton: ❤️
Candygirl: Love it you can do some hair
Phillip Evans:
Lakietha Kelly: Miss your videos!