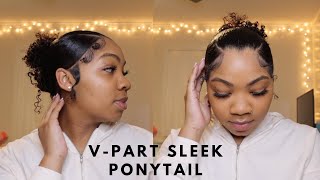
How To Make A Sleek Ponytail On Natural Hair
- Posted on 22 January, 2023
- Sew-In Hair Extensions
- By Anonymous
#hairstyle #sleekponytails #naturalhair
Thanks for watching ✨
*TIME STAMPS
00:03 - INTRO &PRODUCTS TO USE
04:00 - GEL APPLICATION
05:00 - HOW TO TIE A YOUR HAIR
07:00 - TIE A HEAD SCARF
08:11 - EXTENSION APPLICATION
sleek ponytail,ponytail tutorial,sleek ponytail tutorial,ponytail,hair tutorial,sleek high ponytail,how to do a sleek ponytail,sleek ponytail with weave,high ponytail,sleek ponytail tutorial 2019,sleek ponytail on natural hair,tutorial,sleek ponytail and edges tutorial,sleek ponytail tutorial compilation,genie ponytail,sleek pony tail tutorial,extended ponytail,sleek pony,sleek pony tutorial,easy ponytail tutorial,weave ponytail tutorialsleek ponytail,sleek ponytail tutorial,sleek ponytail on natural hair,ponytail,sleek ponytail with weave,sleek low ponytail,low sleek ponytail on natural hair with no water,high ponytail,high and sleek ponytail,sleek ponytail short hair,sleek ponytail 4c hair,sleek low ponytail with weave,sleek ponytail on 4c hair,sleek low ponytail with weave 4c hair,sleek ponytail natural hair,no==type 4 hair low sleek ponytail,sleek,type 4 sleek ponytail no water
Can I go from this to this station since this is your video, hello? Everyone welcome back to my YouTube channel so before we go far Please Subscribe. Let me give you guys three seconds, two one! Thank you. So today we are doing so like ponytail um. The first thing you need is a scarf um, then you're gon na need gel, I'm using Thea smart, holding styling gel, and the next thing you need is your extension or any hair that you're going to be using. So those are the tools that we'll be working with today, yeah so stay tuned. So, as you guys see, my hair is straightened um. If you want a really really light and shiny ponytail, you need to be to like make your hair straight or put some water in it. If you don't like straightening it, then it's gon na be easier for you to work with so right now, I'm just comping! So that I'm able to um part it right foreign, so the next thing you want to do is Pat your hair into three sections. These three sections will help you style easily and take every hair to the part that you want and for me my I'm gon na be doing a low ponytail. So I have to put it into a three three pieces, and this is gon na help me on sectioning. Now I'm just going in with a jelly comb, I'm combing my hair in the direction that I want it to go, because I chose this style because my Frontier is really really short and it was really damaged from my previous hairstyle. So this is like a protective hairstyle that I'm trying and after doing that, you mix all the sections together so that you're able to apply your gel right and you're not able to struggle anymore um. Yes, so now you're gon na go in with your gel of choice. I chose this one because it has extra hold. My hair is really really hard. So that's why I'm using this I'll advise this on anyone with 4C hair, so you just take a small amount and apply um on your hair, starting from the front and pulling it in the direction that you want it to go. So that is the key, pushing your hair to the direction that you want it to go and the gel is just going to glue it down and you should apply. As for me, I'm really applying small amounts, because I choose to apply gel every time so that my hair looks more new and more um beautiful. I don't have those things that pop out when you do a hairstyle, so you can choose to put a lot of gel if you want it um at one hold, but I'm not putting too much. You should just add to the amount that you feel like your hair is satisfied and um. Yes, so the reason I'm pushing it with my hand, is extra hold. This is really really going to help my hair lay down, as you guys can see, it's like pushing it down for that extra hold and, as you guys can see, it's really starting to become shiny. But if you really want it to shine more and look like it's so laid like you're almost about you should put more product that that will help with it now you're going to go in again with the Jelly comb to detail the product into your hair. So that your hair is able to absorb it all, and it's able to lay down easily without struggle like you guys, can see on one swipe and two. It'S really starting to lay down and the hair is already adjusting to the direction that you have pointed it to, and it is starting to look a bit shiny as you guys can see. So this is a technique that I just um thought about it. I didn't know it was gon na work, but I think it's just all right. So yes, foreign with your hair bands to just put everything back there together, like that and like I told you guys, the reason I'm doing. That is because I want you to have an extra hold. I want the products to go in well inside my hair. If you want, you can put two buns just for it to be more strong. Thank you. You'Re gon na add more gel in the parts that we feel like it's not enough, just for that extra hold and for each to become shinier. Now remember to do this to your hair, because this will give it an extra extra hold you guys and, as you can see, it's just ready to go even without a scarf or without heat. This will just dry up and look silky and we end up very, very shiny and it's starting to pop, so you're gon na add some more behind your bun because down there is so easy to forget. Then you just push it all down together foreign. This is just to hold my hair, where I feel like it's gon na erase up later, because I'm not gon na go in with it I'll just let it dry on its own. The next thing you're going to do is put on a scarf. On top of your head, this is going to push your hair down and make it shinier it's going to make your hair stay at one place, it's going to put it in the right place. When you do this, you don't need to put yourself under Heat. This is going to do all the work for you. It'S going to make your hair look so beautiful and laid you want to make sure the head scarf is really really tight so that you get the best results. You want to make sure it's not going to draw lines on you, so you have to be really really careful on how you place it, and it should cover the places, especially the front where it is where it's easily visible. Now we are going to give it 20 to 30 minutes to let it lay down nicely see you guys in 30.. I only took 20 minutes because I wanted to show you guys that it is really possible with even less time it's gon na it's gon na get laid like that. It'S gon na look, really really silk and shiny, and everything is gon na go down through the direction that you sent it now, I'm gon na go in with a hairband with a bigger hair band. This is going to act as a base for the extension. This is going to hold down the extension and prevent it from falling off. Yes, the reason I'm using a hairband is because my extension does not have hooks, so this is a little tip for you guys in case yours doesn't have hooks either now you're gon na go in with the extension. You have to make sure it's really feeling comfortable. It'S really put in the right place: it's not falling off and it's looking and feeling very light. It'S so that's the only tip that I have for you guys if yours has ropes like those that's just for extra hold and yeah. That'S how you do it guys. Thank you guys for watching. Please make sure you hit the Subscribe button. See you in the next video bye
Comments
udaku reloaded with kiddo maasai: Gogoo girl still waiting for the shower routine
IVIA: Niiice
Ngipo tv: Keep going girl✌️✌️..
Scollar Kavii: Very smart
Chosen One:
Essie Bundi:
Real Me Records:
Anette Sonia: Uko sasa ndiko kunabamba
Reinhard galana: Please do a Vlog
khalifa's 254: Support frm Manuel.Wendo .. lookin good.. uuh ook thn..