Ombre Dyed My Curly Wig This Beautiful Orange Brown |Ft. Super Virgin Hair
- Posted on 24 August, 2021
- Sew-In Hair Extensions
- By Anonymous
Hair info: 4x4 Closure Wig Curly Hair 16 inch
Hair Link:http://www.supervirginhair.com/product...
4x4 Closure Link: http://www.supervirginhair.com/product...
Curly Bundle Deals Link: http://www.supervirginhair.com/product...
Website: http://www.supervirginhair.com
Use COUPON code :SUPER08 get $5 off
Whatsapp:+86 159 1575 5966
Email: [email protected]
Instagram @superhumanhair
- - STAY CONNECTED - - -
NEW IG: @ShuannaCreative
https://www.instagram.com/shuannacreat...
FOR BUSINESS INQUIRES & COLLABS PLEASE EMAIL
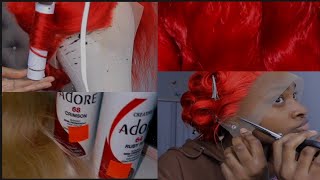
Um period period, that's one. This is the hair bleach that i'm going to be using the l'oreal, quick blue extra strength, and this is the developer that i'll use 50 volume. I made the mixture kind of thick just because i want. I want the process to be less messy so because you know when you're, applying bleach with your hands and the mixture is loose. It'Ll splatter around, like paint and you'll, have bleach everywhere getting all over your stuff, so i made the mixture thicker so that this way it won't splatter as much, and so once i get all the hair saturated well, the sections that i want to be bleached, saturated And fully covered in the bleach. That'S when i'll go in with a much looser mixture, and this will help the hair to process much faster and lift much faster. I'M basically applying the bleach gradually in an up and down motion all around the bottom of the hair, and this will just give that smooth ombre transition. And then i'm going to use my brush, i'm using my brush to brush through the strands to make sure all the strands of hair is coated. Do so, basically, at this point you can already start to see the color has lifted it's getting towards the color that i want it to be and to make this process much faster. You need to cover up the bleach, so i'm going to be using a clear shower cap to cover this bleach and it's going to allow the bleach to heat up and to really process in that hair and make the bleaching process much faster. So this is definitely going to help you need to cover the bleach so that it can do its work and get to the color that you want it to be. It'S looking good, it's looking good we're almost done, but before we wash this bleach out, i want to just go ahead and bleach the knots on the lace just so i can just wash everything out at once and we don't have to bleach twice. So i'm just going to put the bleach on the knots, and for this part you definitely want to use a thick mixture, because if you use it uh, if you make a runny mixture, it's gon na run. The bleach is gon na run onto your hair and then you're just gon na end. Up with you know, over bleached hair, and you don't want that um. I did end up over bleaching my lace because i left the bleach on too long um. I got distracted, y'all i'll, be trying to do a whole bunch of things at once, but, as you can see, the hair is already to the color that i want. So i rinsed all the bleach out from the lace in the hair off camera, and now i'm prepping for my watercolor um die. So these are the colors that i'm going to be using and i'm going to make sure that i mix the dye out thoroughly into the water so that this can transfer properly onto the hair and just keep on watching. Because y'all y'all see what i'm doing. Give me so so: do i'm combing through the hair just to make sure that the dye is transferring throughout all the strands of hair and just make sure you comb through the hair so that you don't have any blonde strands left behind. You want to color. All of the hair, unless that's your choice, not to color um, all the hair and leave some blonde strands behind. But in my case i want to make sure that i cover every blonde strand. So that's why i'm combing through it to make sure every strand of hair gets coated with that die and it's just an even smooth ombre transition. So y'all saw how that hair really absorbed the color out of that water like the water just got lighter. So, basically, that's what i keep doing um each time i add more color and mix it around into the container and then i'm gon na dunk, the hair back into the water after i mix it out and at some point it did, the camera did lose focus. So i apologize ya'll didn't get to see exactly which colors that i you know. I pour it in again, but it's basically the same way that i started off in the beginning. So now, as you can see, you can see it's getting to the color that i want i'm going for like that fox foxtail, orange kinda, bright, brownish orange and it's gon na come out so bomb just keep on watching y'all. So this is the color. This is how the hair turned out. This color is not the actual color, because this is the hair, while it's wet, so you know when the hair is wet it always. The color is always going to look darker when the hair is wet, so when it dries, the color is going to look much brighter, so stay tuned for that, but you guys can still see and get the idea how the ombre effect works. Some parts are lighter and some parts are darker, even though the hair is still wet. You can still see you know what i'm talking about now. We did lose some of that curl pattern at the bottom, so this is me trying to just bring back some of that curls because we lost some throughout the bleaching process. But it's all good, like you can always use a curling iron of flexi rods. You can use a wand curler, you can do whatever you want with this hair. Honestly, you can straighten it. So now i'm going to add two braids to the front. I didn't really show you guys on camera, how i braid, because i'm not the best braider y'all. So i'm not even gon na hold you i'm not the best braider, so i did fast forward on the video in the end i did end up taking these braids out, but i just wanted to show you guys real, quick, how the two braids are gon na. Look just put the plaits in the hair overnight to get a nice wavy pattern in the hair. I did plaque the rest of the hair, but i'm not going to keep it like that. That was just to get the wavy pattern, and i also want to show you guys the inside of this unit. It did, it did come with the elastic band i did not attach. It came just like that, and it has three combs on the inside. So the color came out so beautiful um, the hair quality is immaculate, don't mind my sloppy braids. I did bleach the knots and i kind of like over bleach the knots a little bit but never mind that i ended up putting some plaques in it overnight and i let those plaits sit overnight because after you do um after you bleach the hair, it does Kind of lose some of its natural um, those beautiful natural curls that originally came in it, so just to give it that nice curl pattern again. I just put some plaits in it overnight, and then i took it out just now after i installed it. So this is how you'll get that nice wavy look. The hair came out so beautiful y'all. I really love this color and i want to turn around so y'all can see the back so y'all see it. This hair is beautiful. Okay, i decided to take the braids out. I decided to do a side part, so i was like you know what let me turn the camera back on. So y'all could see what i'm doing. I wasn't. I wasn't feeling the um the braids. It was just it wasn't. I was like nah, so this is how the hair looks when it's wet. It looks beautiful when it's wet, but i just like the the big look so and it's not even fully wet. I just put the mousse in it just to damp the hair a little bit. I


Comments
Isabell Whyte: yesss