Natural Versatile Sidepart Quickweave With Leaveout
- Posted on 29 June, 2022
- Sew-In Hair Extensions
- By Anonymous
Hey y'all !
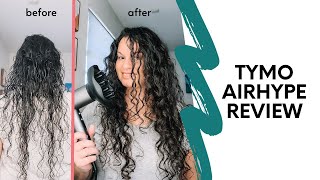
Today will be showing you how I effortlessly give myself a Versatile Side Part Protective Quickweave With Minimum Leaveout .
↘️HAIR ↙️
3 BUNDLES of Brazillian Silky Straight in 26 inches from https://vivifyhairstudio.com/products/......
Fast Shipping
SHOP NOW, LATER
Sign up For alerts to get money off !
Steps♀️
Always Wash, Deep Condition, Moisturize your scalp, and Trim Ends (if needed) Before performing any Hair Installation.
1. Determine where your leave out will be, section that hair off and then Braid OR Mold (place hair in low pony/bun) remaining of hair down. Apply Hairspray (optional)
NOTE: make sure to leave out enough hair to cover your tracks.
2. Place wig cap on, pulling it down over ears and eyes (like bald cap method) then sit under dryer until hair completely dry.
3. Apply Weave Wonder Wrap Glue Protection all over cap, avoiding leave out area, sit under dryer until hair is completely dry.
4.Once hair who is completely dry, cut off remaining cap. Exposing leave out. (If Hair is completely dry, the cap won’t slide off).
INSTALLATION:
1. Unravel Extension and place it against the back of your head, above nape of neck. Measure the weft against your head from ear to ear, using your finger to help measure.
2. Cut the weft that you measured.
3. Apply hair glue to weft and allow to dry for about 30 seconds.
4. Lay the weft on the cap on your head, beginning at the bottom (nape of neck).
5. Repeat the above steps, using the previous weft as a guide to lay the next weft, until you reach your leave out.
6. cut off the remaining cap that's exposed (be careful not cut your hair!!)
7. Style your leave out as desired. (always use heat protectant!)
Product List ♀️
❣️SALON PRO HAIR BONDING GLUE
❣️SALON PRO 30 SEC WEAVE WONDER WRAP (Hair bond/glue protection)
❣️Style Factor Edge Booster Extra Strength (EDGE CONTROL USED)
❣️CHI SILK INFUSION
❣️BaBylissPRO Nano Titanium 1" Ultra-Thin Straightening Iron ( MY FAVE FOR STRAIGHTENING)
❣️INFINITIPRO BY CONAIR 1875 Watt Salon Performance AC Motor Styling Tool/Hair Dryer, Orange
Thank you for watching !
EMAIL: brittanylashellinfo@gmail(.)com
Music by frumhere - your ex's ex - https://thmatc.co/?l=EDC77D4E
Music by Ok.Oso - My Side - https://thmatc.co/?l=7D8F7E6E
Music by yitzzak - Forbidden Fruit - https://thmatc.co/?l=67DC073E
What is up beautiful people? I am britney michelle and welcome to my channel and if you would like to see how i got this super cute and versatile natural, looking quick weave make sure you stay tuned. I'M aware that all the girls are going insane over tape. Ins and i absolutely love tape - ins they're super cute, but i also understand that, with our busy lives and depending on your hair type and texture, tapings can be pretty high maintenance to keep up with and pretty pricey. So i feel like versatile, quick weaves are definitely to go to if you want to get that. You know that super natural looking install and i'm here to show you how to get it at home. So stay tuned. Okay, so we're going to go right into this. Install i am starting on freshly washed hair, i'm 100 natural and i did go in and blow dry my hair out a little bit just so i could straighten it out. I'M going in to section off the leave out area and this is very crucial to making sure that you're versatile quickly. It looks versatile and natural and seamless, so i'm going in and sectioning off every single area around the perimeter of my head, the back of my neck, my sides and then the area where i'm going to have my part at and i'm doing a side part. So you can see me sectioning off my hair and again we're leaving this out next, i'm going to go in and braid down my leave out area, so it is out of the way and then i'm going to braid down the rest of my hair. That'S going to be put up underneath my cap and protect it now. I am not a good writer. I just i know how to braid, but i'm not. I don't braid well, so your braids don't have to be perfect. All that's going to be covered up anyway, and with your leave out, you want to make sure that you leave out just enough hair to cover your extensions, but you don't want to leave out too much to where it's hard to blend so getting into this hair. The hair i'm going to be using is hair from my hair company. All the information will be in the description box below i'm using three bundles of brazilian loose wave and 20 inches. This is absolutely my favorite texture so get into the products you're going to need. Obviously, you're going to need your wig cap, some hairspray of your choice, i'm using that to be glued, and this product is crucial in protecting your hair. Make sure you get this as well protective shoe. You got to have it and also you're going to need your glue, obviously what's up y'all, so we're about to get right into the quick weave installation before we get into this video. I just want to give a few tips and tricks for doing your quick weave. If you're going to be doing it at home, definitely make sure that you have all of the products that i mentioned, but the number one product you want to make sure that you do grab is this. This is the holy grail product, and this is going to allow your quick weave to be protective, and it's going to make sure that you have no accidents with the glue and no accidents with ripping your hair out. Trust me. I have ripped out tons of my hair strands over the years. Just take it from me, dude all right. So now we're going to go ahead and apply our stocking cap, and this is the first layer of protection i like to use. It just makes it so much easier to take out your extensions when you're ready to take your hair down and reuse them, which i will show in another video. Then i'm going to go in and cut the ear tabs out. So this can be a little bit comfortable around my ears and it can be as flat as possible all right y'all. So right now i just put my cap on like a bobcat method. I love to put my cap on like this because it allows me to be able to see where i need to. It allows me to see through the cap um and also it allows the cap to be as flat as possible to my head, and it allows it to when i put this on and put this on, the cap is going to stick to my actual hair. So when i go in to cut it off, it will not ravel back and you won't have to worry about the cap slip and i know i get a lot of questions asking. How do you prevent the cat from slipping back? If you do it like you're doing a ball cap, it will not fall back or slip back or none of that stuff. So, literally, just on the perimeter where my um leave out meets the hair, that's braided already and after we apply the hair spray, you want to go ahead and get a blow dryer or sit up under the dryer to let that dry then we're going to go In and apply the protective shield onto our head and we're going to let that dry up on our dryer or blow dryer as well, and you want to let it dry until it gets really really hard and then you'll be able to go ahead and cut your Cap off and lay your extensions, which i will show in the next clips now, if you are one of my returning babes, you know the deal you know to drill, but if you are new the way that i like to explain how i lay my extensions is: I like to lay them in a u-shape or a c-shape, and this allows for me to be able to stack the tracks on top of each other. So that way, when i get to the top of my head, none of the tracks will be showing. So what i like to do is just measure out the extensions to the shape of my head cut. It apply a very thin layer of the glue. You don't need a lot apply. It then layer up the glue and then use your fingers to help you feel where you're at and just press the extension right on the back i'm gon na let the rest of the video show. So i can show you guys what i'm doing, because i'm terrible explaining so oh um and now that we have completed installing our hair extensions, i'm going to go in and get to this leave out. I am 100 natural and i did go in and blow dry. My hair, but i'm also going to go into straighten it with my flat iron and then i'm going to also use my wine curler to wind, my my hair into the extension, so it can blend i'm going to let the rest of the video play out. So you can visually see what i'm doing versus me talking, because i'm from the show me - and i can show you much better than i can tell you - that's what's always hard for me to sound like the same way of doing the way i'm doing it. Tiptoe is look at all the space i've been out of space. I can tell that you're, my body look up on your face. I'Ve been looking like. I fell deep inside this swimming pool. Sometimes my emotions and thoughts. Don'T keep the control. So i stay to myself. Yeah i stay to myself. I don't know what else to do i'll. Be fine. That'S what's always hard for me to sound like the same way. Don'T you understand the way i'm moving take. My time is look at all the space i've been out of space. You
Comments
Khianti Ray: That’s bomb ass hell