No Braids Quickweave - In Depth Rubberband Method & Liquid Cap, No Cornrows -Gleemade Luxe Body Wave
- Posted on 26 January, 2021
- Sew-In Hair Extensions
- By Anonymous
#Quickweave #RubberbandMethod #LiquidCap #GleemadeLuxeHair
Order This Hair on AMAZON: https://amzn.to/3sJxyGJ
Order GLEEmade Products on AMAZON PRIME:
Gleemade wax stick https://amzn.to/3MtLLiW
Gleemade edge control https://amzn.to/3PvGedC
Gleemade styling mousse https://amzn.to/3wt82GY
Other Products Used in this tutorial:
Liquid cap “Roberts Diamond Bond” https://amzn.to/39DqLYM
Babyliss 1 inch Flat Iron https://amzn.to/3Gc5TnH
Small Sharp Scissors https://amzn.to/3NqqJSD
1.5 Inch Curling Iron https://amzn.to/3LkGfOt
Nude & Black Wig Caps https://amzn.to/3Gc8b6h
Yellowbird Blow Dryer https://amzn.to/3LoIOyL
~~~~~~~~~~~~~~~~~~~~~~~~~~~~~~~~~~~~~~~~~
SUPPORT BLACK BUSINESS!!!
~~~~~~~~~~~~~~~~~~~~~~~~~~~~~~~~~~~~~~~~~
Subscribe to my EMAIL LIST for exclusives…
https://www.jessthedragoness.com/about...
~~~~~~~~~~~~~~~~~~~~~~~~~~~~~~~~~~~~~~~~~
Shop My Premium Synthetic Lacefront Wig Collection
USE CODE “JESSMONIQUE” FOR $$$ OFF at checkout
https://www.gleemade.com/synthetic-wig...
~~~~~~~~~~~~~~~~~~~~~~~~~~~~~~~~~~~~~~~~~
Shop the Hair Products used in this video
https://www.amazon.com/shop/jessthedra...
~~~~~~~~~~~~~~~~~~~~~~~~~~~~~~~~~~~~~~~~~
BUY MY USED WIGS.... 40% all USED WIGS sold ON MY SITE!!!!
https://www.jessMONIQUETHOMAS.COM
Visit my BLOG for more...
~~~~~~~~~~~~~~~~~~~~~~~~~~~~~~~~~~~~~~~~~
Want to meet Youtubers, Social Media Personalities, and Entrepreneur Moguls in your community?
Join the Melanin Movement, Unique Event Experiences, on a mission for social growth and collaboration
~~~~~~~~~~~~~~~~~~~~~~~~~~~~~~~~~~~~~~~~~
SHOP My Custom Design Clothing Collection
https://www.gleemade.com/synthetic-wig...
~~~~~~~~~~~~~~~~~~~~~~~~~~~~~~~~~~~~~~~~~
Shop My Favorite Makeup Products
https://www.amazon.com/shop/jessthedra...
~~~~~~~~~~~~~~~~~~~~~~~~~~~~~~~~~~~~~~~~~
My Camera & Lighting Set Up:
Canon T7i Kit - http://amzn.to/2qLKvlW
Right light & stand - http://amzn.to/2CGNQEj
Studio Lights - http://amzn.to/2CThM3D
Tri Pod for Camera - http://amzn.to/2qLKq1x
~~~~~~~~~~~~~~~~~~~~~~~~~~~~~~~~~~~~~~~~~
follow me on...
~instagram @jessmoniquethomas
https://www.instagram.com/jessmoniquet...
~facebook "Jess The Dragoness" fan page
https://www.facebook.com/Jessthedragon...
for hair reviews, Collabs, & business inquiries email,
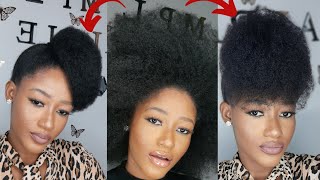
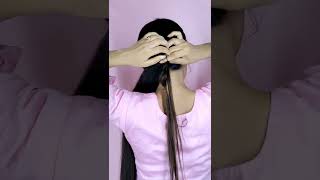
Hey you guys, thanks for coming to check out another quick weave video, so today's video is all about a quick weave that i put in um, but of course, before i get started, i always start with skin care. Um make sure you're taking care of your skin. You guys is so so important. I use the fenty toner and i also used the black girl sunscreen. I love that as a moisturizer. I know we're not really in the sun right now, but it's still important to protect your skin. So i use that and then i also use the fenty gloss bomb for my lips. The pink bonnet i was wearing is from glee may, which is my own beauty, supply store online. So if you need a good silk bonnet that is available on my website. So i went ahead and started with washed hair. I blew it out using my yellow bird blow, dryer, which i swear by and the only thing i put in my hair was my carol's daughter, black vanilla, leave-in conditioner. So now you see me trying to figure out my side part at first. I wanted a deep side part and then i was like you know what i don't feel like dealing with hair all in my face um. So i was like. Let me just do a less dramatic side, part um, so that the hair will be flowing away from my face and not directly in my face all day, so go ahead and measure your leave out. I made my leave out super super thin. I did not want a lot of leave out around my perimeter, but i did make sure i left enough at the top. So, even if you don't want a lot of hair around your perimeter, just make sure you leave enough at the top to cover your tracks at the top um yeah. So that's what i did there. I also wanted to make sure this time you guys, i showed you an option, that's a really sturdy and strong foundation, but with no braids um. I realized on my last tutorial, so many people in the comments were like. I would absolutely try this, but i can't braid. I love this foundation, but i would never be able to do it on myself, um, so there's so many people who don't know how to braid and braiding is like second nature to me, um. So i never really think about it, but i wanted to make sure that i gave you guys an option. That'S a really sturdy strong foundation um but doesn't have any braids or any cornrows. So i decided to use rubber bands um. So you see me here just i'm using the rubber band method to hold my leave out in place or hold it to the side. So i used white rubber bands, so you all could see it more clearly, but i realized that white rubber bands are just better anyway, because when you're doing your own hair, it's just easier to see. So i used white rubber bands to hold down the leave out. I added a little bit of moisture to my hair before i did the foundational area as well, so i just use good old-fashioned old-school, pink oil moisturizer. I still use that. It'S never failed me and i absolutely still love pink oil. I love the way it smells. My mother used to put it on my hair when i was a girl, so i still love pink oil moisturizer. If you guys know of something new, that's better. Let me know but yeah good, old-fashioned, luster's. Silk is never gon na be out of style. So i went ahead and clipped my hair away. If you guys, like these alligator clips they're available on my site as well gleemay.com, they come in a set and they're multi-colored and they're super um strong. I love using these alligator clips, so yeah um so go ahead and separate out part out your um perimeter. Braid. Excuse me not braid, compart out your perimeter area. This is the guide. That'S going to help you to know where the stocking cap goes, where your um, where your bond protector goes, and it's just a good guideline to have, even though we're not using braids, i still recommend having this perimeter section sectioned off, because it just helps you to Know where to put the cap and where to cut the cap, so i would still suggest using this um also notice. The rubber bands are super super loose, okay. I know we have a tendency to put in rubber bands and then like pull the hair, so that the rubber band is extremely tight. Please do not tighten your rubber bands. Okay. Keep your rubber bands super loose um. If it's tight, you will not be able to wear this style. You will do all this work and literally have to take the style out, because the rubber bands are so tight. So please please, if nothing else, you hear me say in this tutorial: please keep the rubber bands loose. Okay, they should literally be like gapping. You should be able to see the space okay, i don't want you guys doing them. Tight um. Also make sure that you soak your rubber bands in oil so that they are, you know really slippery and they're not pulling on your hair, so go ahead and rubber band down the rest of your hair. I like to part my hair in diagonals, and i think i did about five diagonal braids alt diagonal sections altogether, and this is the foundation you guys. So it's pretty simple just make sure you remember that that area is leave out. Okay, so you don't want to confuse the leave out with what you are putting the protector on so the protector base that i use today is robert's diamond bond protective shield um. So i did grab that from my local beauty supply store, but you can also find it on amazon i'll leave a link down below where you can go ahead and grab that from amazon. So i just used a brush to go ahead and apply that everywhere, except for the leave out section. Okay, and if you want you can use a different colored rubber band for the leave out section. If that helps you to remember not to put the bond on the leave out, okay, because um you want to make sure you don't put the bond on the leave out um, so yeah you want to rub the bot. You want to apply the bond all over everywhere, where your hair is rubber. Banded down. You want the bond protectant to be all over those sections. Then you're going to grab a nude color cap. I like using a nude color cap first, because it's easier for me to see when it's time for me to cut the cap away. I like for everything to be super laid down. So i applied a little extra bond to make sure that this cap is going to stay in place once it dries. So if you feel like, like the cat may move, you probably want to add a little more bond and then i went ahead and added the got to be freeze spray to go ahead and even further create a barrier between the glue and my hair. Then i went ahead and applied a black cap because you don't want that nude cap showing so i applied a black cap and then i went ahead and applied more of the protective shield, remembering not to apply it to your leave out. Okay, so um! Once you do all this, you want to make sure that you blow dry all of this and let it dry now me personally, i don't have a sit under dryer, so i do blow dry it for about five minutes or so and then i just let it Air dry overnight, okay or just for several several hours, so that is completely completely dry. You don't want to move forward to applying glue and tracks until this is completely dry, and i want to reiterate that you guys this will not be a protective shield unless it's completely dry and using a blow dryer to dry. It is going to take you some time, so i would say you know let it air dry overnight. Now this is a long process and i always like to get myself a snack and a glass of wine, so i had some roots um and a glass of wine. You guys just remember to take your time, there's no rush. If you're doing your hair at home, like just take your time, don't rush yourself because the more time and patience you use the better, your hairstyle is going to come out and there's really no rush. If you're doing your hair at home, okay, um! So then, i grab my really tiny fiskar scissors. These are the best scissors for precision work. I absolutely love those scissors i'll leave a link down below where you can grab them from amazon, because they're really really bomb for doing um, quick weaves. So i used the glee made luxe virgin hair bundles. I did use the body wave this time and i used three bundles. I used a 20 inch, which is the one i'm going to apply. First, in the middle i used an 18 inch and then at the top i used a 16.. I love using different lengths because it just creates such a nice layered. Look without you having to do a whole lot of cutting when it comes time to do your haircut. Okay, the glue that i use is the 30 second salon pro glue and yeah. I just applied it to the tracks and i applied the tracks in a curved motion: um all the way up to the top of my head. So when it comes to track placement for me, i typically do a few tracks curved flowing forward to the front of my face. Um and then i'll do a few tracks um just straight going straight down, and i definitely didn't want too much hair in my face. This time, so i tried to avoid too many tracks being curved up and forward um. So this is two full bundles and then i started applying the third bundle, which is the 16 inch, and then i ran out because i was applying the tracks is so close to each other um. I finished the third bundle and i definitely didn't want to open another one, so i ended up grabbing some of the tropical deep wave from my previous quick weave, because i do want to show you guys that you can reuse these tracks um for the next quick Weave for the next time you want to do a style, they are still usable and they're still gorgeous. So this is the same tropical deep wave and a 16 inch. It does have a little glue on it. All you do is literally apply the glue again and apply the track, and it's just that simple and the hair is still gorgeous and still usable. So i would say you guys it's important to invest in quality hair. Yes, it does cost you, but yes, you can still continue to use it over and over again and it's still gorgeous. So this is the end result. You guys um. There are about three tracks of the deep wave at the top and then the body wave everywhere else. I love the outcome of this quick weave um. I love that i didn't do a super deep part um. I don't think i would have been as happy with it if i did, if you guys want to see a deep part, quick weave, i can absolutely do that. I just decided not to do it this time, um so to go ahead and get started styling. I went ahead and blow-dried out the hair um just to help um ease ease the process of flat ironing, so i grabbed my babyliss flat iron. This is available on amazon. I grabbed mine from amazon. This is the one inch flat iron and i did flat iron. It on the highest setting, which i think is like 425. I am always so impressed by the versatility of these glime bundles, like they flat iron gorgeous they blow dry out amazing. They look so fire with like no product on them whatsoever. You can literally wash them condition them and let them air dry and they look amazing or you can manipulate them by blow drying flat, ironing or curling them, and they still look flawless. You can use them in a quick, weave, reuse them again for your next quick weave and they still look bomb like i just love these bundles, like you, guys, definitely need to head over to my site and check them out. So here we are the next day and yes, i did go out and i had to run errands, so i just threw a little beanie on um because i hadn't like manipulated my leave out so yeah you guys here we are we're going to flat iron. Our leave out and get this quick weave together. So for those of you guys that are used to watching my channel, you know i do not flat iron. My hair on the highest setting, i usually will just go to about 390 or so so my leave out is never like: silk pressed out. I i don't believe in doing that for my leave out um, i believe, in maintaining the integrity of my hair and my curl pattern. So um, you may see that it doesn't blend perfectly, but it's good for me, and this is how i like to wear my hair. So i went ahead and you know cut the hair. I used my small scissors to go ahead and cut it and i'm making sure that i'm cutting below my leave out normally. I would have kept my leave out together in the um in the rubber bands, but i forgot and took it out so i did use my two inch barrel, curling iron, to show you guys what large barrel curls will look like in this body wave hair. So i had curled the left side first, but i'm not crazy about the way the curls came out on that side. So i decided to add a little bit more layers if you ever find that your hair isn't curling the way you want add a few more layers and try to curl it again and oftentimes. It will fall the way you want. If you just add a few more layers, that's kind of a trick that i've come to understand about cutting hair. If the haircut is bomb, the curls will come out even more bomb. So take your time and make sure your cut is right so that your hair can flow the way you want. So this is pretty much how the hair was looking and i decided um to go ahead and just put on a little bit of makeup. I only did um concealer, eyebrows lashes, blush and lip gloss, but um i was like okay, i'm kind of liking. This more natural look tell me what you guys think um some days, i just don't feel like doing a full face of makeup. Do you guys ever feel like that, like sometimes less is more and it's it's okay, um of course, i always like to put my nails on you guys again. These nails are from queen file down my girl, simone. She does make custom press-ons. She can do any type of nails that you want so definitely check her out. So this is the end, result um and then i was like you know what i like the soft curls, but i think i want something a little more dramatic, so i went in with my um one inch curling iron and i made the curls even tighter and I was so happy with the way these curls came out um, so you guys are getting the full gamut from me today. You guys are getting what the hair looks like straightened, you're getting what the hair looks like with like soft body curls and then you're getting what the hair looks like with voluptuous juicy barrel. Curls. Okay, tell me i'm not going all out for you. I am going all out for you, because i want you guys to see everything that is possible. Okay, i want you guys to see what happens when you take your time. You put in a little extra effort and you reap the rewards of gorgeous hair. Like look at this flawless make sure you guys check out my bundles at gleemay.com. I do offer delivery if you're local in the dmv area make sure you guys are subscribed to my youtube channel hit that subscribe. Turn on your notification bell make sure you're sharing this video share. This video with a friend share it with a quick weave lover share this video with your mama peace. You

Comments
Missy Grando: I love that you are empowering everyone to do their own hair! Even if they go to a stylist, they can see what the stylist should also do to not screw up the extensions.
Domo Unique: I never was interested in quick weaves but this is really gorgeous and natural!
Connie’s Cooking Channel: Yes, less is more. Beautifully done; great content and instructions. YES, girl, you went all out for ME Thank you
Paris Lewis: This is soooooo cute!!! I never tried a quick weave because I always struggled with getting that "perfect" flat braiding foundation or even molding my hair. I got pretty thick and long hair but you have encouraged me to give it try with this rubberband method. I can't wait. Thanks girly, you are so bomb!
Angela Thornton: Thank you for doing this!!!!! I feel more confident now about doing a protective quick weave!!! Because I am not a braider this definitely helps!!!! Being at home and not being able to afford a stylist right now this helps in so many ways ❤️ thx beautiful great review
Candice Arnink: I started doing quick weaves, just from watching you. You’re so beautiful, and I love your videos!
Claire Cobain: Hi, I’ve been watching your channel for the longest. I appreciate all of your tutorials and they’ve def inspired me to do my own hair. I’m a 17 year old fresh out of school and I’ve been strugglingggggg but it’s okay! Cause you’re here! Thank you.
Tiffany Cooper: Thanks so much for this video. I’m one of the ones that can’t braid... now I can try to do my own quick weave!!! ❤️
Be Famous: I have never seen this method!! The finish is SOOO NATURAL and I love the makeup
Missy Pitcher: Love the natural makeup look. Its beautiful. Also I have never done a quick weave because I was afraid of damage to my natural hair but you make me want to try it.
Tameira Shantel: I loved this! Cause when I tried doing my own weave braiding the beehive took 4 hours and the install/ style took 2 hours This will save me all of the time!
Ashley Angelique: Oh my gaaahh this turned out gorg! Love everything about the way you did this and your leave out blended perfectly to me
Capricia Rae: AMAZING option for us non-braiders, thank you so much!
Danii J.: Sis, you might have just helped me out with a new technique and when I tell you I have a whole photo shoot within a few days so imma try it and let you know how it turns out..........but when I tell you I appreciate all of this effort up in this VIDEOOOOOOOOOOOOO !!!!!!!! Thank you so much for sharing Queen !
StarriSkye: This method is also good for a sew in. It saved my life! Looking good Jess
Marvelously Maya: Gorgeous it came out flawless!! you made this look sooo easy!!! New subbie!! ❤️❤️
MARGIE FRIES: Beautiful before and after makeup, love the hair I’m going to try to attempt this
Charlana’s Corner: Enjoyed the tutorial, came out really nice!
M K M: Can I ask how long the entire install process took you? I’ve never considered doing a quick weave on myself but this video has me truly considering it now.
Bosalyn Goss: Yes. I hope every wig wearer watches this and converts. This is gorgeous
Tell The Truth Shame The devil: Super Cute I love it!!! Awesome job as always, I love the natural makeup up look at the end ❤
Nikki & Nanette: This is so easy, thank you
Boldandbodyfull: I enjoy your quick weaves. I like the natural look. Hopefully, I'll get to try this or the previous style soon. Thanks for sharing.
Slaperella: wow your did such a wonderful job. this looks so good !!
Christeenia Lee: Absolutely beautiful!
Krissy James: Absolutely loved and needed this video!! . Timeless video, thank you!
Gypsy Peach: Your natural hair looks so freaking healthy!
MariaHarris: The hair is lovely and I think the natural look leaves you glowing
denisethepainter: I would definitely use different color elastic for the leave out just to make sure. Really good idea for people who don't want to or don't know how to braid... And I like that you pointed out not to do the elastics too tight and to even add oil. The finished result is gorgeous and you are so pretty. Suits You. That was a good decision to put the tighter curls in the front. More volume and framed your face nicely. Greetings from subscriber and Toronto Canada
Deefab 45: Thanks for sharing you made that look so easy
Gail Walker: Great explanation. Love it. Your hair lives beautiful !Blessing
Christina Watson: Yaassss!! I just love your quick weave videos. So natural and beautiful.
Tameka Martin: I absolutely love this....sooo pretty
EyeKnow36: OMG yesss girl you done killed this quick weave. I’m sooooo trying this now. How do you remove the cap?
Mary J Flanagan: I love the smaller curls in the front. They frame the face so very nicely.
Maria Luis: Sis, you are naturally beautiful without makeup.
Kellionta' Mason: Love this method! I suck at braiding. Haven't done a quick weave in a minute
EnMode: Geez. Why would someone dislike this? This is was a perfect, straightforward and easy tutorial. Well done
B_unqik: I love the tutorial it was easy to fallow and the hair turned out gorgeous . When it’s time to take it out how do you get the glue on the cap off ?
Erica Coleman: Child, your lazy make up is my everyday make up lol . Also, I love your quick weave videos! I love quick weaves!
zharia tucker: Literally the best channel to get step by steps. Thank you
Ragad Kadan: I have never tried full weave and I am very interested and have a question: How long do the extensions stay on the head?
12miscellaneous: Yayyy!! She did it without cornrows, for women like me who cant French braid!!! Thank you sis
Sunshine Rayne: What an excellent and informative video. Thank you.
Kelema White: U got me wanna do a quick weave on myself. I have had this in 5 years. I'm scared of the glue pulling out my hair. I'm natural and don't like alot of products on my hair plus I love to oil my scalp. I think I might do this for my boo for his bday tho since he likes hair
AwakeTheWisdomWithin W.GabrielleEther: Yeesss go all out sis You’re so right about keeping the rubber bands loose or you will be taking it down lol. N I’m going to start back with the pink lotion bc I remember how moisturizing it was. Also girl the deep parts are pretty but such a nuisance.. I have one now. The tracks keep coming up at the part. Beautiful install.. do have trouble with itching with quick weaves? I always do n would love a solution it any.
elvsrae: Love this and yasss you went all out and it's appreciated... can you record the take down of this I love the rubberband idea and just want to see how easy it is thanks
Catherine Askew: Just beautiful!
Lydia Boone: Even though you couldn't figure out what look to go with. I swear it was getting better and better..... I'm def going to try my first quick weave. You got me hyped!
Tammi Roundtree: I always enjoy each style/video I've seen you do! If only I could do my own hair like that. First of all my hair is too short and my edges are thin thin.....I really liked that hair....what brand and what type of hair was that? Dont let anyone tell you different, girlfriend your styles be the bomb! And they all look FABULOUS on you!! Thank you so.....much for sharing!! Trust me, I'm learning!✌♀️
Modestine Mungo: You have more patience than a mom in labor giving birth to her 1st child or me.. Took me 24 hrs.. Bless your ! Very interesting . Never saw anyone using rubberband method.
Positive B: I’ve always loved quick weaves..prefer this over wigs any day.
Katie Jones: Thank you for showing us the rubberband method my first time seeing this lol I can’t braid to save my life
ITakeTripsWithEbony: THIS WAS BOMB! I WILL BE BUYING THIS HAIR!
Ibiana C: Wow love it!
Sisa Mhlan: Hey, how long does this last if you work out often?
Andrianna Douglas: Thank you girl because I’m trying to put on my wig and I can’t braid with nails
Tiffany Walls: I seriously think I am going to do this!
SoniaJR: Gorgeous. I love watching your hair videos
Love And Loved: How long could this possibly last ? It’s beautiful ☺️
Sandra Walker: You are simply gorgeous. However would you please mind doing a full quick weave without hair out for beginners. Also can you reuse the hair?
Juliana Cheatem: That is beautiful!
Daniesha Handy: I’m glad I found your channel I love it
keep kalm: Wow! Love this video and your personality
1cocoadelight: Beautiful! Did you double the tracks when you glued them in?
AlwayzN 4Ever: I love it
teena82: Thank you for this ..I can’t corn braid my own hair…This worked well
Teisha Queen: I’m not even a fan of quick weaves but this just made me want one
Missy Grando: I am on the less is more train too. Especially when you get a good concealer like Juvia's or even ELF Camo.
MrsHoward ToYou: Love it!!!
CC7: Your website is Awesome, beautiful products at reasonable prices. I'm definitely about to order
Sammy Da Goat: You Stay Rocking Every Look
Monebyrd: Beautiful thanks soo much for sharing
SuperPerfection28: Beautiful
Celesta Williams: I love your work! Once you remove the hair what do you do with it?
Feeneishia Rodgers: Oh Sis I love it. I have to use the rubberband method because I can't cornrow either, but my hair is getting longer, so maybe I will be able to try to do it soon. I love this video!
Crystal Keitt: Do you have a video of this same banded braid pattern for a sew in? Saw this video on Instagram and now a subscriber ❤❤❤!
Satira Jones: Looks amazing. How long does this last
Lashaun Holoman: Beautiful!!
Jessica Virgo: Can you achieve this with some flat twists or small twists that lay really flat under the cap? My carpal tunnel won't let me be great using all those rubber bands. Just wondering. Bomb video as usual!
Christina Gaines: Girl this was beautiful
Jennifer Grisby: As always you did that love it and ure soo beautiful
Margo Taylor: Beautiful Jess!!
Myrtle Smith: You are so good at it ❤️❤️❤️❤️
Mikah Thomas: You about to have me do my girl hair!
Chloe Ways: Can you do a deep part quick weave please?!
yuri jones: Does this quick weave last longer then other ones?
Anisha Maclean: How long does this last?
S S: Fenty products are brilliant. And thank you for sharing the the black girl sunscreen.yes we need it as black because it orevent skin from ageing too
Cooking for Learning: is this available in the UK? LOVE THE VIDEO TUTORIAL
Danielle Sanders: "SHARE THIS VIDEO, SHARE THIS VIDEO WITH A QUICK WEAVE LOVER, SHARE THIS VIDEO WITH YOUR MAMA!"
raylaxo: This came out soooooooo bomb!!!!!
Keisha Anderson: Does the bond protect your hair from the glue??
Jo: How long does it last?
At this moment: I Loved your look just b4 the lashes so sweet and fresh
Inesha Simmons: The quality of that hair is Flawless
andra nelson: Hello I am a new subscriber of your I love all of your videos I’ve seen so far ,will you do a video on a updue with your quick weave please and thank you in advance.
Sunshine Rayne: Excellent, informative video Sis
Bridget Lee: How long will the quick weave last?
Dante Velasquez: I just love quickweaves