No Glue, No Sew In Quick Weave Tutorial
- Posted on 27 June, 2011
- Sew-In Hair Extensions
- By Anonymous
This is video is about how I did a quick weave without using glue on my own hair! Hope you enjoy! This video is one of my older ones. Check out some of my newer content!
▸ ▸ SUBSCRIBE FOR WEEKLY VIDEOS! http://bit.ly/1TKrTam
▸ ▸ Instagram | http://instagram.com/godzdesign
Check out my store!!! https://www.gracefulmedboutique.com
// PREVIOUS VIDEOS \\
Not Everyone Will Like You | http://bit.ly/2kCCFqv
Time to Move! | http://bit.ly/2kaI6JQ
I Rather Be Fat | http://bit.ly/2kaOXms
The Power of Positivity | http://bit.ly/2q0kN7y
---
// SOCIAL MEDIA LINKS \\
▸ Vlog Channel | https://www.youtube.com/user/PatriciaV...
▸ Instagram | http://instagram.com/godzdesign
▸ SnapChat | https://www.snapchat.com/add/Godzdesig...
▸ Facebook | http://bit.ly/2kfRBK4
▸ Twitter | https://twitter.com/GodzDesign
▸ Periscope | https://www.periscope.tv/GodzDesign
---
// FILM EQUIPMENT \\
▸ Canon T3i | http://amzn.to/2lceATZ
▸ Sony a5000| http://amzn.to/2m6BG1S (VLOG camera)
▸ Sigma 30mm Lens | http://amzn.to/2kfZNdz
▸ Ring Light | http://amzn.to/2jRzqXY
▸ Ring Light Stand | http://amzn.to/2ppt7Bp
▸ Ring Light Diffuser | http://amzn.to/2oPtNwA
▸ Final Cut Pro X | http://amzn.to/2jRybYE
▸ Microphone | http://amzn.to/2jRzDKx or http://amzn.to/2movPGa
---
// DISCOUNT CODES \\
▸ GET EBATES & FREE $10.00 GIFT CARD HERE! https://www.ebates.com/r/1GODZD?eeid=2...
---
BUSINESS INQUIRIES ONLY
This video NOT sponsored. Some links listed may be affiliate links
---
// ABOUT \\
Hey Loves! This channel is all about nursing the mind, body, and soul! Here I focus on motivation, empowerment, self-care, and spiritual health. Teaching you how to love everything about you; committed to showing you how to live a holistically happy life. I hope you consider joining this family and my journey
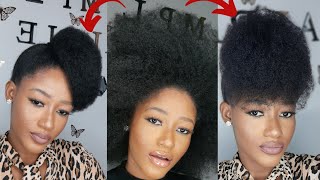
Hey, ladies, this is Patricia here also known as God's penguin here on YouTube and welcome to my channel right now. I have my hair in a side puff. It is a old washing bill that I've exported for the past past like two days three days, and so that's what I'm doing my hair right now, but to give my hair a bit of a break, I want you to do something. That'S more protective, and so I decided to do a quick weave, but I wanted to do in a matter where it could look natural, look, realistic, look, believable, really and also I want to do in a way that I wouldn't be putting any glue to my hair. I don't want to be putting any heat to my hair either. So this is my method of doing a quick weave. It'S really it's really a way. Actually, um and sporting a straighter look um, while you know keeping your hair protected because I don't want put my hair at risk for anything just for a style. You know what I mean, so I just want to make sure my hair is still healthy. I'M not putting any glue to my scalp, not putting at me or to my hair, I'm not putting any you know heat to it to you know, blend textures. I don't want to deal with any of that. I want something quick and easy, and so that is what this video is going to be about right. Now, I'm going to go, buy some wig clips. I'M gon na buy some glue and a wig cap and I'll be right back that fettuccine from the fridge and put it up just put it out. For me sorry, ladies, as you can see, my hair is all twisted up. Okay and I was so excited because, while I was doing my last twist guess what came in the hair yeah, I started it without without the hair. Let me show you what I got first of all, I mean I got some random things and this is from hair, sister's, hair sisters, calm and everything is in here. I got some ardell lashes in here, and this is the 110 really natural-looking and I also got the 116 more glamorous, but y'all don't care about that. Let'S get to the hair. First of all, I did buy an out. Tray do be closure just to make my life a little bit more easy easier and so yeah, that's the closure, and I got the closure in four, because the hair is four and so hopefully that matches pretty well. But this is what it looks like. The hair looks like this: this is black pearl diamond black pearl, yet Premium yaki, remy, hair, okay, and it's in a for now. I'M opening this right now, as you can see. So this is the first time I'm taking a look at this for hair. It is gorgeous look. I got straight only because I feel like I have natural hair of curly hair. It'S as my hair's gon na be all put away. I'M going to wear weave, I might as well just make it straight something different and yes, but I'm not really used. This is the for hair very pretty very pretty as soon as it feels really really soft. I know that's weird guys, but I can't stay in here that stinks. Okay, that's hair smell, so this is what it looks like very, very pretty I'm looking forward to it. Hopefully it looks good with my skin tone. What do you think you like so yeah? That'S that my hair for about 45 minutes and then I'm going to sit under a hooded dryer. You could also blow-dry. You could also air dry, but I'm gon na sit under the dryer. Just because I feel like the hair, the heat isn't direct and I'll be better off that way and I'll be able to accommodate for my time. So don't me talk so much I'm going to do that and then I'll see you later on the day. I guess I'm all done all braided up and I basically braid these all the way to the back and I braided these kind of slanted. Just because I want to make sure that part laid nice and flat. And then you know so I'm just gon na straight back right here in the middle they're kind of bigger than the rest got called lazy but, like I said, and it doesn't really matter okay. So what you're gon na need at this point you're going to need a wig cap, and I got this at my the beauty supply you're going to need a few wig clips. I bought six large wing clips, there's two and each one and then some glue and, of course, the hair and all that jazz. Okay. So I have my scissor here yeah. I do that myself we're gon na do first, oh one more thing: you're going to need! Um you're going to need this. What is it called a what I call shower cap there we go a shower cap, but just before that happens, I'm going to pin my get my edges up. I guess you can sole them up if you want, but I'm just going to, pin them upward with a hair pin, okay Shell's, like that, I just crisscross them all is pinned up, and then I'm going to take the shower cap put that on the hair, and This is just to protect your hair from the glue okay, I'm going to take the bag with the wig caps in them and there's two in this bag. I think there should be yes, there is and that's what they look like and then go ahead and place that over the shower cap. Again, this is the hair. It'S a human remy hair. I bought it from hair sisters, calm and it was buy. One get one free on this hair and this is 12 inch and I bought the one pack for $ 29.99. It was on sale and I got the second pack free all right here we go. I decided to do it this way, because I figured you guys get the better look at what I'm doing then the other way, and so this is what it looks like. Okay and what I'm going to do is I'm going to take the hair and I'm going to measure my hair from this very bottom to the other side and then I'm going to cut it. Then I'm going to take the glue and glue put put the glue on the track, make sure you put a generous amount. You know you don't have to OD so that it's all over the hair, but just make sure you use a generous amount, but take each end. And then I'm going to place it at the back of my hair on top of the wig cap, to help them glue to dry faster. You can just take your blow-dryer and then blow on the top where the glue is far I've come good about. You guys. Take a look at it, it's super long! It'S too long is this! Well, where is this 14? It'S just super long yeah, it's just 12 right there. Maybe it's because I'm short and it looks a lot longer, but that's gon na have to be cut okay. So this is what the floor looks like against my skin, which i think is okay, Oh what I put it obviously is a lot brighter. I don't know how I feel about that, but you know maybe, when I finished the whole thing I like it, I'm already hot. Maybe this wasn't a good idea: okay to have this hair out so long, but just just show you guys what I did. I took an old, a jumbo pencil and I basically trace to where my part, where my part is happy and that's right under there. So I had so just basically line that up. Just to make sure that I know where I'm going to be doing the invisible part, so I'll come back for the visible part, hey guys. I just realized that I only have 40 about 45 minutes to finish this up. I'Ve been here taking my time, but I'm yeah, let's work on this invisible part. Basically what you do. Is you start once you get up to like here? I guess ish, you just start laying the tracks this way on top of each other along this line. Just on top of each other on the line and it'll end up looking something like this and we're going to take care of this line in in a little bit. But we're going to do that all the way back until we get to about. Maybe you right about right here and then we'll work with the closure. Now I'm going to do it a few times, maybe once I don't know how much how much memory do I have? Okay, I'm good, but I'm gon na I'm really the first one here hold on. Let me make sure my line is to get so I don't there we go, but I'm going to lay it rather close to the line like right there. That'S where I'm going to lay my first one, you cut that little piece off add some glue, just like you've been doing before and then I'm getting hot keto and then just lay it right there on the track, see how close it is to the line. Can you see how close it is to the line, okay and slightly slant the end toward this way, the end of the hair just slightly okay? There we go and you can use your blow dryer to blow dry it as well. You could put a little hairspray on top of it. Some people like to do okay, and then you just keep to keep going that way. I'M gon na do one more hey, I'm gon na do one more man, it's getting hot. The a/c is on or Lacey's not on, yes, just gon na lay it right there on top of it, I'm not going to get too close. I really don't want to be here all night and I have to get out of here. So I just cut the piece off: I'm gon na glue again, okay and now I'm going to lay it down and slightly slant, the inner part, and you do that all the way up and put a little hairspray. This is um pink, holding spray, pink yeah. Remember this yeah, a spray on all would never use this on my natural hair, but here it is in the house, those the only holding spray that I have. This old can lay nice and flat. There we go and I will be back once I got all this done and then we'll deal with the closure as I'm back, and this is what it looks like there is my invisible part, and I have this much left and I'm going to go ahead and Close it out okay, so here is my doobie closure and for and it's a pretty good match. If you can see it's a pretty good match all right. So since it's all curled up, I'm going to go ahead and just um Flatiron it right now and have it ready right here, I'm just going to flat iron, it kind of straight bumping it just a little bit. So it's out of this like circle circular thing it's got going on here now I have to be out of here in like 11 minutes, so I don't think I'll get a pull soon make it. I'M definitely going to talk you through it. So don't worry. Okay, so it looks kind of like that now, so it's a little straight instead of you know, bent out of shape and just glue it all up, glue and Allah making sure to get the you know very edges and then you can fill in in the middle. This is what it looks like all right and then I'm just going to place it right in this crown area. Okay right in that crown area, making sure that I open it up so that the line is exposed, the invisible part is exposed, and then you could take your dryer and dry it up and what I'm going to do is just take a little bit of hairspray And just kind of so the hair can blend a little better. I don't I don't have a brush. So it's going to be hard kind of difficult for me to light flat down, but it looks pretty good, I'm sure after wrapping it up one night, it's going to look a ok. So that's what the closure looks like see. It I'll show you from the back now from here. What we're going to do is we're going to cut this down the middle, but we're going to separate the with this thing called the shower cap from the wig cap, okay, and then we're going to take these wig clips and glue them. I mean glue sole them into the sot2 right here and right here for like that, and then I'm going to put two on each side and then two on the back to help to secure them. Okay, this is what it ooh boy. Okay, this is what it looks like it's still kind of sticky in there, but there goes it's nice and open, and then I'm just going to go ahead and sew. The wig clips on the inside right here to next to each other on one side and two. Next to each other, on the other side, Hey, ladies, I am back and it is approximately two days after the install of this quick weave. I want to come in and show you guys. I just as I showed you. I only put two clips here on each side. You can also add two clips here on the sides or new your temples and one or two in the back, depending on how you like it. But the wig cap that I bought has a really good band around the side, and so it fits nice and snug. So I didn't have to add any clips on the sides or in the back. If you don't want to save money, and if you don't want to buy clips extra clips, you could just take a hair, pin and just pin it on the side. And what? On the times where I want more tension, I'll go ahead and just add pins on the side, just for it to be more secure, but this is a very good you know way of having up a you know, protective spot the style if your natural giving you Opportunity to rock straight hair without having to add any heat to your hair and for those who are heat conscious across the board. This is great, it gives your hair a break and it protects it from all the elements, and so that's why I really do like this method that I've done and I haven't really seen it so I figured I wanted to do a video to help my subbies Out to give them a look for the summer or just a look, a change in style. Sometimes we need that. You know whether your natural relaxed you just want something different. That'S what it looks. The part looks like, and you know I wasn't too meticulous. As far as putting the tracks close together, the parts probably when it came out a little better, but you know what I feel like this is good enough. Ok, so let me show you guys what it looks like: it's not styled or curled or anything. I just want to take advantage of the straight look. You know for now and I'll rock it straight until you know you know maybe, and so I don't want to and then I'll curl it up put rods to it or whatever. This is what it looks like. I only cut it a little bit. I figured I'd just leave it limp that it is, since I do take it off at night. It'S right there over my bra strap. That'S why I cut it down too, because it was a little lower than my bra strap yeah. So that's the final look. I really hope you guys like it and I hope that helped. I hope that you guys try it. If you do, please do video response. Okay, but like if you have any particular questions on how I did it, the hair with clips or whatever just leave a comment down in the description box below. But if not I'll see you next time with another video and as always, god bless


Comments
Mical Anyah: Ladies she meant No Glue/No Sew In on her natural hair!!! Goodness!!! Anyway great job!! Came out the way you wanted it to
Jessica Weaver: this is basically "how to make your own wig" haha I LOVE IT! it looks gorgeous
Blessed One: I love it! My favorite instruction. I am in the process of making my first wig. I am going to watch this over and over till I get it Thank you!
Lauren Shepherd: This really has my creative juices flowing and I'm so ready to try it! I just gotta figure out how to do the invisible part but everything else looks pretty easy. Thanks for sharing love! This is gonna help tremendously bc i'm now transitioning!
TheBatman1103: Thank you so much for this video!! It is SO detailed and so helpful. I have been looking for a tutorial for a quick weave for a protected style with no hair out and this is PERFECT!! And you even answered the question about how to keep it in place. Sista Girl...you are beautiful!! PS - Love your bathroom colors too!
Maxima Plane: This is stunning and so natural looking, love it x
denise wood: I love the look! I have lupus and suffer from hair loss, and this is something I can't wait to try!
WyldShana: I so love this hair demo!!! This was the best one I've seen yet. I loved the humor. Everything about this was bomb! Thanks you just helped me boss up my skills.
Peaceful Living: I always wanted to know how to make my own wig...thanks! It came out so cute!
sheila crawford: Wow that was so sleek and pretty! I'm going to make a wig one day thank you for the tutorial!
Patsy Woods: Classy, well spoken young lady, great job!
Keisha Perkins: This is an excellent tutorial! I'm natural as well and I am strongly considering this hairstyle. Thank you for the tutorial!
Karatsukino: so beautiful! I'm gonna try to make one myself :)
sugarbear777: That's really pretty! And you explained everything very clearly, thanks!
Jeanine Sebring: Thanks for your informative video! It is very detailed and easy to follow! Looks great on you! I'm definitely going to try it the way you do it
Sherri Hollyfield: You did a great job!! Great video!
ldycop74: Such a good tutorial. I was looking for a way to do this without glue on my hair and part separating. With the clips you can place the wig where you want and create a closer part. Nice!
Urana S. Kush: Thank you for the demonstration. You make it look so simple.
Michelle Lynn: I love it, you did a great job. Thank you for the teaching.
Eva Ramsey: That was very good! I have been natural for 3 years and Im ready for a new look without perming or putting heat on my head. this looks easy too.
MsNayJ: You did a great job and your beautiful !
Nesha Wright: This is a really great tutorial! Thank you!
mssmtaylor1: I love it! I'll be doing this some time this week. I've been natural for a while, rocking everything from brush length, afro, twists etc. Ive had a box of hair in my closet for over a year. I may as well put it to use. I'm a little nervous about the invisible part, part. How did you glue the tracks on without them actually showing?
bob: This will be my first time trying to attempt a weave and I find your video very helpful! I am going to do it tomorrow using this video as my guide! Thank you!
Bianca McGuire: I love it. great idea for us black women. thanks so much.
Nicole s: Amazing job!! I am now inspired to do my own thanks for posting
dee dee brown: I love it, quick and easy, thanks good job!
Geraldine Staples: Beautifully designed!
SookieSookie: You go girl!! I'm doing this today!! ❤️
Kamrie Johnson: I came here for the hair but... I got make up inspired! I'm wearing that look tommorow!
Cherease Andrews: Very very nice!!!! Thanks for such a detailed video. I'm confident I can do this now.
Amanda Cross: Oh wow, you are looking gorgeous!! Love it!! You did a great job!
Ashley Russell: this video was very helpful. im natural also and have been making my own wigs for about 2 years. apparently ive been overworking myself lol. thanks for making it easier!
ialli1: Hey Sis! Thank you for sharing this tutorial - I found it VERY simple and methodic :o) and thank you for NOT playing any music while your teaching! That is SO distracting :o( Anyway, I really appreciate the step-by-step, pictorial video - God bless u!
Katrina Shanice: Ya'll are being too harsh in the comments section. There is nothing wrong with protecting your hair under weaves. If she chooses to use weave or whatever to protect her natural hair, then that is what chooses. What she does with her hair should not and can not affect you... This video was actually amazing!
Julia Tsalabutie: This video helped me so much!! I am doing a platinum blonde weave & I'm very picky about my hair. So this helped since I won't damage my hair :) thank you so much!
Val Zod: Thank you for this upload just did my first and it turned out OK I made a few mistakes but all in all you helped me save money and I feel competent enough to do a few more. Great job!!!
ELM2015: I love this, definitely a fave and I will be trying it!
ibeautifulest93: happy i found your channel today. Love this tutorial & def. going to use it :) Thank You!
Debbie C: Came out so nice! Have to watch this again.
GDaEssence: The color compliments ur complexion very nicely!! I'll be trying my first quick weave soon. Thanks for sharing! :-)
luv4tika: This is really cute. Your natural hair is gorgeous as well!
Stephanie Brown: This video is perfect because I'm natural too, and I really dont want to put glue on my actual hair. Its cool how you basically taught us how to make our own wig:) Thank you so much !
Shanay: OMG I so didn't want glue on my hair. This is perfect. I already have the clips. Thank you for sharing!!
Izell Astrile: That is interesting the way you did that. Very ingenious,
Marcal MJN: Awesome ... thank you for sharing ... I will definitely try this technique :)
Karen Adesanmi: I been looking for a video like yours to do a quick weave in my head every time I do a quick weave even though I mowed it down glue still get down to my real hair so thank you so much girl I appreciate your videos so much
JazzSinatra: This video was awesome! Helped me out alot to protect my natural hair :) thanks
SexcNcute: im going to try this . its my first time putting weave in my own hair wish me luck ladies lol !
laurynciera73: Amazing! Thank you for showing! ♡
Aging Gracefully: That's beautiful! Awesome job!
SimplyShateria: Hi! Just tried this and it turned out awesome! Thanks for posting!
Bella Monroe: I love it..Thank you..I currently wear my hair natural. No perms..This is a great way to have the look you want without damaging your hair. I am going to try this..Thanks again.
Kym Kay: will be trying this today (:
Tianka Price: absolutely love this video!!! very helpful
Vernassa Fields: Glad I found you! Been rockin' natural hair for 20 years and have been wearing wigs for variety, but wanted something more, but cost effective without changes to my natural hair texture! Thank you!
wandalicious Q: It turned out beautiful. Good job!
Timothy bellinger: I think its very nice that you can watch these videos cause you can save a lot of money and do your own hair. That's how um learning to do my hair better.
Danielle Sheftal: this is a great way to do a quick weave....its beautiful and u did a awesome job
OGVTV Zsa Zsa Gabor: Very well done, I'm definitely going to try it.
Lovely Shay: I am so going to do this!!! Thank you for sharing!
islandgodess81: It looks great...Thank you for the tutorial
Amber M.: Every quick weave includes using glue... She meant there is no glue on her actual hair. Some of y'all need to get a grip!
k rutledge: Thanks for posting. I'm going to try this!!! It really looks nice on you.
brooketastic2010: Wow! That was such a great video. I'm my mother's hairdresser and I'm going to the Army in a couple of months. I have been trying to figure out a way to keep her fresh to death with her hair styles and you have given me my solution. Thank you for the video. :-D
elaine Nelson: Looks great! Doing it this weekend. tfs
Dezrine Walters: Love the video, I think I will try making one myself. Thanks!
Simone Thatch: It came out so nice I was like wow
Valerie Davis: Luv it!!! Very helpful. Thank you very much!!!
Cassandra O. James: Brilliant! I REALLY enjoyed watching and the result is fantastic.
Tracy Wright: I love it came out perfect!!!!
epidemicfire07: Oooh it came out so nice! I really wanna try it!
Annette van Goodman: Great information and your personality is great. Just want to add that the scalp should be oiled and the hair loosened and combed out at least every 4 weeks to remove the shed so your hair doesn't mat. I had my 14 inch hair in a protective style and did not do these things, got 3 inches of new growth in 3 months but then my hair matted with the shedding hair at the back and I had to cut off 12 of my 17 inches...sad but glad that I now know what to do to get my hair to grow. Good luck yall on your hair journeys
Nandi Wahid: i just finished a sew in weave. i wish i would have seen this before hand. this looks so much easier, and less damaging.
Victoria Powell: omg its so pretty ! wish i could do this to my hair .
Truth Be Told: Far more comfortable that a traditional wig cap. I love them and make my own all of the time now.
Warlesea Fatta: This was the best tutorial I have seen. I do not want to leave any of my hair out and I do not want any glue on my head. thank you so much! it was a pleasure watching your tutorial. Now I am ready.....
Rebecca Arnold: You go girl. Keeping your natural hair healthy and beautiful is great. Because if a girl wanted to wear her own hair. Then she could. Who wants damaged, pulled out looking hair. Bald edges. I don't wear weaves. But if I did. Then I would make sure that my own hair stayed beautiful too.
mario villegas: Love the video. Very helpful!!
aplusdiva: Great job! Keep up the great work❤ p.s. your naturally beautiful.
Hi-imcurrentlyobsessed: I love it! It looks awesome! And i love that you ventured out and got a lighter color than your hair!
tito jones: WOW!!! It came out so pretty!!!!
Tonya Morrison LadyBugTLuv: Ladies please have patience with some of the ladies that talk alot because some of the girls watching NEED that and i am one of them ... some of us have never done a wig/weave/extentions and we need all this information ThkU
Annie Phillips: you just opened my third weave eye!!! such a good idea. thank you
Tenasia R: This looks sooo good! I can't wait to try mine. Did you use that whole two packs? or about 1 and a half?
Wanda Moore: I am in love with this video!!! Can't wait to try it
MegaChicChi: Beautiful!! Im gonna do it right now... (:
Donna Gambrell: I Think U Have Beauiful Natural Hair......Great Video...And Great Personality....Thanks For The Share.....I Do Not Wear Weave Myself, However, I'm Thinking Now, LOL.....Thanks Again!!....
Pat Brown: very helpful planning my first quick weave I've been doing weave since 1988. 2008 had breast cancer & hair didn't come back good. thanks you made it look easy.
jpnelso830: that was brilliant! and you are beautiful and so is your natural hair. thanks for the video
I Luv food by Amarie: Great job! ive done this method as well its way better than having tension an all that glue!
Terri H: Great video very detailed and this is a great idea thank u
Pmomma100: Girl this is awesome! I have got to do this next! Thumbs up!!!! God bless!
sylvia katabaazi: Thank you so much for sharing. I am going to be styling in a different hair do every two months; thanks to you. You are beautiful too.... :)
mizzberry19: I love this i have been making wigs for while now and I always wanted to make a part but i didnt know i would could i am natural also. But now i can thank you for this video and I love that color :)
Iesha Rose Music: U did an awesome job on this!!!
Nicole Plummer: No thanks, I would rather buy a wig. Just as cheap and less trouble... geez!
kocoa berry: Thank you so much for sharing this method. I want to make like 10 of these in different textures.
prettyboy46402: You did that! Much love to your creativity.
ajcclassified: LUVS IT!!! I am forwarding this video to my friend with the same needs (a straight style without any heat/manipulation to her 3c-4a hair) THANK YOU!! Color is beautiful and u resemble Sanaa Lathan in some parts :)