Tape In Hair Extensions | How I Re Apply And Reuse Tape Ins For A 2Nd Application | Reusable!
- Posted on 11 March, 2019
- Tape-In Hair Extensions
- By Anonymous
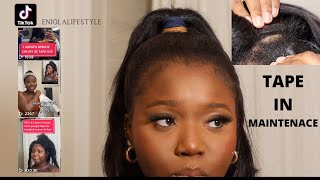
Tape In Hair Extensions are designed to add volume, lenght and thickness in a shorter amount of time than most other extension applications. They use medical grade adhesive and tangle free human hair that comes in endless color variations and combinations to match any style or color. Tape ins are comfortable to wear, the bonds are flat and resistant to heat and moister and blend seamlessly with real hair when applied correctly. The Tapes can be re lifted\re used with new adhesive about every 6 weeks. This client used 4 standard packs of blonde and honey blonde mix packs of 14 inch tape in hair from Donna Bella hair. I love hair extensions and always enjoy the process, thanks so much for learning more about them with me and don't be afraid to book a consultation and find out more today! (248) 646-7929
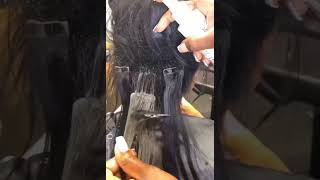
Hey guys, it's Danielle here, thanks so much for tuning into this tape in video, I wanted to do my best to give you as close to a step-by-step application, as I could on how I put in my tape in extensions now on this client. We are actually doing a redo, so I've already taken her out. We'Ve done her color I've, cleaned up all the tape and glue on the old extensions. Well, these are the old assumptions that we're reusing, so you're, actually seeing me do a reapplication on the same day. Now, with a reapplication, the only difference I have is placement, so I have to change up the placement every time. I do an application because I don't want any one area of the hair to get weakened or pulled repeatedly in the same exact spot over and over. So here you're, seeing me going in on an angle when I do a fresh application. I actually go in on straight lines only, but since this is a redo and we're changing up the placement, you can see me there putting the hair in on an angle, and now I'm going in with my second one and I'm just following this diagonal back line. All around the perimeter, and then I can start going in on my straight lines now that I have kind of reset my placement, so the placement of all my extensions is just a little bit skewed when I'm doing a reapplication. Just so like I said that one those areas on the head can't really get weakened by just over placing tape and glue in the same spot every time so just going along - and here you can see the full application of that first perimeter - and this is the Top tape. Okay, so I haven't gone back and done the sandwich ink tapes. Yet so I apply my extensions with top and first because, as you can see, I can go back and kind of like part, the hair and it's already snatched up the hair. That'S going to be sandwiched in between the sections, so by adding the tape on the top first, it's kind of like grabbing the hairs that it needs. As you can see right here, all the hairs that are going to be sandwiched in between are already stuck into the tape. So now I can go in with the bottom end and just sandwich those hairs. It'S going to be a very thin layer and by doing the top one first, it kind of it eliminates the process of you having to to section out that layer of hair. So when you do it on the bottom, first you're placing it as you can see here like I'd, be placing the tape on the bottom just with the hair on top of it, and then I'd be going in and parting out. How much, I think, is the right amount instead of just going ahead and using that tape as my guide and letting it scoop up that hair and then flipping it over, and it has already grabbed the correct and the perfect amount of hair that should be sandwiched In between each tape, so I hope that makes sense for you guys, but if not, I will definitely go ahead and show you on a full clean. You know brand new hair brand new sectioning in a different video, but for today we're going to kind of learn and reverse and we're gon na just watch a reapplication. So there's that sectioning again and as you can see, that's those top the top tapes. And then you can see he's sandwiching, some of the hair and just redoing that process again on that last tape, in that, oh just squeezing those hairs in between those tapes to create our perfect sandwich and there's the first layer done and ready to go. So another thing I do when I'm doing a redo is that I cut as I go, so you can see me placed in that first layer and now I'm cutting her into shape. The reason for this is because, when I'm doing a redo we're already using hair that has been sectioned placed and cut into style. So all these pieces are a little bit uneven and we just want to go ahead and shape them up as we go, and it makes the whole process a lot easier when you get to the end now on this section here, you can see another challenge that We get sometimes when we're doing, reduce and even sometimes on fresh tape is that you'll come to a spot in the hair, where the sizing isn't quite right, so the tape is longer than the amount of space in between the hair. So I just go ahead and I cut it down into perfect size. So that's another great thing about tapings is that they're completely customizable? You can cut pieces down into exactly the size you need, and all you do on. The reverse is just cut the sandwich in bottom part as well, so you cut it and you're able to move right along. So you see, I just finished, that one section on to the next one and just go back and sandwich everything in between as a disclaimer to this video. I just want to apologize. I am wearing a body suit and sweat pants and it is terribly distracting because of course I could not have been bothered to actually snap the bodysuit it's just tucked into my sweatpants and yeah. It'S annoying. So sorry I'll do better next time. So now we're just moving up the head. A lot of tape in application is really just place, a repeat place, a repeat so in the video you're gon na get a lot of just in and out between real time and just be sped up video, because that's really all it is once you get it Down you get a groove and it's just place and repeat: I'm going ahead and I'm straightening as I go, because when you're working with old tapes you want to straighten them out because you're you know washing them and they're gon na get that natural curl to them. So they're going to be extremely straight, so you might as well just straighten the hair as you go and as you're cutting as you go. It just makes the style at the end really easy. You just always know that when you're doing a redo chances are you're. Gon na go out with a straight style cuz. It just makes the whole process so much easier, since the hair itself is so straight and it's just easier to straighten as you go so like I said, we're just constantly repeating the process of place. Then flip then place the bottom sandwich. Then repeat so, hopefully, just by watching the repetition you start to get the concept of it like I said I want to do one more, very in-depth video on this and just start from the beginning. Do everything in real time and just cut a lot more of the sections, but for this I think it's just really great, for you to kind of just watch me on the process, see how I do it and I think you could pick up a lot of Tips a lot of things that are just easier seen than explained and understand some of the nuances of doing extensions, especially taken when doing a redo. You also do have to reapply the tape to each individual section of hair. So in these instances, where I'm doing it a takedown and a redo all in one day, I do employ my client to help me with the retaping, the tape so she's, putting the tape on then I'm flat ironing it and placing them back into the hair. So here we're getting close up on that bottom part as you can see the top and the sandwich hair is already done. So I'm just going ahead and placing that tape there. Sorry, my hair gets right in the way of the money shot, but don't worry, you'll get it on the next one, so just placing it in there and then I'll go back and just apply my pressure and then we'll be ready for the next one. Hopefully this section illustrates what I'm talking about in my method a little bit more, so I'm just taking that top tape, pulling it up with the hair that needs to be sandwiched in between with it sectioning that off and now I'll just be going in with my Bottom sandwich making sure that all the hair that needs to be there is right, and everything that doesn't need to be is out of the way and we just go ahead, and you want to perfectly align that bottom tape with the top one. So matching them up. As perfectly as you can applying pressure and voila there, you have your tape in application. I am almost done and I'm just going in and making sure that I'm cutting as I go and just making sure that all these hairs blend in perfectly with these tapes. As I said before, it really is just a process of place tape and repeat so here we are just finishing off the last top few sections she's looking gorgeous, and this is really starting to shape up. I think it looks really good. I was really happy with this application, but, as you can see, these are some of the challenges you deal with when doing a reapplication. Some of those things are the uneven layers of pre used, hair going in on different angles, spacing all types of things that I hope you have taken note of during this process, but all in all, we got through it towards the end of any of these applications. Both you and your client might start to get a little antsy. You know just being ready for this process to be over. I always know when my client is ready for the end. So hopefully you just get a little coffee, so you can go ahead and through these processes, although they are one of the quicker methods of hair extensions, you know they do take time and you do want to take your time and just make sure you do them To the best of your ability, so for me the best thing I can do is be patient, take my time and do what I'm called to do and do it in the time that I know I need to make you look your best, so you know we're Coming to the end of that process, it's never too bad, but we're just you know doing the finishing touches just making sure we have the longest piece of hair that we can to match up. It'S all just a matching game from here on, even in the beginning, it's really a matching game, even though you have all these hairs to choose from towards the end. You start, you know grabbing still wondering. Do I have enough left? Okay. Does this color match with this? It really all is a process. For me, I kind of have a method to my madness when it comes to my color placement, as well as with length and just the placement of where I want the tapes. So it's it's almost like a just like a mathematical Tetris. You put up building blocks type of process, sometimes you're bricklaying when it comes to color. So it all makes sense in my head and all you know kind of translate translates in the end and just blends with the color, but it can be challenging as well. So you'll see me towards the end. I have to go in and dip into a few old tapes or not old tapes, but a new tape since we're using all of her blue used hair in this application. I'M just going in and just picking up a few tapes from a brand new pack because we ran out or we may have ran out of the color to match up with, but either way it's just really really smart to be well-stocked, well supplied and just have Everything you need and just always have hair on hand, because you never know what you're going to run into when dealing with every application. You might also have a client who's coming in and has had a few hairs come out as her application previously has worn. You know that is not uncommon. Some of these hairs might slide out as they're redo appointment is approaching, so I might not even have a full head of hair after taking out all the old tapes, so you want to be just always well stocked and well supplied and just have everything you need At your fingertips and everything should work out well, you can always improvise as a stylist, so you know just make it work as you go. It'S totally true in a process like this, when you're doing a redo, you're doing everything as you go and just making it all make sense in the moment and that's what we're doing now, just finishing off those last few cuts: kind of sculpting and layering, the hair And yeah just making her look as beautiful as I can so. The last few things I'll be doing in this video is just shaping up the rest of this haircut, just making sure it all blends together. Like I said, it can be a little difficult when you're dealing with all old pieces of hair that I've already been cut into shape for a totally different layout and placement of each of these hairs. So you just really have to go in and kind of just blend it all together with your cutting, as well as your styling and everything else. So you're just going to be watching me finish off this haircut and styling the last few sections of hair to make for a finished product at the end of my process, I'd like to go through with the blow-dryer and brush and just smooth everything out get all Those little pieces of hair that got caught up in tape, but don't need to be there and smooth. My last section before I finished my style flat ironing and getting ready for my finished product, and this is it guys this is our finished product. Sorry, I didn't get any nice glam shots for you at the end, but she was done and are ready to go so there. It is start to finish tape in process redo thanks. So much for watching. Please come back for the next one love you bye!
Comments
bronzing1x5x: Very good tutorial!! Great job!!!