Diy Fairy (Mermaid) Hair! Holo Tinsel Hair Extensions At Home
- Posted on 24 July, 2020
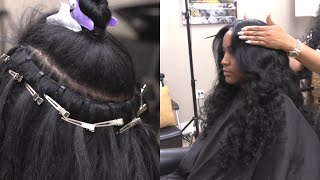
- Tape-In Hair Extensions
- By Anonymous
Today we're going to turn our hair HOLO! Tinsel hair is a fun trend from the 90s that we could see come back in recent years. You can style them with heat and add any colour without damaging your hair!
There's different methods of applying hair tinsel but today I'm going to show you one that looks most natural of all. It takes a bit of practice to get it done but the results are mermazing!
I can imagine it would look fintastic in water!
*btw excuse my oily face! I got really into skincare recently and my skin is trying to figure things out haha*
Materials:
- Hair tinsel in colour of choice, I got mine here (amazon affiliate link):
- Ardell eyelash glue in clear (amazon affiliate link):
I love this little trick because the tinsel is so easy to use and the colours last ages! Fun activity for a night in, sleepover, birthday party, festival or special occasion.
******************************************************************************
I hope you enjoyed this short fun video! If you did, please consider subscribing for more!
I make mermaid related content on Mondays and some fun DIYs/random nail/hair/whatever comes to my head on Fridays!
If you liked this video check out how to make hair out of yarn (for dolls or extensions): https://www.youtube.com/watch?v=LZ7M-X...
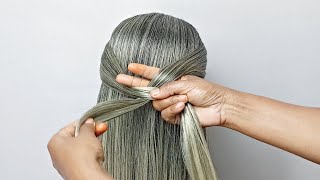
Hello, everyone welcome back to my channel, so in today's video i'm going to show you how to put tinsel in your hair. Let'S get started, so there is three main kinds of hair tinsel. There is ones with beads ones, with tape in kind of extensions and just the plain ones, which is the ones i'm going to be doing today with a little bit of a twist. So what i'm going to be doing today is tying in the single strands of tinsel into my hair and securing them with some eyelash glue. But it's not just any eyelash glue, i'm going to be using the ardell lash adhesive, but it's the one that makes your lashes stay on for like a few weeks and stuff. So this will make your extensions last way longer. But if you don't want to put any glue in your hair, you can just tie them in and let me show you how to do that so you're going to take your ribbon and you're going to fold it in half and by ribbon i mean this is Kind of your piece of tinsel and what you're going to do is take your fingers like this kind of like a chef's kiss and put it through the loop like so, and then open your fingers and catch that part below kind of making like a little tie. Just so, you can create a loop and then pull it through and then we're gon na, take it off the finger and catch it through the loops. So basically, the premise of this is when you pull on the string at the bottom. The knot will kind of tighten itself, so that's what we need for our hair and then you're going to part your hair. I would do like the under layer, so the knots don't show at the top of your head and then i would take a tiny, tiny strand of hair and then put your fingers on the hair. Take your ribbon and tie it to your hair like so so then what you would do is take your tinsel and tie the knot together. Take your strand of hair and you would tie one piece of the ribbon with your hair as well and tighten it now. You'D want to make sure to keep your knot very, very close to your scalp, so now that you kind of know how to do it, let me show you with the tinsel i'm going to start by brushing my hair and i'm going to tie the top part. Then i'm going to find the part where i want the tinsel to be and pick a color. I want to use next, i'm going to take a piece of the tinsel and fold it in half make a loop like. I showed you earlier pick a tiny strand of hair and pull it through the loop i like to put the hair in my mouth to make this next part easier tie. The two pieces of tinsel together then tie the tinsel and the strand of hair and pull tight. This is the part where you add the glue, i'm going to use this weird sculpting tool i had lying around, but you could use a toothpick or really anything. You have so i'm picking up a little bit of glue and applying it to the knot to finish it off. I'M going to trim the ends to match the length of my hair and that's how you do it if you want to remove it, use any kind of oil to dissolve the glue and gently slide, the tinsel off the hair, so that is it for today's video. I hope you guys enjoyed it, don't forget to give it a big thumbs up if you did and check out some of my other videos, i've got some nail tutorials and some mermaid videos diys and that kind of stuff so feel free to stick around. For that and i'll see you in my next one bye, you

Comments
Silver Cierra: So excited! This is the best explanation video I’ve found! We get our tinsel in the mail today and we are gonna do silver and pink too! My little girl & I.. because mommy can NOT tinsel her hair without her too! Hehe
Amazing-Andrea: I didn't know it was THAT easy! I will definitely try this for special occasions
Francy Fey: This is so cool! I remember this trend from a few years back. I always wanted to do it, but never knew how and it was soooo expensive here at the salons!
malababez: Just wanna say i appreciate you using a bigger ribbon to demonstrate because i wasn’t able to tell with the regular tinsel!!
NataliejmTurner: thankyou because this was the only tutorial that actually made sense
PassionFruit DIY: Hi guys! Have you ever tried putting tinsel in your hair? It's such a fun touch that doesn't damage your hair and you can easily remove if you get bored of it!
Melanie Garibay: thank you so much im ordering right know how many pieces you used?
This is Cutie Ringo Joy: oh a slip knot