Do Your Own Kinky Curly Tape In Install | The Best Blendable Tape Ins With Natural Hair | Niawigs
- Posted on 30 August, 2022
- Tape-In Hair Extensions
- By Anonymous
I love how easy this hair was to install and blend
With my natural hair
Tape In Hair Extensions in the video: https://cutt.ly/wXN1v6i
Hair length: 18inches & 20inches & 22inches
===♛Coupon Code : Tayy20 get 20% off ♛====
More Products all on https://www.niawigs.com
More hair extensions products:
Tape In Hair Extensions: https://cutt.ly/nL71wiV
Microlink Hair Extensions: https://cutt.ly/hL8qQyH
I Tip Hair Extensions: https://cutt.ly/aL8qU7k
Bulk Hair for Braiding: https://cutt.ly/aL8qGH9
Contact with us: [email protected]
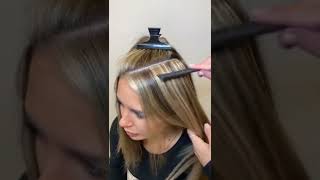
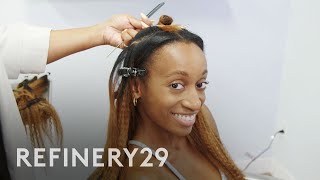
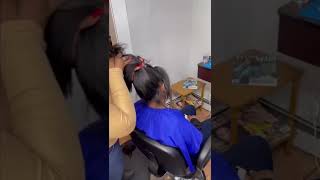
Foreign perfect, nothing compares to this. What'S up this. Is london tay welcome back to my channel today's video, i'm going to show you guys how i did these tape and extensions. These are kinky curly tape and extensions, see the bones come with like two bundles within the one bundle. So technically you only need like two bundles okay. They gave me three though, so i do have a lot of hair left over um. They gave me the remover extra tape, those little um black little. You know, um fly away holders that you guys will see. You guys will see me include in this video okay, so i don't want to ramble too much. I'M going to give you guys an intro um, like i said this hair came from nia, wigs and yeah. I just wanted to show you guys how the end result was. I showed you guys how i styled it, how i wet it in the shower. After i styled it and also the products that i use to style this hair, like i said this is how everything turned out. I will talk to you on my next video love: y'all, bye, hey y'all. What'S up welcome back to my channel so right now, i'm just showing you guys how i'm part and everything and i'm getting everything started. So i like to have versatility with my tape ends i like to have the whole entire perimeter out, which is basically the front and the sides and the back out, and i also like to have a good part in the front out: okay um. If there is misplacement of the tape ins, i will just get a little bit of the remover and remove that tape in and leave that hair out or whatever like. If you know you have too many tape, ins or you can see the tape into the hair, you can just literally just take that tape in section out and leave that hair. You know out but, like i said, i'm going to have the middle section: i'm not going to do any side parts, but i'm going to have the middle section, the entire perimeter and also the top crown. So it's that so the crown is the top middle part of the head. So the reason why i want that out is because i want to be able to wear half up half down, so i'm gon na be able to wear it in the middle down. Half up half down all the way down and everything up into a ponytail okay. So that is why i'm sectioning everything out. So, if you guys don't know from my other video, i really need to stop with savings. To be honest because um i just haven't been taking care of my hair, taking care of them i'll go like days without combing it and things like that, so it gets matted. So i end up cutting my hair into like a shoulder length. My hair was um lower back length, but i cut it to shoulder length um, not necessarily because of tape ends mostly because of postpartum shedding for two years. But when i did the tape ins um, i got it in salt water. I had to cut my hair so yeah that is a little disclaimer, while my hair is shorter in this video than all the other videos - okay, but it's just hair it'll grow back. So i have everything sectioned out. I have those black sticky things that you hold used to hold the flyaways down. You'Re, definitely going to need that when you do your own hair, because those little pieces that get stuck the wrong way will really really pull your hair out and hurt. So make sure you are using those black sticky. You know mesh stickers on your hair, okay, so, as with the when it comes to the tapings, i like to just go ahead and take the tape off of like 10 tape in to go ahead and just make the process quicker and easier and make sure you Know since i've done them about five six times now, i know to basically feel for how long across you are going to use the hair to put that tape in out. So if the tape is two inches long, two inches wide, then i'm gon na take two inches of my hair um. Also, you want to have thin enough sections, but not thick too thick or too thin. You don't want it to be too thin because you will rip off your hair and put so much tension off that little section, but you don't want it too thick where, whenever you do sandwich everything together, then you can't reach the other side. You get what i'm saying so this is about how much much you need for the tape ends. Um i like to gauge how i want my hair, so i do this little back section and then i kind of section off everything else and braid out the way, and then i let it go to the front to me like it makes the process quicker, especially When you're doing your own, because you just kind of steadily climb up, i don't know like i have a little bit of um adhd guys so, like i hate going streamline in the line because i feel like it just takes too long in my mind, i feel Like i can like multitask and do things quicker if i like hop around - which probably is not quicker to be honest, but that is what i like to do, especially when i do my own hair. When i'm doing someone else's hair, it's easier to just go, streamline. Doing my own hair, i'm super impatient, so this is how i like everything to go, so i literally did like a half a bundle back there and i was like you know what i'm gon na go ahead and go to the front so, like i said i Did that part in the middle that you guys see, i braided it out the way and i'm just gon na, do both sides of that part. Okay, only on the sides of that part, i'm not going to do any of the crown. That'S why you see me um section off the section that i'm going to do now. Each section on the front will have one we'll have one bundle, so you guys see every pack that they gave me had two bundles in it. So one of those bundles are going to be in the left, one of the bundles gon na be on the right. So basically, that front has exactly one pack of hair: the back will have one pack of hair, so i'm sorry yeah one pack or one bundle. I think it had one pack or one half a pack. I think it had a half a pack. So basically i think it had like one bundle and like a little bit left so, like i said, every pack had two bundles right. If every pack had two bundles, i had a bone on the left, a bundle in the right and a bundle and a half in the back. So basically i had two and a half three and a half bundles, but i only had two packs you get. What i'm saying left over from that second pack, um one thing i did not include is: i did dye. The tape ends now be mindful about dino tape is because, if you get the tape ins wet prior to applying, then they may not stick well enough. For you, if you do have a problem with sticking, i would recommend for you guys to get one of those little mini flat, irons and whenever you apply the product just use a little flat iron on a low heating, a low setting so kind of press and Seal those tape ends to your hair. Okay, it's not damaging that doesn't do anything different. I did it to that this style and i took it out and it's fine when it comes to that. Okay, now, like i said when you are dealing with curly tape, ends guys be so so so so mindful do not try not to layer the tape in the extensions, especially curly ones too close together, because you may have matting and you may have tangling, do not Sleep with these tapings out and about and just you know whatever doing what you want to do, because they will get mad at guys, make sure you are two strand twisting or putting you know these tap in extensions and two twists and then tying them up with A bonnet, if not guys they will get matted so be very, very mindful, especially the nape of the neck, where hair is prone to get matted, be mindful of that. Okay, so all i'm doing is getting two taping extensions, taking the tape off and sandwiching them. On top of each other have a thinner section of hair in between, and that is it so guys. It'S very, very, very simple, very you know once you get the hang of it, you realize it's pretty pretty quick um. I like to kind of line my tape and it's kind of like in a diagonal so that way, whenever i pull it up or flip it back, it'll lie flat. That is one key. If now the bottom front of my tape in i did see it whenever i was um putting my hair up whenever i was done like i see it through my hair, because i like a lot of baby hairs and thick baby hairs out. So since i do, i did take um two tape: ins out on the front hand section - and i just use that remover - that they gave me because, like i said, i've seen it through the hair and i like a lot of baby hair. So i needed a little bit more leave out in that front, but, like i said, everything is basically self-explanatory. Those black things will keep the straightaways the flyaways hair out. So that way you are not in this place and what hair goes into the tape ends at the time you want them done. Okay, so i went ahead and did those two front sections now i'm going to maneuver back to the back section and i'm just going to do what i'm doing guys tie both of the front sections out the way, and you see that little braid in the back. That is what i'm going to finish with the tape ends. Okay, guys, everything above that braid that is not already done, is going to be left out, because i want to be able to wear my hair half up half down so guys. I, after i do curly tape ins. I always always always wet my hair. I don't know if this is a great idea or not, but since these are thick and they're kinky, i like to go ahead and just start off with a good old base and just soak my weave and my hair down. Okay, especially since my hair was kind of blown out, i wanted to kind of combine all the curls together and get everything you know everything going in one direction and everything, starting with a good little base. Okay, i am using a cantu kids curl cream. I don't like cantu regular, i like the cantu curl kids, because it's just like more moisturizing for me, i'm not really sure why um and i'm using the eco style gel to style, i'm doing it in sections guys and small sections at that, because it's thick hair And you want to kind of get that curl that came with it and kind of get your curls and that curl to match together now my curl pattern is 3c. I think this curl pattern is like 3c 4a, more so like 4am um, but you guys, if you try to get your curl pattern, they come and kick your texture. They come in loose textures. Try to get your curl pattern as best as you can um like. I said, and i'm going to use one of those denman brushes to clump all the curls together and i let my hair dry for like a couple hours and then the beginning, and then the end is what you're going to see. The final result, um of how i did everything so the gel will keep your roots flat and the curl cream will keep it moisturized and then, on top of the curl cream, i did put the gel to give it a slight hole. Do you get what i'm saying? Okay, so yeah guys? That is basically what i used. I got. The glue gel is just for the edges and the eco style gel is for my hair throughout. So you guys will see every for every half half of my head. I did four sections, the other half. I did four sections, and that is what i used to apply all the product and blend everything together and then i ended it off with oil sheen. I didn't provide that, but that's how i did everything guys. I hope you enjoyed this video. I hope it was informative. I'M going to show you guys another clip from the beginning of how everything turned out um. Like i said these tapings are from nia wigs. I only use two packs because there are two bundles in every pack. Okay, guys, i did use permanent hair dye, revlon permanent hair dye to dye it but, like i said, be very very very mindful of the tape part. If you can like seal the tape part off before you dye it, so it doesn't get wet. That is highly recommended. Okay, guys so learn from my mistakes. Learn from me guys, um, take all these tips and tricks that i said in this video and, like i said i will talk to y'all in my next video. Everything about this hair will be in the description box below every length, every texture and all of that and exactly where it came from okay love, you guys so much, and i will talk to you guys in my next video love y'all bye is, i just wanted To show you guys how the end result was, i showed you guys how i styled it, how i wet it in the shower after i styled it, and also the products that i used to style this hair, like i said this is how everything turned out. This is the back okay, okay, this is the top okay, and this is the slide and things like that yeah guys. So i just wanted to come here and show you guys how the end result looks and yeah. I will talk to you on the next video love y'all, bye,

Comments
Maggie Wheeler: