Frontal Tape Ins 101! Adding Fullness Around The Hairline!
- Posted on 17 November, 2020
- Tape-In Hair Extensions
- By Anonymous
I'm back with the hair tutorials!! Have ya missed me? This video is dedicated to how I like to utilize tape-ins for fullness around their hairline. Every blonde needs this and frontals are a great way to get your clients hooked on extensions! Let me know what kind of videos you want to see in the future in the comments below! LOVE YA MEAN IT!!!!
INSTAGRAM!!
FOLLOW ME: @STEW.STYLEZ
FOLLOW JESSI: @JUSTJESIIII & @JZ.STYLES
FOLLOW THE SALON: @JZSTYLES.CO
FOLLOW OUR EDUCATION PAGE: @EDUCATIONWITHJESSI
LISTEN TO OUR PODCAST!!!
JUST JZ PODCAST
COME TO ONE OF OUR UPCOMING CLASSES:
SHOP JZ STYLES:
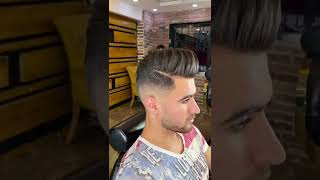
What is up you guys it is stu, and today's video is going to be dedicated to everything you need to know about achieving fullness in the front with tape in so, if you want to learn exactly how i like to do, my frontal extension stay tuned. All right, so, let's get right down to it, so today's client has a three frontal extensions on each side, so she has three tape, ends on the left side and the right side. What we use this for is because she is blonde. She needs a little bit more fullness in the front just because one of the things that come to with being a blonde, especially in the blonde, that's not natural, is you're going to have a little bit of breakage in the front. It'S kind of inevitable, a client's hairline is already the most fragile part. It receives the most heat damage, because that's what clients can see whenever they're styling, at also with it being so fragile, anytime you're, not a natural blonde and want to go blonde you're going to have a little bit of breakage. So what i'm going to start off by doing is re-taping these guys. This client has three tape: pins on her right side and her left side just to give her a little bit more fullness where she has that breakage. So i've already removed these extensions with the tape down remover by jay-z styles, co and maybe i'm biased. But before i started using this tape or remover combo, i hated taping. So much like. I couldn't tell you or explain to you how much i hated tapings before i learned how to do beaded wefts. The only thing i knew was tape ins and i hated offering it to clients because it was a sticky mess. There was always residue. I felt like i had to always wash and clarify the client's hair to get all the goo and the gunk out of it, but since i've started using these, since i moved to jay-z, i have actually fell in love with tape, ends they're great for a full Head, but mostly, i just use them for funnels to fill in the front like we're, going to be showing you in today's video but getting into the process of actually what i'm doing and stop talking up jay-z a little bit, even though it is the best taper Remover ever what i've done is i've removed the sandwiches and i've actually kept them stacked on top of each other. So every piece that goes together, i have them stacked together, and the reason i like doing this is because i know every top part and bottom part of the sandwich is going to be going exactly on top and bottom where they belong. I don't have to worry about a shorter piece being sandwiched on top of a longer piece or anything like that. Everything can go in really nice, and even so, whenever i'm doing any type of tape in extensions, i love to remove them, keep the sandwich together and then also keep them separated so to the right of the table. I have three and to the left of the table. I have three. This just ensures that i know what side is the left side and which side is the right side. So whenever i'm done re-taping, i can put them back in not only a little bit quicker, but also, i know exactly where everything goes now that i have everything re-taped and organized. I can go ahead and get into my sectioning. What you're going to see me doing is sectioning it off on a slight diagonal. The reason i like to place my tape ends on a slight diagonal is because it's not only going to work with the head shape better. It'S going to help push that hair forward. So, whenever her hair is laying down, it's really filling in that front, but also if my client wants to pour her up into a ponytail or even a high bun, it's kind of going to bend with the hair and kind of fold up better is, if you Just place them straightly horizontal. This is something that i like to call a placement test, and what a placement test is is i'm placing the tape in where it would be if it was installed in the hair? What this is going to do? It'S going to show me where the hair is going to fall once that tape in is installed. So now i can see the baseline make sure that that's going to be full make sure the end of the tape, in extension, matches up with the length of her hair, and also this is going to ensure that i don't have to lose any length on the Extension, hair, her natural hair when everything is in and said and done, everything's going to match up perfectly, so i can just move on to styling her and getting her out of the salon. As far as the install goes, it's pretty simple you're going to be seeing me, take a thin slice of hair like this and just applying that bottom piece of the sandwich to that section. What this is going to do is install that bottom piece. So it's already in there and then you're going to be seeing me kind of take my comb and rubbing those hairs on there just making sure they really stick after i've done that. I kind of push the hair forward, make sure everything matches up and when i know that tape in is exactly where i want it, i'm going to be skimming the top just grabbing those little excess hairs. Those hairs that kind of didn't make the cut and clipping those away just because if they didn't stick, they don't really need to be in that sandwich. Once that's done, i'm just going to be taking the end of my rat tail comb and kind of cleaning up those corners. This is to make sure that any of those hairs that are kind of being caught on the side aren't being pulled and tugged into the sandwich. This is going to help your client not have any tension on their scalp. This is going to prevent any kind of damage or pulling over time the six to eight week period of where her tape in is it's not going to be pulling it's not going to be tugging. It'S not going to have any tension. It'S going to be really healthy for her hair, and it's also going to be very comfortable for your client once the tape end is installed. I want to make sure that it's not poking out if it is poking out, is going to be too tight for your client and then also. I want to make sure that i can flip it back and forth. This is just going to ensure that it's not too tight as well, and then once i know that this taping is perfect, i'm ready to move on to my next section. I'M basically just going to be repeating that same pattern of doing a placement check and then installing the tape in the exact same way, something that is important to keep in mind. Whenever you are doing tapes, you want to make sure that you're actually bricklaying your pattern. If you put all the tapes in the same spot, it's just going to look really full in one area. You want to make sure you prevent that going in with the bricklay pattern, it's going to help the hair fill out in more areas, and it's also going to make it look a lot more natural. It'S going to make the client's hair look a lot more fuller, and it's going to make your client feel like they're, getting a whole lot more bang for their buck. Something else that i really wanted to touch on is that this is a really quick express service, and what i mean by that is, while you have a root, color processing, while you're waiting around for foils to lift you can do this service during another client's processing. Time with or without an assistant, this is just going to help you bring in more income for yourself and then also you're, not waiting around for someone to process. You have something else to do. Not only are you going to be getting clients in quicker you're going to be getting paid for your full amount, every minute, you're at the salon, when someone's processing you kind of just hang out in the break room. This way, you're fitting in another client you're increasing your income. This is also going to be a great way to kind of get your clients hooked on extensions for those clients that have never had extensions before adding a few frontals is really going to get them hooked. Once they see what their hair can be like when it's more full how they can actually like love their hair more than they already do, something that i always say is extensions are like pringles once you pop, you can't stop and people get addicted. So, just adding a few frontals in the front is going to be kind of the start of their hair extension journey. I know that i have a ton of clients that i've started off with just putting two frontals, even one, sometimes on each side and after that they literally are addicted. Now that i'm wrapping up this last sandwich on this side, i kind of wanted to show you guys the difference that the front ones have actually made. So if you look at my client here, you can see that this side is really full and then, if you go to the side that has no teeth, you can actually see that there is going to be a lot shorter pieces. It'S not more full in the front, so i hope this guy's helped you with my little tips and tricks on frontal extensions. Thanks for watching, don't forget to like and subscribe and i'll see you on the next one.


Comments
K Phillips: Thank you for this video! I have done full application with tape ins in the past but just installing around the front is new for me. This was so helpful.
BeckoningBeauty: Hey Babe! I love how your YT is going growing and all the new content that has been coming out!
Brooke Binkley: Love it!! Thank you for the info lovebug ✌
Sexprilla: Great explanation & great video! ❤️your videos xoxo
hairstylist135: Audio was all the way up and still had to focus on words lol
Cassidy Savage: Good video but the audio isn’t great. But I still love you stew!
Wendy: I'm so ready to get some tape ins I'm all the way in the east coast what do you suggest I use if I can't get the kind your using
GWEN WILSON: So you did three on each side ?
Olive: I took a tape in class and they said to only apply tape ins horizontally not on an angle due to weight distribution and tension
Nikki Rose: Hi what is the brand you recommend?