I-Tip / Microlink Hair Extensions Part 2
- Posted on 17 November, 2021
- Tape-In Hair Extensions
- By Anonymous
I-Tip / Microlink Hair Extensions Install On Curly Natural Hair. Hair Transformation!
Purchase Your I-Tips Here: https://qbwigcollections.com/collectio...
______________________________
Shop - www.QBWigCollections.com
Email - [email protected] (Business Inquiries)
Social Media Links - beacons.ai/qbwigcollections
QB Wig Collections Favorite Products -
Recording Setup
My Camera (Sony a6100): https://amzn.to/2QrmiyW
My Lense (Sigma 16mm): https://amzn.to/3wg2xcO
Camera 2 (Nikon D5600): https://amzn.to/3fnJ43c
Camera 3 (GoPro Hero): https://amzn.to/3eUtDk6
Camera 4 (Iphone 12 Pro Max): https://amzn.to/3fnJ43c
Memory (WD Black 8 TB): https://amzn.to/3v1uaWV
Memory (Samsung T7 500GB): https://amzn.to/2RkO0Ov
Nintendo Switch: https://amzn.to/3wh1qK1
Tripod: https://amzn.to/2T04V9t
Lighting: https://amzn.to/3u1f7ey
Ring Light: https://amzn.to/3or5If3
Headphones: https://amzn.to/3BnED2F
Hair Supplies
99% Alcohol: https://amzn.to/3v0IeQr
BabylissPro Flat Iron: https://amzn.to/3bxmDrm
Bold Hold Lace Glue Active: https://amzn.to/3v1FIJY
Bold Hold Maxx: https://amzn.to/3uTrWsC
Ceramic Oven: https://amzn.to/3vgxwFF
COLOR: Redken Shades EQ
Conditioner: https://amzn.to/3hzdt14
Conditioning Shampoo: https://amzn.to/3hEdZej
Cork Wig Block Mannequin Head: https://amzn.to/3CQvbof
Crimping Wave Iron - EAP Heat
Curling Iron: https://amzn.to/2QsPZzD
Design Essentials Shampoo: https://amzn.to/3oqOI8G
Extreme: https://amzn.to/3hw8Ftu
Got2B Glued Freeze Spray: https://amzn.to/3wfJFL7
Hanger hooks: https://amzn.to/3m65Lw1
Industrial Sewing Machine: Techsew
Joico K-Pak: https://amzn.to/3yl1rhV
Keratin Restore Bonding Mask: https://amzn.to/3uXVTru
Lightener: https://amzn.to/3eWFn5y
Mannequin Head Tripod: https://amzn.to/3ujvJ3a
Olaplex: No. 1, 2, & No. 8
Purple Shampoo: https://amzn.to/33Rfxtv
RedKen Purple Shampoo: https://amzn.to/3hBwLCY
Remover: https://amzn.to/2Ruqnmz
Root Touch up: https://amzn.to/3AMuzj3
Salon Care 20 Volume Clear Developer: https://amzn.to/3hC2B2r
Salon Care 30 Volume Creme Developer: https://amzn.to/2S9ghYo
Schwarzkopf Developer: https://amzn.to/33VaisI
Schwarzkopf Lightener: https://amzn.to/3ifezPk
Sebastian Shaper Plus: https://amzn.to/3fsXFKH
T3 Curling iron: https://amzn.to/3uhZFwf
Tea Tree Oil Conditioner: https://amzn.to/3op569W
I-Tip Supplies
Beading tool kit: https://amzn.to/3CST6mY
Cheaper Beading tool kit: https://amzn.to/3o7ZnHs
Office Supplies
Ipad Pro: https://amzn.to/3COLF0c
HP Printer: https://amzn.to/3hS7Db0
Rollo Label Printer: https://amzn.to/3zC6eeT
Sewing Machines
Singer Classic 44S: https://amzn.to/3BrlI6V
Singer 4423: https://amzn.to/3hUuanu
Brother LX3817: https://amzn.to/3BvxkWI
______________________________
#Microlinks #Hairextensions #Itips
Keywords: itip, itips, beads, microlink, microlinks, hair, hair extensions, raw, indian, raw, sew-in, sewin, weave, 4a, 4b, 4c, natural, hair, protective, style, install, installs, braidless, tape in, clip in, clip on, everything you need to know, tips, tricks, hacks, howto, how to, step, by, step, tutorial, detailed, rings, strands, curly, straight, human, hair, blend, short, long, hair #YouTubeBlack
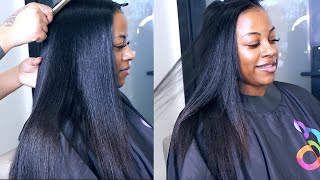
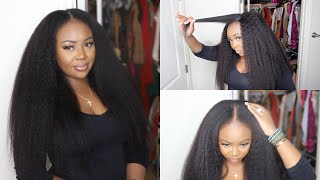
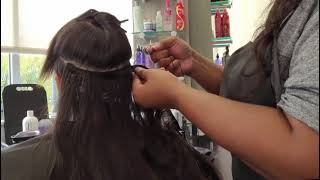
Hey guys welcome to my channel today i am doing a itip install for you. Guys here is a basic itip install set that you see which you can purchase on amazon. The information for this set is below, and this is everything it comes with. I have another set as well: it's g4 vision set, and this one comes very nice with everything that you're going to need for this install, including the shears and the micro rings, and everything you guys are going to need needles thread. I mean just everything, so i love it so much and i ended up using a little bit of both, but these are two different sets that you can use all right. So this is what i'm working with her hair is just been washed. I am going to go ahead in and blow dry it. I always recommend to my clients to come in ready to be washed and blow dry, because i prefer for installs like this specifically to do the washing and blow drying myself, because it needs to be a certain way for me to get it done correctly. And if the hair is not washed properly, the whole install is just not right, so i'm blow drying her hair out straight because she's going to wear these eye tips straight for the initial install. You guys definitely do not have to do that, but you can wear it straight for that. Of course she brought her daughter in. I do not normally let my clients bring their kids at all under any circumstances, but y'all know i got ta. Let my best friend bring her baby because that's my niece, that's my niece avon. She was playing with everything and she just loved being there, and it was just so it was just so cute. So after i blow dry her hair, i am going to section off the areas that i need for her hair to be out. Her edges are not too thick, so you guys need to make sure that you leave hair out enough to cover the eye tips. Regardless of you know anything else. The eye tips need to be covered in order for this style to work properly. So her hair is completely blow dried out. If their hair is thin. I suggest you need to leave out a little bit more hair, the more hair you leave out in the install the more the less eye tips you're gon na be able to put in so make sure you guys do that step first before installing these eye tips, I use burmese curly hair on her, as you guys saw, and i didn't necessarily need to use two full batches. I think i use like one full bundle and maybe a quarter or a half, because i did have to leave more hair out on her. Her hair is not super super thick, so i had to leave more hair out on her head alright. So these are my sections, as you can see, the top parting area and all the hair that i'm going to eye tip are the three bunches, as you can see in the middle, are all the hair that i'm gon na eye tip. So i start by adding my beads on and my eye tips one individual piece at a time. Definitely time consuming very easy, though, to do once you get the hang of it and once you get the rhythm of things it makes it so much better to add them in flip them back and forth, and everything like that, so, as you can see here, you Want to make the eye tip tight enough and close enough to the root to where it can stay, but you don't want it to be stiff to the point where you can't move your hair and put it in a ponytail, and things like that now, if there's A little soreness, that's fine, but as long as it's not super super tight towards their scalp, they should be fine and they should be able to move their hair around freely as they are wearing these eye tips. So this is the first row. This is how it looks. I have it in there there we go there's the other row underneath it and i'm just making sure that i can move it freely without her being in too much pain or having too much pulling going on okay. So i'm just gon na install these eye tips one by one and i'll show you guys, of course, how it looks as i put it up, put it down and make sure all the eye tips are covered nicely this okay. So, as you can see, i'm just putting the hair up so that i can see what's going on with the eye tips, i'm gon na blow dry her hair a little bit straighter. Definitely, even if you're gon na wear your hair straight for an install, getting textured hair is the way to go for the most natural looking eye tips, because your hair is already textured as well. If your hair obviously is naturally straight, then of course you can get some naturally straight eye tips and you should be just fine. So i'm just going to press and flat iron, these eye tips and then, of course she can wear her hair up. She can wear it in a ponytail, wear it freely. She can wash her hair at home. Of course, i get that question all the time. Can i wash my hair like normal? Yes, you don't really have to wash it now. I do recommend that you wash it in one continuous motion which is going downward, but you definitely can wash it like normal with no problems. My friend actually likes the eye tips blow dried versus flat iron. She feels like having it blow. Dried only gives it the most natural effect, and i absolutely agree if you want just a really natural ponytail. You can just blow dry the hair, maybe just press your edges out a little bit so they're not super super tightly curled and then just wear your ponytails and things like that, just naturally down so then it just looks like you blow-dried your hair and walked out The door, so if that's the look you're going for it'll, look amazing, i'm almost done with her hair here, as you can see, her hair is not super thick. So the density of the hair that i used was perfect just enough to leave her hair out and cover all those eye tips make her look like it's growing from her scalp super natural. Her hair is definitely a little bit darker than the eye tips. The eye tips come like a natural brown color. You can definitely dye the eye tips jet black. If you need to it, takes color just fine, you can do ombre on it whatever it is that you need to do. If you want some little highlight pieces in there, i suggest you take out some of the eye tips from the bunch that it comes in and color those individually before you install the hair, and she is definitely satisfied with her ponytail because she's like i just want Something natural i can throw up, i can put down and i can just live free. So this is her. I tip install very natural. 18 inches is the length that i used on her and, of course, as you guys can see, i did kind of layer the front just a little bit, not too much just so. We can blend in with her hair, but this is exactly how it looks. The thicker, your hair is the more eye tips you will be able to use, because then your hair can cover more and you won't have any issues, especially if your edges are very very thick for this install. It'S amazing amazing, and you can leave them in for a long period of time. My clients will normally leave them in about eight to ten weeks and they'll come in for a tightening and things like that of their eye tips. They'Ll come in to get their hair washed and pressed like normal and they'll be good to go all right, so i'm gon na put her hair down, and that is her install you guys. I thank you size so much for watching this video. You guys are amazing, and you guys have supported me so so much. Please comment rate and subscribe to this channel to see more videos like this. If you want any special requests for an it, video leave it down below and i'll get right to it. You guys i have so many people waiting to get this install. So thank you guys, see you later say hi. Just if you want me,
Comments
OLAPLEX: We appreciate your support! ✨
BigChrisIE909: