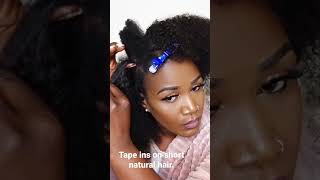
She Broke The Code!!! Diy $2 Tape-Ins With Straight Kanekalon Hair!!!
- Posted on 29 November, 2022
- Tape-In Hair Extensions
- By Anonymous
SHE BROKE THE CODE!!! DIY $2 TAPE-INS with Straight Kanekalon hair!!!
Hey Loves, In today's tutorial, I'm going to show you how to make your own Tape-ins at almost NO COST, with items that you already have a home!
Please make sure you LIKE, COMMENT, SHARE and SUBSCRIBE if you found this tutorial helpful.
// P L E A S E S U B S C R I B E
https://www.youtube.com/channel/UCtXt...
248,862 Queens!!!
// P R O D U C T S U S E D
X-pression Braiding Hair Color 1B (Pack of 6) - https://amzn.to/3UgpIj0
Multi purpose adhesive - https://amzn.to/3ARkVgW
Vitale Olive Oil leave-in conditioner - https://amzn.to/3gPK4lg
Gold scissors - https://amzn.to/3Vs9vZa
Croc hair clips - https://amzn.to/3UiHhyK
Clear tape - https://amzn.to/3ARpZSu
Double sided tape - https://amzn.to/3gLX7V6
Baking paper -
Rat tail comb - https://amzn.to/3GPPmYM
Wide tooth comb - https://amzn.to/3Uei7RS
Satin head wrap (pack of 8) - https://amzn.to/3u4xrWK
Peforated hair net - https://amzn.to/3F9unPr
Detangling hair brush - https://amzn.to/3ODgVFd
And a Ton of love from me to you darling!
// L E T S B E F R I E N D S
Instagram - https://www.instagram.com/lovethspeaks...
Twitter - https://twitter.com/LovethSpeaks
TikTok - Lovethspeaks
Snapchat - Lovethspeaks
// B U S I N E S S
For business enquiries please contact
// D I S C O U N T C O D E S
My discount codes can be used at checkout
NOUGHTY USA: http://www.noughtyhaircare.com
Discount Code: LOVETH25
CURLS CURLS: http://www.curlscurls.com
Discount code: "LOVETH" to get 5$ off entire order
DUVOLLE: http://www.duvolle.com
Discount code: "LOVETHSPEAKS" for 70% OFF on all styling tools and Radiance Spin Care System!
// M U S I C
Jasper Sawyer
Empowering every woman of colour one tutorial at a time!!
KEEP QUEENING AND WINNING!
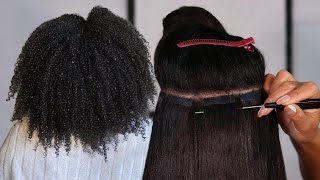
Here we go again, I got ta pay. These bills save something in today's tutorial. I am going to show you how to make your own tapings at home, using only one pack of braiding hair that you can guess from your local beauty supply store for as little as two dollars. I'M also going to be showing you guys, my bedtime routine as well. Hi guys welcome back to my channel if you're new here my name is Lovett and if you are a returning subscriber, like welcome back. Welcome back like welcome back to my Channel today, I'm leaning on stop carrying your problems through your life. Just let it be cause, everything will happen so get up on your feet and stop worrying about things. So for this tutorial, I'm going to use less than a pack of braiding hair and I'm going to cut it in half feather it out and brush the hair through until it looks like this and see that anything can happen so get up on your feet. Next, I'm going to take my baking paper cut out the amount that I need and secure it to my table using Chiller tape, and this is just going to ensure that the entire process of you know making our DIY tapings doesn't mess up my table. So now that I'm done with that, I'm going to divide my hair into 60 core parts and that's because I'm going to be making six bundles of hair today using my measuring tape, any marker, I'm going to measure 48 cm and Mark it down on the baking Paper - and this is going to be the length of each bundle next, I'm going to evenly spread out the hair within the matte area and because the hair kept slipping off, I decided to use something to secure it until I had arranged the head to my desire, Guys I do have a little bit of cold, so if I start a little bit off, please bear with me using my solo tape, I'm going to tape the hair down, so the baking paper about two inches away from the beginning, like so and now to the Star of the show, so, while cracking my head up for weeks on how to break the code on this, I decided to try this b6000 multi-purpose adhesive, and this right here baby is liquid gold. It is clear in color it is flexible and, most importantly, it is waterproof. So now I'm going to go ahead and apply the adhesive glue to the edge of the silo tape as a guide, and this is just going to ensure that as glue is applied neatly and in a straight line. I'M also going to use the the back side of a comb like so and press the glue down so that it gets distributed evenly. I got this from my local beauty. Supply store for 600 naira, Which is less than the dollar, and this stuff right here, will have your attachments or braiding hair glued to the guts. So now that I'm done applying the adhesive to the hair, I'm going to let it sit overnight until it is completely dry. So now our hair is completely dry and I'm going to go in with our second star of the show double sided tape. Guys when I looked online, I discovered that the regular expensive million dollar tpings that have been around for some time are usually 4 cm long and one same white per piece. So I got this one cm wide, double-sided tip for 800 naira, which is about a dollar. So I'm going to align the edge of the double-sided tip with the edge of the sealer tape and then take the silo tape off be okay. Everything is Gon na Come On Time. Next, I'm going to take a ruler and make a mark on the double-sided tape. At 4 cm intervals and girl, this is just going to ensure that our tips are equal. When I cut them the way you are don't let some girls stop you from reaching. Once I'm done with that, I'm going to remove the hair from the parchment paper cut off the excess hair like so and also cut the bundle at the max areas and because we cut each piece of hair at 4 cm, while our bundle was 48 cm long. Each bundle made 12 tippings us take back your power inside so now to give them that you know extra Factory finish and round that professional. Look I'm going to place four tips together and cut the edges like so to make cutting it easier while saving time and guys are tapings are ready like this is so easy to do, and if I can do it, then you can also do it as well. James go ahead and let the world see your light and take you dancing, keep that stuff from changing love, love cause, that's what you are made of so it's time to put a DIY to test it's time to install them. So on this day I just washed. My hair and I was trying to stretch it a little when I noticed that there was a fly in the room and I wasn't having it so to cut the long story short, I said, screw you fly and ended up humidity throughout the next day. If you look closely you'll notice that my nails were different and I tried to make my makeup look, just as it looked the previous day, okay, to stretch my hair, I used my Remington keratin protect hair brush and let me tell you, I love the fact that It has a very hot setting, immediate setting and then a cool setting. If you don't want, like heat at all, so literally all my life, I have suffered from severe dandruff and psoriasis, which leaves my scalp extremely dry and Flaky if it is not properly moisturized after I wash my hair, however, because I saw people mention that, if you Want to you know, get tapings, you shouldn't oil or apply conditioner to your hair. So I didn't. While I was parting, my hair, I just couldn't. Okay, I just couldn't ignore the flakes. So I went in and applied my favorite leave-in conditioner in the world, which is a vital olive oil, anti-breakage leave-in, conditioner leave-in conditioner is water-based. It moisturizes and detangles your hair. It helps prevent breakage and, most importantly, it provides heat protection which is amazing because I'll be flat. Ironing my hair - and let me tell you something my tea pins didn't slide off until I was ready to take them off. So I did leave out the perimeter of my hair like so because my intention was to wear this hairstyle either in a ponytail or in a bun. I also decided to flat iron my hair as I go. You know just to avoid doing it over and over now the whole idea about applying tea paints is just imagine a sandwich or a burger, so see. You'Re born as your tip in you have one side of the ball. That has the Mayo and all of that. That'S the sticky side and then see your hair as your meat, your veggies and all of that and then see the other side of the Tipping as the top of the bun. Okay, that has the Mayo and the Mayo is like the sticky side. So the entire idea of you know tape. Paints is basically used some machine, a thin layer of your hair in between two tips. Once you get the concept installing the hair will be easy. Breezy installing that first tip here was a big struggle, like I almost felt like. I had just wasted my time because I just could not place it right. So after trying for several minutes, I decided to place the sticky side of the taping horizontally to the tip of my rattle comb, and that was it once I did that I took off the comb attached it to the second tip in this time. With the Sticky Side facing inwards - and I place it on top of my hair - I also give the tippings a good press and finally, our DIY taping was in. I also went to have it a flat iron that wasn't so hot and you know press the hair together, so I went ahead and installed the second TP. However, I kind of like discovered that it was just too close to the first one, but I was like you know what I'm not taking this house, because having the installed was a struggle like this was my first time trying out tapings, and I was literally just Winging it out one taping at the time. Okay, suddenly, the rest of the hair was easy breezy, because I had gotten the hang of it. By this time I just took out like a section of my hair flat ironed. It took out a piece of hair and sandwiched it between two tape beans, and that was it so I'm going to go ahead and allow you guys to watch How I install the hair and I'll be right back. Please go ahead and hit that subscribe button and turn on your notifications, because trust me, you will not want to miss the next tutorial. We are almost at 250 000 subscribers and I would really love to have you, as part of the lover speaks family foreign. I was in my mind, and it keeps me strong. Everybody in the world has the problems yeah. I also didn't use one full pack of hair and that's why the hair didn't look really really full. My intention was to wear this in a ponytail and in a bun, so I wasn't really bothered with you know the um, the fullness of the tips, okay, foreign. I also went in with a flat iron that wasn't too hot, like so just to get more security, and I did this to every single piece of the tapings that I had installed on my hair. So this hair lasted for so long, and I did have a few pieces come off here and there and what I did to service. That was, I just reapplied, the double-sided tape to the piece that came off and that was it, the song isn't over foreign, Australia, United States. This right here was the hair. I'Ve had two weeks like two freaking weeks. At this point I was just. I was just that strong at my own invention. I haven't seen anyone doing this on YouTube. So if you try creating this, please give me: some credits like hey tutorial was inspired by lover speaks okay. I also know that some of you by now will be wondering like love it. How do you take this out? Don'T worry? I also filmed like how to take the hair down, but because I didn't want this tutorial to be so long. I was like I'm going to put that in a separate video. It'S gon na come up after this upload, so make sure you turn on your notifications like hit that Bell button. If you are not subscribed to my channel just so, you don't miss when I upload the takedown part of this tutorial for now it's time to show you guys my bedtime routine on this day, God was just straight off. Look at that glow like the skin and the makeup was given so for my bedtime routine. I'M going to show you guys three options for option. One, I'm going to be using this satin head, wrap that I got on AliExpress for 1.99 and I've had this. For so long - and this is like my my go-to bedtime routine, so yeah I'm going to put the link to this in the description box of this tutorial. I can't sleep tonight, I'm too busy trying to figure out how tomorrow I celebrate for option two, I'm going to be using this perforated head net that I got from my local beauty, supply store for 300 naira and I'm going to use it along with a scarf. Now, even though the hairness alone stays in place, using this scarf will prevent my natural fussy, hair from you know, reverting it's going to make sure that by the time I wake up in the morning, my hair remains silky straight. I can just add the fresh silk press. Okay, the world is full of wonderful people for option three, I'm going to be using this big satin scarf and I'm going to bend it to form a triangle and tie my hair down like so. This option is also very easy and keeps my hair flat till whenever I'm ready to take it off, and I'm pretty sure that you have a scarf in your house. Okay, guys, that's it for today's tutorial. I'M sorry this tutorial was so long. I just wanted it to be as detailed as possible. Okay, please make sure you subscribe to my YouTube channel and turn on the Bell: icon. Okay, so you'll be the first to get notified when I upload the takedown Parts. I hope you guys found this tutorial helpful. Please comment down below any trendy hairstyle that you like me to create also give this video a big thumbs up and share it with your friends and your loved ones and I'll see you guys in my next tutorial till then bye guys crazy dreams. Whatever I want you

Comments
elvsrae: Brilliant as always... you always crack the code on what's hot in these hair streetsjob well done
ADUNNI'S SPACE: This came out beautiful. Very detailed. I have seen this tutorial on other channels too before now.
Emeth: It was that long. I have been waiting to see who would come up on YouTube with this DIY. Great job I have seen another woman do it right after the tape-in became popular on YouTube. The way you do it was much easier.
Clemmy🍊♑: Thank you so much I'm going to have to try this!
Soul McCray: This is Amazing you did so well. I may have to try this. Thanks for sharing
blonde graham: So happy you made this video.I wanted to find a way to try tape ins without it being so expensive ..Thank you
Sophia Thomas: You've been missing beautiful lady. Much Love.
Sonya S: Another awesome creation Loveth! Please could you do Afrithreaders stretching tools next? I've been looking for them and reached out to the sellers but they've been out of stock for a very long time. I'm thinking the tools needed are: snap fasteners, satin hair ties, a stiff fabric mesh, cotton binding to place the snap fasteners, and a needle and thread. Would be great to see your genius on this.
Dani T.: Another great tutorial and James Sawyer vibes Can you do a video with a braided wig install or how to make one?
Starr The Protagonist: I love you hear woman... Thank you for all you do for the frugal girls like myself... We look sweet but do it cheap
Jauza Amukuje: I love Ur tutorials loveth❤️❤️
NicNacAttack: Hi Beautiful!! I can't believe to made tape ins!!! Amazing!!!This might sound silly, but would you make longer tape ins that look more like tracks or clip ins? I even think they have tiny tapes that look like i-tips now. You're so creative. Are you left-handed?
Susanita Efe: This video came right on time my tapes are on the way I will give it a try.
Johnson Jannel: Your amazing girl
Miz Sandy: You are so funny.. it's the fly for me.. thanks for the Tutorial.. so helpful..
Geraldine Fidelis: You're so creative
Gathy Melkiz: We miss you loveth....thanks for another video!♥️
dupzy hair and care: So beautiful I will try it
Yolande Laïla Nguembou: Wow Amazing !!!is it reusable after the first time?
Lion Nees: I'm a stylist and I've been making my own tape ins for years ... I just look and laugh when I see these people being overcharged
Ek: Wow beautiful
Mundia Simasiku: Wow just wow.♥️♥️
she who lives: i have missed you madam! welcome back to you too Loveth!
Oluwatomisin Sonia: Sis where have you been naaaaa? Miss you so much oooo
candice patton: Very beautiful what can't this young lady do
Cynthia Dzoti: U r the best ok I practically look up to you
first lady Clarke: wow i have to try this going to try get that glue
Océ May: ❤
grace oyinloye: Wow! You really broke the code. Well done
Nappy Gabby: Wow
Pris Aina: Welcome back
Michael: