Doing My Own Tape In Extensions On My Short Fine, Thin Hair
- Posted on 11 April, 2022
- Tape-In Hair Extensions
- By Anonymous
LINKS:
----------
→tape in extensions: https://amzn.to/3JsdePZ
I have them in 14” length and color is B8-8#18-18#60
My jewelry is from: https://shop.analuisa.com/yp-tash
They currently have a Buy One, Get One 40% OFF sale running through Mother’s Day xx
|| CONNECT WITH ME ||
♡ email: [email protected]
♡ shop my AMAZON storefront: https://www.amazon.com/shop/Tash
♡ shop my Amazon MERCH: https://rb.gy/7ruzb1
♡ shop my OUTFITS: https://www.liketoknow.it/tashvitorsky...
*some of the items in this video are in partnership with Amazon Beauty
**not a paid collaboration
All rstyle/amz links are affiliate links. By purchasing an item from the affiliate link I receive a small commission. However, you aren’t charged more or less by using an affiliate link. Thanks for supporting what I do! I truly appreciate it. xx
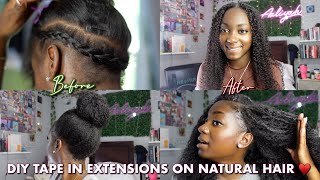
Hey youtube. Welcome to my channel. This is going to be a very casual style video, but i kind of want to show you guys my little setup going on here before i went in and just talked through everything that i was going to be doing for today's video. So i'm going to be doing my own tape and extensions. I already have one pack in, and i accidentally this was supposed to be part two of the video, but i accidentally deleted all the footage of part, one showing you guys my before, showing how i installed them and like going through the process how tapings work. So i'm gon na try to like do all that today, but one pack was not enough for my hair because i do have short fine, thin hair and it's a pretty blunt cut i'll show the back once i you know sit down in my little station here, But you can definitely see where my hair ends and where the hair extensions begin and it's just not a very good blend, so i went ahead and purchased another pack and i'll talk through how i apply my tape and extensions. This is not i'm not a professional. This is not a how-to video by any means. I just thought it would make an interesting video to sit on youtube and i thought mainly for entertainment, honestly, so just take everything that you see on youtube with a grain of salt um, but here's my little station here. I just found that this works best. For me, so i have like a a little bench and i'll sit behind it, and i have this mirror here that way i can see the back of my head and then i push this as close as possible to the mirror. Just so i can see what i'm doing so, i'm going to sit behind here. I have a video and i'll link. It right here of me doing my own tape and extensions on the sides just for volume, and i cut the tape and extensions to my natural hair length. That was pretty easy to do, because it's just right here on the sides, so i can really see easily when you're doing tape and extensions in the back. That'S where it can start to get tricky so the way the tape and extensions work. Let me actually open these here. I got these off of amazon and i have purchased a few different brands off of amazon, as well as from lily hair, which is not on amazon, but right now my hair is pretty hard to color match it's like so many different shades of blonde like right. Here, on top, it's more of like platinum, blonde highlights, but underneath it's more warm toned and underneath my hair is like a perfect match for these extensions. So this is the only reason why i chose these extensions. Otherwise i've never tried them. I'Ve never them heard of them before this is the brand six star hair and it was fifty dollars for these 14 inch extensions, so pretty affordable, and i did already wash them once they did get a little bit like drier on the ends. So they're not a silky smooth, but i actually like when the extensions um kind of get a little bit more lived in. If you will, i don't like that whole super smooth feeling it just doesn't feel like natural hair. This way it feels you know more realistic. I'M not sure how they'll be long-term, so i'll try to update in the description box, because a lot of i have tried extensions before where i love them and then, a few weeks later, they just matted up like a bird's nest and they were just absolutely awful. So we will see with these i've never tried this brand, so i can't say, but let me go ahead and open these up. This is the color b8, 1860 and 14 inches, like i said so in case. Anybody is curious. These are the deets and i will link them down below as well. You get the tape ins, you get replacement tape, which is really nice, because if these are good quality, you wear them for about four to six weeks and once they start to grow out, you remove them using like rubbing alcohol or special tape and extension remover, and They usually come right out, no problem, you just got to be very careful, and then you can take off the old tape and put on new tape and reuse them. So long as the quality of the hair is still good, and you also get a clip like this, which is great for you know when you're doing tape, ins and also like a rat tail comb like so each pack that you buy has 30 uh, 10 sandwiches. So there are 20 pieces and you sandwich them together in between your own hair. So i'll show you guys in the front what i mean by that, if you are completely new to tape and extensions, because i'm doing this myself, the method might be a little different than what you would get done professionally. But you want to make a clean part as clean as possible. Say like this, so you want to make sure the part is clean as possible. You know you don't want like zigzags or anything like that, and what i do is you take off the backing for the tape and i stick it wherever i want to place it and i place it wherever it is. I want to place it, but i would say place it about quarter to half an inch away from the root, because if you place it too close to the root it's going to pull and tug on the hair, and it's just going to be super uncomfortable. You can cause damage, so you do not want it like directly at the root, i would say, leave about a quarter to a half inch. I usually place it about like right here and then, because this is the sticky side, i kind of like stick it to the hair and then, when you go to flip it over, some of your own hair is gon na be stuck to this, and you only Need, like the smallest section, you don't want too much hair in between, because if you have too much hair, then it might not hold because you don't have enough adhesion. You have too much hair in between the sandwich. I'Ll try to show you guys when i'm actually doing it, but i am a visual learner. So it's probably going to be even less than this honestly, but a few pieces of hair are going to get stuck to the tape and then you also want to make sure that this part is clean when you flip it over. So you want to make sure that it's like a straight line as well, and that's when you take your other side of the sandwich, take off the tape, uh the backing for the tape and literally sandwich it right on top and that's essentially how tape and extensions Work, so this is the method that i do to do it on my own hair when you get it done at the salon. Usually, what they'll do is take like a very, very, very fine section and kind of place, the tape in underneath and then sandwich this one on top, but because i'm doing my own hair, it's so much easier for me to do it that way. So let me actually insert a photo of what my hair looks like before i'm trying to find a video that i have somewhere floating around from old videos or something. But my hair is like a short blunt cut. Usually i can get away with one pack, no problem. I'Ve never used more than one pack, that's how thin and fine my hair is, but because it's so short - and it has such a blunt cut - i just need two packs. Let me show you what the extensions look like right now. I don't ever plan to wear my hair straight like this. I definitely plan to curl it and when you curl it it blends so much better. You can obviously see especially like right here where the hair ends, so i'm gon na do, i think, one more layer. What i ended up doing was. I did three different rows. So in the first row i did three pieces in the second row. I did three pieces and then i did one more row with just two pieces. So that's eight and then i had two left over like two sandwiches left over and i cut those in half and placed them right here in the front. So you can actually cut the tape ends in half and i have one here and then i have another one here. Just because my hair in the front is, you know a little bit more sparse and i don't have a lot of volume here. So cutting them in hot in half definitely helped with that. But now i have to go in and kind of like fill in and try to blend it a little better, which is tricky because i applied the first few layers. Thinking that i would only need one pack so now i just kind of have to do the unconventional method of trying to squeeze in these sandwiches, where i can, without it being uncomfortable and like positioned properly and things like that again. This is not a professional video. If i were to do this all over again, i wouldn't do three three and two: i would do more like three, four or five, you know just place them better. Just to show you guys, here's the first layer here, there's one two three as you can tell, and when you part your hair, you wan na make sure you're doing a very clean part, like i said, i'll, create like a horse shoe shape with the part as If i were to like apply a weft, so that's another little tip that helped me that i saw online all right. I managed to squeeze two sandwiches in in the third row just because i only had two pieces there, so i did um. I think i did one on this side right here and then one on the other side, and then i made one more so this is going to be the fourth row i made another clean part like so, and normally i honestly would not place them this high, Because i really don't have a lot of hair, i have fine thin hair and when i um put my hair over the tape and extensions, i don't want them to be visible. So i want as much of the hair at my crown to be covering the extensions, but i also feel like this will help them blend better, putting them a little bit higher. I think i'll do three, because my hair is shorter and more of a blunt cut. So adding that fourth layer, hopefully hopefully helps them blend better as well, so we will see yeah. So i think i'll do like one two and then three, i'm all done with that. Fourth layer. I added one two three sandwiches and then underneath it. That'S where i added the other two one here, one here, so i added five extra all together, but i feel like that. Fourth layer made such a huge difference in the blending right here. It just blends so much better. I think i'm gon na do add. Like a half in the front somewhere like take one and add a half in the front, or i might leave it like this because i actually feel like this is not so bad and i don't want to overdo it either. Plus i like to put my hair up a lot like in a bun or something so if i were to add too much in the front, you'd be able to see them, whereas right now you really cannot see the tapes at all. Just because i have these two pieces here, where are they there's one here and one there and i cut them a half, so that was like a great tip that somebody told me about cutting them in half. My ponytail feels so thick right now i love it. Let me go ahead and curl it and then pop back on here and kind of close out this video, okay, here's the big reveal so i'll insert another picture of my hair before so you guys can see, and then this is the after. I'M so happy with how they came out. I personally always wear extensions um curled, i feel like they just blend so much better when they're curled and then this is the back right here. I think it's a pretty good blend, i'm not gon na lie. I don't know i'm really really happy with how they came out. I think the blend is really good if i were to go back. I'D probably place four here, instead of spacing them out as three um and then i added a fourth row and i added one two three there. So i have one two three, four, five. Six. Seven, eight nine ten, eleven twelve thirteen fourteen fifteen fifteen sandwiches all together and i feel like that's plenty. I wouldn't recommend this if you're completely new to tape-ins, but i have tried i've had tape and extensions so many times in the past - and i did do my own in the front a few times right here and it's really not so bad so far, so good Fingers crossed it remains that way, but that kind of concludes my entertaining a little. How i did my own tape and extensions. I hope you guys enjoyed this video. Thank you guys for hanging out with me, and i will see you guys in any future. Videos.

Comments
Jennifer Allred: I have short thin fine hair and wear extensions however instead of sandwiching 2 wefts, my stylist uses 1 weft and single sided tape for the other 1/2 of the sandwich. The weight is less on my thin fine hair and blends better.
Taylor Jenkins: Your skin looks amazing!! Love the tape in extensions, looks fabulous on you!
MaryMary bo berry: I love it, only thing Id do is use like an olaplex purple shampoo on the extensions because they have more gold tones than your natural hair. You did a better job than 99% of at homes do. Love it!
Sarah Hood: You did a great job with them!
Lisa Harris: They look amazing!!!!!
Lucinda Peterson: I Luv your DIY videos ❤️
Maurita Edwards: Great DIY Job...It's beautiful.
Roxana Luca: I love your videos. you are so real!!!
Green Fox Illustration: Ah they look great! Do you have a video of how to remove them?
Debra Roth: The tape in extensions look good in your hair I could not do those . your skin looks good .have a great day
Lucinda Peterson: Yes looks beautiful
Tina Park: It's looks really pretty
Julie Andrews: How long can you keep the extensions in?
Zaira Quintana: You should try kpak repair mask from joico youll love it and As I am cowash will help your hair grow stronger and healthy and shampoo only once a week
Katie Crane: Do you prefer these over keratin bond?
CharityRose: Tash are these the ones you’re wearing in your latest video? Love.
bebeluvv: Yay the verse is back!
Muah la Kaparak: hello, have a nice day