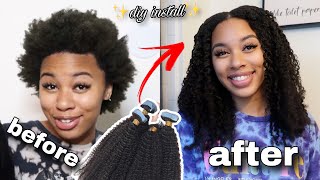
Diy Tape In Install On Yourself Flawlessly | How To Tape In Extensions On Natural Hair
- Posted on 24 February, 2022
- Tape-In Hair Extensions
- By Anonymous
Hey fran !
In this video, I am showing you a video on how I did my own tape In extensions!
Enjoy and remember to like, comment, and subscribe!
Social Media
❤️Facebook : London Tayy
❤️Instagram Hair page :@thelondontayy
❤️Instagram Personal page: @londontayysway
❤️ Amazon Storefront : https://www.amazon.com/shop/londontayy...
❤️ Business email : [email protected]
Location: US -Columbia, SC
Link to mirror: https://www.amazon.com/OMIRO-Trifold-A...
-------------------------------------------------
Music by K3ntorey - .about last night - https://thmatc.co/?l=4A9AE4BB
------------------------------------------------
Products used:
hair used : 3bundles of color: 1b https://amzn.to/3iYOWSX
mirror used : https://www.amazon.com/shop/londontayy...
---------------------
how to apply tape in hair extensions,tape in hair extensions,studio techilo,tape ins,tape ins on natural hair,tape ins natural hair,black hair,how to apply tape in hair extensions on thin hair,tape in hair extensions at home,tape in hair extensions black women,tape in hair extensions tutorial,tape in extensions,hair extensions,tape extensions
O g g e - it's a lot. We don't talk about. I don't really know where to start, i got feelings inside me can share my stories. We fell apart. I had wrote you a letter, but then i burned it up. Your satisfaction is key, but the satisfaction in me won't let you be be, and i know i'm selfish plus we got one on the way: hey, hey y'all! What'S up welcome back to my channel, this is lonnie tay coming to you today with another video girl. Today'S video i'm going to show you guys how to do your own tape and install right here, guys, i'm just showing you how everything started off from my curly hair to blowing it out to straighten it. This is the irrelevant part which is kind of what i'm talking through before i really really get started now, so everything that i use will be in the description box below the mirror that i use. The tape ends that i used um tools and everything that i used will be again in the description box below it, took me about an hour and a half to complete the style. This style, i can wear it down the middle. I could wear it to the left side. I can wear half up half down. I could wear all up and a high or low or mid ponytail okay, so i could wear a different, a lot of different ways now right here guys. I just my hair is into little ponytails. I took them out and you see that little part down the middle. That'S already here. This is my hair guys. My hair used to be super super long um after two years of just postpartum, shedding it just basically got all the way mid back, so i'm just working on kind of growing it back and doing my thing: okay, okay, okay, all right here guys! These are pretty easy to do. You just have to find your momentum in your motion and how you're going to do the tape ends. Okay, so you are one you're going to want to make sure that you do straighten your hair before. If these are curly tape ends, you can blow it out before. If these are straight, i just highly recommend just go ahead and silk pressing your hair or your client's hair out. It makes everything way much easier. Okay, so right here guys, i'm just braiding down the perimeter, make sure the complete perimeter of your hair is braided down. Okay, if you're going to wear it in a high ponytail, make sure you have enough hair left out on the sides, the back the front. All of that, okay, like the back, i knew i was going to wear a high ponytail, so make sure you have at least an inch or two. I honestly recommend almost two inches of leave out on the perimeter. I know that seems like a lot guys, but you want to make sure your install looks as natural as possible. If you don't have enough hair left out to cover up the tape ends then you're gon na need. You know you're gon na be in a crazy situation. Now i do have fine texture hair, so that means i kind of probably need a little bit more hair left out to cover up the tape ends. But if you have super super thick hair, you can kind of you know, judge off that all right. So this is my first time doing. Tapings on my hair, i've done it on other people's hair. This is how one tape in look okay. So it's two tape. Ins for one piece: this is just only one p, one half of the piece. These are two pieces which makes one complete sandwich. Okay. So what i like to do is, i just did a slit, a slim, thin section of my own hair and how i'm going to do it is i'm just going to i'm trying to see how to do it. So i'm like okay, let me go ahead and peel off that white tape and kind of stick. It stick it underneath my hair and just kind of sandwich the other tape in at the top, all right and just press it firmly in doing that was it worked pretty well, but i still feel, like the tape end, didn't light as flat as i wanted to So i'm like okay next time i apply the tape in maybe i'll, apply it um closer to the roots and then kind of press everything down once it's already on and then sandwich it in the first row in the back. It was more so like a test trial to see what works for me guys, but let me just tell you what worked for me was definitely clipping off the other piece for the first tape in install. I did not clip off any other sections to make sure that the hair didn't get caught, so i didn't notice my other pieces of strands did get caught when i was completing the tape and install on the back. Okay. Now for this size, my struggle side baby. I couldn't really see now i have a three-way mirror. I end up stepping on the mirror, so only i have two pieces of mirror on it instead of three that is supposed to so i wasn't able to get a very, very good angle. On the right hand, side, but right here guys this is another method, i'm using i'm using that white tape to judge how long i'm of a piece that i need for that type in. So it just made sense to me right so um so yeah, that's what i did and honestly that worked out pretty well, because it was not too long of a section in order to apply the tape ends. If you do too long of a section um, you know you'll have pieces of hair, that's sticking in a piece of the hair, that's kind of halfway in and halfway out, you don't want that. So just kind of make sure that you are doing it the right way. Now, when it comes to this row this time when i sandwich the hair underneath first, i did not lift my hair all the way up. I just kind of lift it up and stuck the tape in underneath and then pressed it in with my fingers and then got the other. Half of the tape ends peeled that white tape off and then pressed it in now. For this section i want to get a good amount of hair in this part, because i want to have hair left out in the middle and i still want it to be full. So i use one whole pack of tape in here. Okay, so guys, let's just go ahead and be honest, the hair that i used for the tape and extensions um. I did not enjoy it at first, because the hair that came from this company is remy here, remy hair. If you guys don't know it's not virgin hair, you can't dye it. It automatically comes in a color already which, for this it came in a jet black color, okay. Thankfully i had already dyed my hair. Before i mean also, the ends were very very blunt, and it's just. It was just very too silky for me for my texture. Even though i do have pretty silky hair, when i straighten it and pretty fine hair, it still was just too silky for me, like it was just too silky for me. I highly recommend watching these extensions before you apply them washing these extensions before you even take it out of the little um pack that is in okay but yeah, so um, that's one thing i can say also slimmer pieces, the more slimmer piece that you put um Between the tape is to me, it's the better. You don't want to do the strings, but you want to do like a slim piece so that way, you're not having all of this hair that you have to sandwich in between. Okay, i did take these out with no problem. I do have a takeout video that is coming after this video, very, very simple: i'm going to highly recommend a product um to definitely put on this hair. Okay, so yeah guys, i'm just going to keep on going. Keep on going until i'm getting to a part where i want um the middle section out um. What else i need to tell you guys? Yes, i highly recommend you washing this hair. I had four bundles. I did not need four bundles honestly, two and a half bundles is fine, so i guess to be safe. Three but honestly, two bundles is fine as well, when i noticed um that a couple of ones that i took out and being like lesser hair, i enjoyed that better. I think it was just too much hair for me to use like three bundles, so i did take some hair back out. It was not hard at all so yeah, so i end up doing that: lower half section leaving that middle part out and now i'm going to kind of work on the front, because i want to make sure that everything is even throughout. I don't want to put so much hair in that back and then the front just look very very you know just doesn't look right, so i wanted to just go ahead and move towards the front. So i did the middle part in a side part where i'm going to have. You know my leave out, make sure you're doing this leave out girl, and this right here is the middle part that i'm going to leave out. Okay, for like the half of half down it's a little low, it does seem like it's a little low, but i still wanted to make sure that if i part that down the middle, i didn't want like a super high half up half down. I wanted like a natural half up half down, you know, so i feel like that. This was enough for me like enough leave out for me. Also you, if you do leave out for that half of half down you're going to want to make sure you have enough hair to cover that top part in the bottom part. So make sure you have enough hair when you're doing that half up half down all right. Now i'm going towards the front so the front section, especially the side, the front side, you want to make sure that you're going in that type of direction, um, laying it kind of going towards the side, because when you lift up, you want to make sure that The tape ends are flipped up um, and you want to make sure that if the piece is too big, like the tape and piece section, is too big for that part by all means guys cut that tape in in half, because if you don't need it, why You know if you don't need that big of a section. Why not cut it? It'S not going to do any harm, so this is way easier to apply on yourself than you know. Micro links, because you know micro links, have this whole plier method and the beads and the you know, and then the track. It'S a lot. I feel like with that. You probably have to get somebody install it on yourself um. I wouldn't recommend no you installing it on yourself, because, especially when it comes to the pliers, they say, if you press it too hard, you can break off your hair from the root. We don't want that now, i can say: do not apply the tape. Ins too. Close to your roots, baby, you want to make sure that you're applying it enough where, if, if you lift it up, it's not hurting a couple of the tapings, i did they were a little tight okay, but overall it was pretty comfortable honestly. To be perfectly honest, it was pretty comfortable to put in so all of these tapings are going to go that way on that section. Until i get to the middle part and then on the other side, you know well, the sidewall has a side part you're just going to do it up to that side, part and just kind of go around. It'S honestly, i feel like it's self-explanatory guys. It'S very very easy to do like i said. The removal process is good. Now, do not use any type of like growth, oils or any oils on your scalp, because that will loosen the tape ends. Okay, they will come out. You can't wash yours your hair with the tape is in i've washed this style like two or three times. To be honest, i didn't have any issues with it now, the first time i put oil in my hair and they were starting to slip out. So i guess that's the perfect way to try to remove it. If you like, to remove the tape ends all right, but yeah guys. So this is the other side. You see i'm just kind of parting pieces off, i'm doing it in clusters and doing the clusters really close together. You see how skinny the pieces are, because i want to get as much hair as i can, but still have everything look flat and natural. So, on the side you see how the middle is like. I got the tape ends going alongside the middle and then on the sides. I got it going the same way, all right so yeah. This is basically how everything look guys and so so simple guys so easy to do. Um yeah! That'S it that's it! You see that little section right there that's going to be for the side, and then you have those middle sections now make sure you are thoroughly examining your head when you are done, because if you're flipping it this way and flipping it that way, and you see Tape ends you might want to remove them. You know start over like take that one out take a couple of them out. I did take one out at the very top where the back of my part would be because it just showed. I don't know if you probably could see it a little bit at the back, the top back but yeah. I definitely took that out because i was like baby. Don'T if i need to see these okay, no one needs to see these y'all so so so easy find your method find your rhythm, find what works for you! Okay! I didn't want this to be too long, because i know how these long videos be - and i know how you girls like to say girl, get on with the video. Let'S just go ahead and jump into the video, so my other taping install. I think i didn't really jump into totally so yeah you guys can see. I can put it all up in a ponytail. This is a mid ponytail. Okay, look how natural it looks. I didn't even slip. No edges down your girl didn't do anything. This is the high ponytail, come through cup, throw high ponytail hot bun, whatever, let's get it. Okay boom high ponytail for the girls. Look at that, and this is how everything looks down all right. Yes, look how good it blended with my hair and this i have up half down. I was telling you guys about it. Wasn'T super high or anything like that, but yeah um, the care was pretty easy guys but, like i said this is super long hair. Again. These are 24 inches. I have four packs. I only use two and a half packs and the color is color number one. It'S strictly straight up black. You can get other colors. The color i got was black. The ends are very blunt. I, like the blunt look because it gave an even look but yeah. This is how they turned out guys if you want these tape ins and go ahead, purchase them. Okay, of course, the longer hair you get the more you have to maintain it. Also that mirror actually was bomb. I broke the mirror, but i ended up getting getting sent another one from amazon, very, very great, very, very easy to to do, especially if you're doing your own hair, guys cutting your own hair, doing your own braids and your own tape ins, whatever that mirror is Great, i have my amazon store with these tape ins and the mirror in my amazon store, if you guys are looking for some pretty affordable type-in to do it yourself in that mirror, because i highly highly recommend, i hope you guys enjoyed this video hope it was Informative, i was trying to get all this information in and yeah. Like i said, i do have a tape, a takedown video, that's coming, so you guys can see how easy it is to take these tape in extensions out love. You guys so much, and i will talk to you on my next video bye

Comments
Arika Chennelle: Beautiful outcome! Could you please show a maintenance/wash day in addition to filming the removal when you're ready to take them out? I'm highly considering trying tape-ins! :)
Jazmine Nicholson: Love it! Could you please do a wash day video?
KweenC: This was perfect. Thank you
Eangelique: I looked away for a second and saw your real hair and was like "Oh is she done with the install?" and then you started parting! Lol, great install and great hair
Monique Wright: Turned out so well!!!! What length did u get??
Tamika Stewart: Looks so good
Cookie Drake: Can you swim in them?