How-To | Installing Tape-In Extensions On Fine Natural Hair At Home | 7 Strands Raw Extensions
- Posted on 17 June, 2022
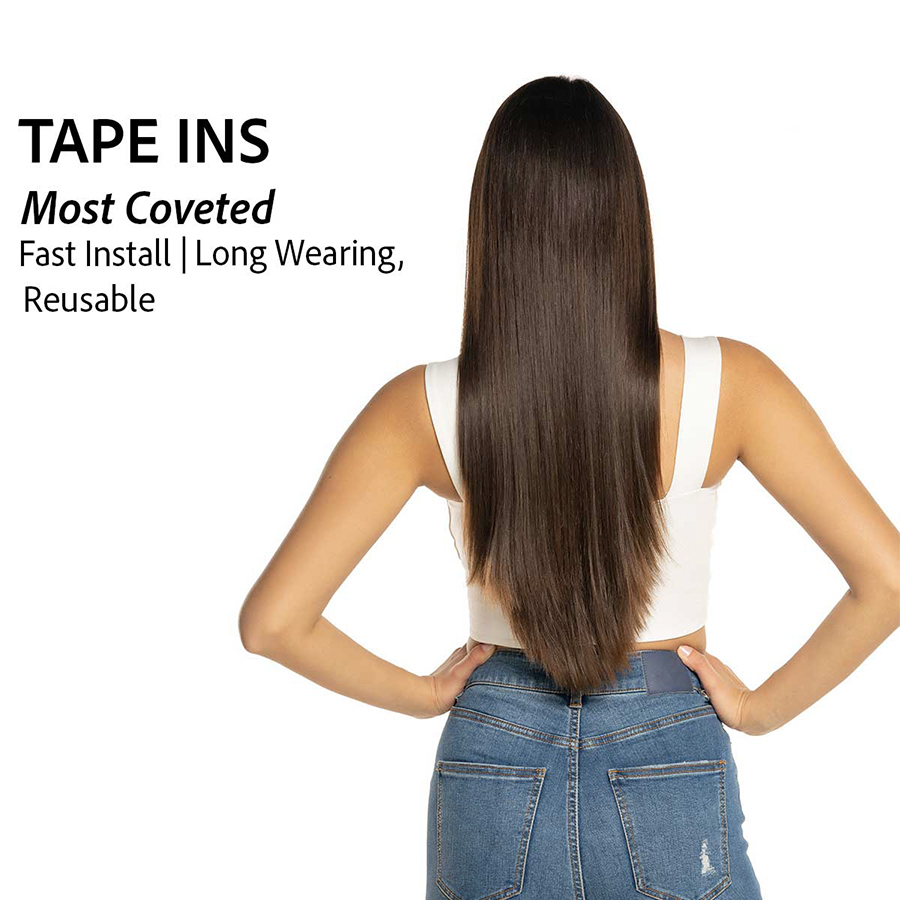
- Tape-In Hair Extensions
- By Anonymous
#tapeinextensions #tapeins #tapeinhairextensions
Hello everyone! Finally back with another video showing you how I installed these tape-ins that all the girlies are getting into. I hope that you enjoy watching this video and that it helps you if you decide to install tape-ins on yourself! If you liked this video, subscribe to my channel and don't forget to interact with this video by liking or commenting.
PRODUCTS USED
BioSilk Hairspray: https://amzn.to/3y2DRbL
Kenra Blow Dry Spray: https://amzn.to/39wik1w
Ion Clarifying Shampoo: https://www.amazon.com/dp/B003XXKANI/r...
Mielle Strengthening Mask: https://amzn.to/3xC0m5D
Rat Tail Comb and Clips
Babyliss Pro Titanium Flat Iron and Curling Iron
Remington Shine Therapy Blow Dryer
DISCLAIMER
If you click on a product link, I may receive a small commission. Thank you for your support!
Proverbs 3:5 Trust in The Lord with all your heart, and do not rely on your own understanding; In all your ways know him, and He will make your paths straight.
Let’s connect on other platforms ♥
Contact email for brand inquiries: [email protected]
Instagram: https://www.instagram.com/lovefromlon/...
Tik Tok: https://www.tiktok.com/@londonsegre
Twitter: https://twitter.com/londonsegre/
Hi everyone welcome back to my channel if you're new, here i'm london sugri, and thank you for supporting by clicking on this video. So today i'm going to be showing you all how i installed these gorgeous tape and extensions at home. I, of course started off with purchasing the tape ins from seven strands raw extensions, my absolute favorite hair brand. This is actually my third purchase from them, and this time i did purchase two sets of wavy 16 inch tape, ins, which i did dye jet black before installing and with tape ins. They do recommend you use two bundles for a full head, especially if your hair is on the thinner side which mine, kind of is, and each set comes with 40 pieces, and you are to take two tapes and sandwich them on a section of hair professionals. Also, do recommend that you start with freshly washed clarified hair with absolutely no product, i'm a 4c girl, so i did make sure i did a deep condition before starting and right before i blow dried, my hair, i went in with the kenra blow dry spray, which I'Ve been seeing so many people use on their hair and it comes out so silky and i also learned that it can be used as a heat protectant, which was definitely a plus for me, because i needed one and i sprayed this all over my hair and I went into the tangle and before i cut my blow dryer on, i just worked that product in and it really. Surprisingly, surprisingly, y'all made my hair way easier to detangle and blow-dry, which i love. So if you live near an ulta, please go pick this up. It is an essential, and after i finished blow drying my hair, the best that i could might i add. I went in with my baby list, titanium flat irons to press out my hair, and this is where i started to get really nervous y'all. Even after all, the videos i watched prior to this, i wanted a really natural install that i could easily throw up into a bun or a little ponytail or whatever. So i decided to start in the back to make sure i had enough hair to cover the back of my ponytail and it really just made more sense to do so anyway. So i left about three fingers: width of hair out and perfected. The parting as best as i possibly could you're gon na need a lot of mirrors for this. I'M gon na just throw that in there now i was using the bathroom mirror a mirror behind me and my camera hooked up to my macbook in front of me, which really helped the process. I also left out a good amount of the sides of my hair to cover up the tapes. I feel like it's really your preference, depending on how you know you'd like to style your hair and girl. I have to press on my bbs so excuse that as i'm pressing those out it got real when i was about to apply the first tape so with tape ins, this white cover, i'm peeling off, reveals the sticky part that you apply to your hair before applying. I tried to just measure out exactly where i wanted to place this, because i did not want to mess up. I also do want to mention you do not want to place the tape directly on your scalp at all. There should be no tape on your scalp. Only on your hair, because this will make the tape ends very uncomfortable, especially when you try to like look them up to go into a ponytail after i did lay the tape down. I just tapped it into my hair. You only need what hair actually sticks to the tape. You don't need to force any hair to try to stick to it, and this was after i laid all the other top tapes down. I was so proud of myself y'all, but this was just the start like so to begin sandwiching, i parted my hair directly under where my hair stuck to the top tape, if that makes any sense, y'all i'm a visual learner, so that made sense to me. I don't even know, but i tried to place the bottom tapes as neat and even as possible, which i feel like i did do a pretty good job on like on my head, and i continue to sandwich the hair together by pressing them together after i finished That first row i did a little ponytail test, just to be sure that it was flat and that you really couldn't see any of the tapes. So for the next row, i did about two fingers with and repeated that same process with three tapes on this section. This can really vary depending on how you plan to style your hair, but i do suggest that when you are doing your tapes on the sides, you apply them slightly at an angle, just to be sure when you go to put your hair up, that it lays Nice and flat, i did go ahead and speed this part of the video up, just because i was repeating the same process and it's kind of self-explanatory at this point, don't fall for it, don't listen to them baby. I was so happy when i got to the front section, because i could finally see what was going on in my head, and i was just ready to be done. You guys know you spend the whole day in the salon. It'S hot and you just want to get the chair yeah. That was me, and i was just ready to be out of that bathroom and go on about my day. So with this section, i parted my hair, based off of where i usually style my hair, and i made sure that there was enough hair to cover up tapes. Be mindful of this, because i had to go in and remove a tape which was so painful. And i 10 out of 10 do not recommend for me. I just applied four tapes to this half of the top section. As you can see, i even had to cut a tape, so i could fit it in there and to break it down. I did a full tape and half of a tape on one row and the same thing on the second row, i went ahead and repeated these same steps to the other half of the section as well. I wanted to make sure i could fit in as many tapes as possible because i actually ended up only using one bundle and i had six individual tapes left over, so not overspent on some tapings y'all, but that's okay. I have a whole bundle left for a rainy day but yeah here i was just making sure everything checked out and you couldn't see the tapes at any angle which you couldn't. It was actually so so weird feeling the tapes in my hair, but oh well, we're. Finally done and i'm just loving this install all right, everyone that was the end of the video. I hope you all enjoyed watching me install these tapings. If you like this video, please give me a thumbs up and comment. It really helps me out and don't forget to subscribe. If you like this video - and i will see you all in the next me -

Comments
KOVEN: Came out beautiful Would love to see how your maintenance care of these and your hair in the summer heat! Thats the one thing that stops me from trying these...frizz mode!
Life of Clo: This tutorial was so good I wanna do tapes now !!
Brooklynn Carter: Good to see another review for 7Strands! I am scared of tape ins, but you did good!
Lyfe as Dani: They look so goodyou make tape-ins look so tempting but i just feel like my natural hair is gonna frizz as soon as i step outside :/
Erica Danielle: Tape in Extensions that’s super new omg I loves it yooooooo lol gotta try this