At Home Tape In Hair Extensions **Detailed**
- Posted on 15 June, 2022
- Tape-In Hair Extensions
- By Anonymous
Hey Y'all! This was my first time trying tape-ins and I loved them, let me know what texture I should try next! #tapeinhairextensions #tapeins #extensions
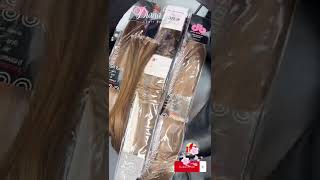
Link to Tape -Ins- https://www.masteredminks.com/product/...
Link to Hair Grippers: https://www.amazon.com/TRU-BARBER-GRIP...
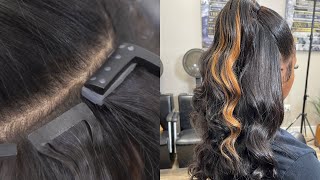
So, as you can see from the title, we're putting in some tape links today, if you want to see me install so i don't know that i'm going to need all of these tapings y'all. This is like kind of a lot, but this is how they come. So this hair looks super duper duper pretty. I definitely want to be able to wrap it. So i've been watching a few videos and we're going to see if i can do what to do. Oh, i got a 12 inch. I have 14 inch and i got a 16 inch, so i got a super like silky just because i'll be liking. My hair bone straight with my super, so the tape ends are like a little bit more silky, but that's kind of what i'm going for like. I, like a really silky look, so i just want to see like how i could blend this hair. I want to say it's vietnamese here, but i'll link, all the details below on these um tables, if you are interested in getting some hair. So let me start with 16 inches, and this is like my first time doing this, so i have no idea what's going on just a friend, so i'm basically just trying to see where i want to place my tape in and i didn't want to put it Too close to my scalp, where my hair is because i wanted to make sure that i left room to pull it up or to pull it down, i'm just kind of trying to clean up the hair that excess hair that did not stick to the tape from What i've seen you just you just pretty much want the hair. That'S stuck to the tape to be in between your tape ends. So, as you can see here, it's not a lot of excess hair, but this also was my very first tape in so as we go along you'll see like the hair in between it gets a lot more thin, okay y'all. So, as you can see, i'm just taking a comb and really trying to make sure i clean the area really good. I don't want any little fly waves or any extra pieces that can get caught because that's going to cause tension on your hair. So i'm just placing the tape in directly over the other tape. In that i applied, you want to make sure it's lined up nice and even before you squeeze, because once you place the tape in on it's on, okay, so make sure y'all line up your tape ends very evenly and then just squeeze really really good. I know some people like to apply heat onto the actual tape, but i didn't put any heat on my tape in i just flat ironed right beneath it and flat iron, the rest of the hair just to keep it nice and smooth. I did want to do my tape ins, where i didn't apply any extra heat to the adhesive as far as the bonding goes and i had no problems y'all with my tape ins for weeks, i even washed my hair with the man and i didn't apply any Heat to the actual adhesive, so definitely if y'all have good tape, ins or the right tape ends or the right tape, you should be able to just squeeze it with your fingers and that should hold for weeks like you should have no problem. So now i'm just going ahead and applying my next tape in as you can see, i just pressed the tape in up against my hair and now i'm just pulling the hair down that stuck to the tape in so i'm just trying to leave only the hair. That'S already stuck to the tape on that tape in so that i have a nice clean, even feel when i apply the other tape in above it. So now that i have the area, nice and cleaned up, i'm just doing the same thing as the last one. Making sure that it's lined up good and i'm just pressing it down really good with my fingers, making sure it's nice and tight and making sure there aren't any extra little hairs. That are, you know, stuck in your tape and because that's literally just going to cause you a lot of tension and it's going to drive you crazy, because it's going to constantly be pulling and being comfortable moving along to the other side, i'm just moving my hair Grippers over and i'm just repeating the same process y'all, so i'm gon na just let y'all watch this for a second but same thing here: press the tape in on really good against your hair, pull it down gently and then just naturally let those hairs fall that Are going to be stuck to your tape in you? Don'T need to add any extra hair parted or anything like that. The hairs that are stuck will naturally just fall down, and then that's going to be the hair that you keep in between okay y'all. So it's starting to look like a little something i'm just continuing the same process. I got the first row done and i didn't leave any hair in between on this one um. When i got closer to the top, i did leave a few rolls where it like. Maybe the size of a finger with amount of hair in between, but honestly i like it a lot better with no hair in between, because once i washed it, it was much easier to just have the tape ends flat against one another going throughout. So i would definitely recommend y'all not leaving any hair in between and just making sure that you, you know, place them in evenly and use the method that i'm showing y'all, because my hair laid so flat and felt so natural y'all. It was really crazy, as you can see, y'all, i'm really really making sure i squeeze that nice and tight. I just put my hair up really quick, just to make sure what i left out in the back will cover, and it did so. That was good, but i'm just going to proceed to continue to add the tape in throughout and just make sure that i evenly place them right above each other. So one thing i found to be kind of helpful was putting my hair grippers, underneath once i got to the middle just because it helped the hair beneath not get stuck or not get mixed in with the hair that i had separated for the tape in. So if y'all do have hair grippers or something similar that you're, using as far as keeping your hair separated, definitely go ahead and put that underneath your tape in before you apply it, because the color would help me see the area where i needed to place. The tape in and two it just really helped the hair down. So this is really really helpful if you're doing your own hair, because, as you all know, it's hard to see the back of your head, so go ahead and place that gripper in there girl and it is going to save you some time. Okay, so i did leave a little bit of hair out on the sides in the front, so like make sure y'all pay attention to like your hairline and just the fullness, because that's going to make a big difference in how natural this looks using the same technique. In the front area, i did apply the tape ins on an angle so that when i pulled them up, they would lay more flat if you just do them straight across it's going to stick out on the sides. So once y'all get to the perimeter and once you get to like the front of your hair, you want to make sure that you do apply them on an angle, because once you pour your hair up in a ponytail or flip it over, you want it to Just lay nice and flat so something else to keep in mind too. When you place your tape, ins and as i kind of got further along, i realized that you want to make sure you find a good happy medium between your tape and not being applied too close to your scalp, but also not being applied too far down on Your actual hair, so, as you can see, i just have really light like as much as your hair will go. So maybe like a half inch, i just used that small little space because, like i said earlier in the video, it still allows you to pull your hair up into a ponytail. But if you tape it too close to your hair y'all, it's going to really really pull so definitely make sure you find a happy medium between your hairline, but not so close. That is uncomfortable because it's going to make a big difference once you start start to style your hair, so i just continued the same process all the way through i'm just about to the top. Now, as you can see, once i got to the middle i kind of left more space, i didn't stack them right next to each other, but it's looking cute y'all like it's looking flat, it's laying good so so far so good, just going through and seeing where I want to lay more tape ins, so it's going to continue the same process. Make sure that i'm applying the tape ends at the top on an angle so that they'll pull up nice and flat. So you can kind of see here like the very front tape ends. I didn't place them on a good enough angle. Y'All. I should have kind of turned it a little more. It'S not a big deal and it's not really something you cannotice, but just after having my hair styled for a couple weeks when i had them in like definitely on round two, i'm gon na make sure that i place them on more of an angle. So now i have most of the foundation done basically just like bottom three quarters of my hair and kind of look now and see. You know where i want to add more tape. Ins. How do i want to have a style so um? You know it doesn't. Look bad like this to one side, but i definitely want to make sure that it's not like a big gap between my hair and the tape ends. As far as the length goes, i'm just going to continue to add more tapings in the top, and i did flat iron each little piece before i put it in just because i didn't want to have to you know flat iron over my hair. Every time i put the tape in and just put more heat on my hair, so you know at the beginning of the video after i did the first tape in i just flat ironed over it, but, as i went along, i just found it easier to just Go ahead and flat iron, the tape in before i put it in so that way i didn't have to apply any extra heat to my hair and it already looked nice and flat. So your item - tapings, are blending so good, and now you can see it gives me more of like a tapered look in the front instead of like a choppy long to short now it looks like way more layered and like a lot more natural, so i did Do 12 inches in the top 14 inches in the middle and 16 in the back, and as i continue you see how, on this side like you can see, my bangs are just a lot shorter and the other side. It looks a lot more layered, so i'm just going to go ahead and add more on that other side, and i think i add a few more on the first side as well too, just to even it out and make sure it looks super natural, okay, y'all. So it definitely was starting to look a lot more natural and a lot more. Even once i added hair on that side - and i will say i style my hair middle part and to the side pretty often so - i'm just kind of checking to see like now how full the bangs look on one side, and i really like it. I think it came out really cute um. I am going to add a little bit more in there, but just kind of checking to see how it looks y'all. It was like four o'clock in the morning by the time i finished this, because i was just trying to figure out what i had going on. So you guys you can see. I was starting to get a little tired, so i'm just checking to make sure that you know the placement is good, but it looks really really natural. Like i know earlier in the video, like, i told you, i used a more silky straight texture, but i feel like that. Texture mixed with my hair, looked so pretty y'all like look at that, okay, so yeah. That was my finished look. I was so tired and i had to go ahead and get to sleep. This was my finished. Look. It came out so cute. All i did was wrap my hair the night before so i told y'all. I was up super late doing this, but i went ahead and wrapped it and it really made it just lay so cute and so natural, like i love how it came out. Anything i'm gon na do, i think, i'm just gon na um, maybe pull my baby back soon. No, i'm gon na leave it straight. I don't know i might curl it back just a little bit. I just wanted to give it like a little body. I don't know why it's pretty, but yeah, i'm just gon na now with that i can wear it to the middle too, but i'm gon na just wear it to the side and i'm just gon na take a little bit off yeah. I was out of breath and everything i was running late to the airport and i was just trying to do something really quick. But yes, this is the finished look. I did want to come and show y'all how it looked before. I ran out the door um. I really didn't need to bump my bang, but i guess it gave it like a little bit more personality and a little bit more body but yeah. Definitely let me know what y'all think about these tape. Ins, i'm gon na put the link below if y'all want to order some hair and make sure y'all like comment and subscribe, and i will see you all next time with my updated video from when i wash my hair
Comments
Dwandra Williams: I love this look! Thanks for the thorough explanation
Nickole Clark: Final results was. Thanks for the clear and precise angles. I am definitely going to try this, hopefully it comes out looking like yours
Char Crawford: This is flawless . Great job
Brittany Pittman: U made me order the same lengths u have na I can’t wait to see mines this will be my first time too ♀️
Brittany Pittman: That’s how I want mines very natural
Jorele Hayden: Yesss ! Love the tape ins
FollowTrackStarCam: Thank you for sharing!!
Malia Armstrong: beautiful, u are so talented !!!!
GODsaidONLYHIM: You did great
Dana Dane: How many inches are you using? ❤️❤️❤️
VINIA LAV: Such a gorge
Vee Vee: Okayyyy! Flawless