The Best Self-Haircut Tutorial 2020 | How To Cut Your Own Hair
- Posted on 10 March, 2020
- Hair Knowledge
- By Anonymous
Self-Haircut Course (Save Your Time & Money): https://alexkouras.com/join
♂️ SUBSCRIBE to This Channel: https://www.youtube.com/c/alexkouras?s...
️ SUBSCRIBE to my Other Channel: https://www.youtube.com/channel/UCreRM...
Text me @ (305) 614-6188 if you or someone you know in the Miami, Florida area are looking to buy, sell, or rent a home! I would love to help! I am a Realtor at OnePath Realty and am on the #1 Real Estate Team in Cutler Bay. (License #: 3484730): https://alex.luisandrewgroup.com/
@alexkouras merch: https://bit.ly/3dRsAAB
Instagram: https://instagram.com/alexkouras
Tik Tok: https://www.tiktok.com/@alexkouras
Equipment/Tools
1. Wahl Professional Super Taper II Clipper
2. Wahl Lithium Ion Total Beard Trimmer (Model 9854-600)
3. Any 9 Piece Kit Including: Hair-cutting Scissors, Thinning Shears, Cape, Neck Duster, and Duck Clips, Combs, etc under $30.
4. $7 (13" x 49") Door Mirror from Walmart or Target
Discount Codes
1. Manscaped - 20% OFF Link: https://mnscpd.com/AlexK
Contact Alex | Business Inquiries: [email protected]
Don’t forget to Like, Subscribe, and leave a comment letting me know what you thought of the video!
All Rights Reserved. If you wish to use any video footage, please email me: [email protected]
#selfhaircut #haircut #menshaircut
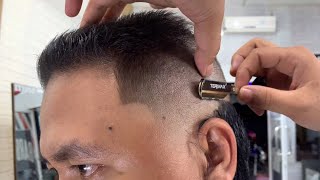
In this video i'm going to be showing you how i fade and cut my hair from the beginning to the end, with all the useful tips and tricks you will need with that being said, let's jump right into the video so right here we're going to be Putting in our bald line, we want to make sure we have no guards on the clipper and make sure that the lever is closed to cut off as much hair as possible. You want to start the cut around the top portion of your eyebrows and start cutting straight back on a slight downward angle. Toward the back of your head. Also make sure you guys let the blade do all the work. The last thing you want to do is press the clippers really hard against your scalp and potentially cut yourself. Keep your clippers clean at all times and gently run the clippers back and forth on your head to make sure you don't leave any stray hairs instinct. The goal is to make sure the bald line is as straight as possible. It doesn't need to be perfect. I like to stop my bald line right at the occipital ridge. On the back of my head. I would recommend everyone who wants to try cutting their own hair to use a bathroom mirror and a second mirror to see the sides and the back of your head completely. This second mirror should be relatively big in my case. The mirror is over five feet tall and about two feet wide. This will ensure you can see all of your head looking through one mirror to the other, to cut your hair as clean as possible. Instinct here you guys can see i'm using the bathroom mirror to look at the second mirror to cut the back of my head, always double check your work and go over your head a few times to make sure there are no stray hairs in this case. Our bald line is perfect to my liking and we can start using our guards now we're going to be using the number one guard closed and going up from the bald line about half an inch. We'Re going to do this all around our head same thing with the left side using that number one guard closed, go up from the bald line about half an inch all around your head now without any guards in your clippers open your lever, so we can start To flick out that bottom bald line, the key here is to make sure you are starting below the bald line and flicking up and out at the line you don't want to dig into the bald line. Remember we're trying to fade in this line. You do not want to cut the line flick from below the line up and out, so the hair you cut flares out and makes the fade look extra clean instinct with the number two guard closed. We'Re going to start to cut off all the bulky hair on the side of our head. We want to use the same technique as we did when flicking out the bald line, go up about half an inch to about three quarters of an inch and then flick out to give your hair that nice flared out. Look. This will make fading in the number two guard even easier when we start cutting with our thinning shears all right. This is honestly, my favorite part of the haircut using your number one guard with the lever open start to fade in that middle line below where you just cut with the number two guard closed. This guard does wonders and really makes the fade feel extra crispy. If you guys are liking, this video so far drop a thumbs up and subscribe to my channel, i'm all about do-it-yourself work and saving money as much as possible without taking any quality away from the work. I do leave a comment as well and let me know what your favorite part of the haircut is so right here, i'm doing a little bit of touch-up work on that bald line fade. The goal is to make that line. Look as invisible as possible, so with no guards on and the lever about three quarters of an inch open, i'm going to slowly flick up and out that bald line again and get rid of any hard lines. Instinct all right! So now we're going to section off the side of our head to the top of our head using a comb comb down your existing parted hair make your part line as straight as possible, normally a very good rule of thumb. To start, your part line is to eye up the comb at the corner of your eyebrow. The upper corner of your eyebrow is usually a great place for your parts. I might have to post a separate video on parting, your hair, so stay tuned for that now, with the number five guard lever open, we're going to cut the rest of the hair, we just separated from the top of our head feel free to use either your Hands or duct clips to hold your hair back, so you don't cut the length off of the guard. Keep using that flick out motion when you get to the back of your head and make sure the number five guard is even all around your head double check with the mirrors. So yet now we have the middle line left from the number two guard and the number five guard using thinni shears and a comb. You want to start cutting that bulky middle line without cutting too deep into your hair. You already cut with the guards. Remember we are trying to remove the bulk, not the length cut the hair until the middle line is completely faded in instinct. So i always like to do two things when using my thinning shears number one is to cut the hair that you pull upward with the comb always start below that middle line and cut into the bulk and number two once the comb is pulled above that middle Line after you've cut it, put your thinning shears below the comb and cut the bulk, as it falls back into place on the side of your head. Try to maintain a relatively slow comb speed, so you have time to cut that bulk with your thinning shears. Oh boy, this cuts looking fresh so far now using your smaller beard trimmer, i always like to cut off the hard hair line around the back of my head. To give that fade a much cleaner look. Sometimes the clippers don't cut deep enough, so using the beard trimmer, i know for a fact that hardline will be faded in now, you've completely faded your hair, we're going to start cutting the length on top of our head. The first thing you want to do is wet your hair completely. You don't want any dry spots once the hair is completely wet, just use your hands to wring out any excess water, then dry your hands, so that your cutting shears and comb don't slip. Out of your hand, comb all of your hair straight down and start cutting your fringe in a straight line across your forehead. So my hair was about five inches before cutting it, and i usually cut my hair just above my eyebrows, which usually leaves my hair between two to two and a half inches in length all right. So now we're going to section off our hair into two sections. Combing all the hair completely sideways when you begin cutting make sure you angle, your cutting shear at the very end of your eyebrow at about a 45 degree angle. This method of cutting makes things easier for you when you have to start cutting the middle portion of your head. Look at this method like starting the cut on the perimeter of your head, making sure all of your perimeter is cut to your liking and then using that perimeter as a guideline to start cutting the middle section of your head angling. Your cut at 45 degrees ensures that the longest part of your hair is at the front and the hair gradually gets shorter throughout the back of your head. So again, here angle, your cutting shear at a 45 degree angle at the end of your eyebrow, keeping the front of your hair longer and making it gradually shorter throughout the back of your head. Now, starting from the back to the front start your haircut around one. Third, from the back of your head and begin cutting your hair in a straight line across your head from one side to the other side, use that perimeter guideline to begin. The cut this guideline is the length you want all of your hair to be in this particular section of the hair. Now work your way completely across your head, using the same section and cut your hair using the same guideline from that initial section of your hair start cutting toward the back of your head using the same guideline that you just cut in the previous section. This will make a seamless blend in the length of your hair from one third into your head, all the way to the top portion of the back of your head right here, i'm combing the very back portion of my hair upward to grab any loose or long Hairs use that same guideline and comb, your hair upward to cut the long hairs on the very back portion of your head. Now we're going to blend in the fade to the length on top of our head, use your comb to grab and lift the faded hair and the length on top cut. The hair straight up from the bottom fade portion to the longer hair. On top. This will create a beautiful blend from the fade to the top of your head. Okay, so now that the back portion of your head is cut, it's time to move on to the middle section of your head grab the next section toward the front of your head and use that perimeter guideline to cut off the length. Do the exact same thing as before and cut straight across your head using that guideline? Yet now that the middle section is cut, we want to make sure everything from that section was cut, evenly run your comb throughout your hair and push it back into the previous section to cut any long or loose hairs. Using that same guideline, you want to do the exact same thing for the front of your head use that guideline from when we cut the fringe to begin cutting off the excess length at the front of your head. I also like to comb my hair from the part line and pull the hair straight up from there to make sure i'm cutting the hair along the same perimeter. Guideline is the key to cutting the top of your hair is to always double check your work, comb. Your hair from left to right and then right to left to make sure both sides are completely even right here. You can see that i'm using a technique known as point cutting this technique is great for cutting off bulky sections of the hair. Along with cutting the length you need off point, cutting is also a great way to add texture to your hair and give it a more natural look and if you like it, give it a thumbs up subscribe. If you're new to my channel, i want to give a shout out to the youtube channel instinct for the fire soundtrack i'll leave his link in the description below also check out my facial hair grooming video. If you found this video helpful and has motivated you to give cutting your hair a shot, but that's all i have for this video i'll catch you guys in the next one peace


Comments
Alex Kouras: Self-Haircut Course (Save Your Time & Money): https://alexkouras.com/join ️ SUBSCRIBE to my Other Channel: https://www.youtube.com/channel/UCreRMw95IFjUoWj0LykO32g?sub_confirmation=1 I hope you enjoyed the video! Comment below what you want to see next. Let's hit 100K subs!
Lu ke: I tried this and the only fade I got was my confidence fading away
Digital Kid: Been cutting my own hair for over 25 years now, saved a bomb and it gets easier with practice
Kirk T.: I can't believe how well it worked. This was the first time cuttimg my own hair and won't be the last. After the surprisingly good result, I dont want anyone else cutting my hair but me from here on out. Thanks for a awesome DIY haircut tutorial!
Pyro.1nsom: I personally think the whole, "don't use any clippers at this part" can be EXTREMELY dangerous, because with my type of hair, I go from 4 to 1 (depending on how far my hair has grown) and 1 has always been my fading guard, and the others are my pre-fade guards to set the foundation. so on a normal basis, with my hair length that I normally have before I cut my hair, I start from 3 and end at 1, 1 is always perfect because 1 is the perfect length so that I fade my hair, without making myself look like I'm half bald. so please, whoever is watching this PLEASE, do NOT use the sheer without clippers, you could literally cause yourself to get a bald spot. instead, gradually go from the biggest guard to the smallest guard, to experiment with the length, because going straight to NO guard, is quite honestly stupid. have a good day and thank you for coming to my Ted talk. oh, and btw, if you wanna trim your hair, just use the biggest guards, unless you have short hair. the point is, go from biggest to smallest, to experiment with the length. always get to know your tools
Peter K: W.t.f this guy cuts his own hair better then my local shop
Shashank Shukla: Tried it. Looks like lockdown is gonna continue for me for another three months.
colibrilibre: Thank you! I have been cutting my own short hair style 3 times, each time successfully, having an "okay" haircut afterwards. I am still learning to get better though, I want a real good one. I normally start in the reverse direction, with the long guard first and going down the hairline to the short ones. With your parting techniques I am sure I will do it better next time. :-) Still practising, but each time it gets better!
Marc Maxwell: I've started cutting my own hair and the last two times I cut it, my fade wouldn't improve. It was too short, too high. What you said about remembering to pull away from the head BECAUSE that's essential for fading the lengths is something I think I've been messing. Great video!
Matthew Browne: I cut my own hair, this is a really good instructional video. You've helped me a lot with practicing my fade. Trimming the top is a little different for me though. I have a very narrow and rounded head shape and also a receding hairline that gives me quite a widow's peak. The fade techniques apply all the way, but if i trim the top using the parameter guidelines you showed, I'm gonna be one goofy looking dude lmao. My head shape needs more of a high fade undercut look and shorter length on top because my hair just doesn't grow the same way yours does. However, the same stuff still applies with blending and fading. Thanks for the tips!
Bonnie Hoke-Scedrov: This is my first time enjoying your YouTube channel. Great work! I’m looking forward to more great content from you. Thank you so much for this informative video! I got so much out of it. Wow! My son wants exactly this haircut to be done at home by his mom (me!). This is the best video I’ve seen so far on this haircut. Wish me luck…
iZauce: been doing this for 9 years now. thanks for the videos man. made things a little more clear for me and made my cuts better. epically for the top which i always struggled with
Junior Neves: Top demais, vou tentar cortar o meu próprio cabelo ! Parabéns !!! ✌✂️✂️✂️
italbadboy4382: Did my first fade cut this weekend! Thanks for sharing your knowledge!
thisisnimish4 thisisnimish4: Had my first haircut today It was not at all possible to be done without any help. And this would require like tons of practice. it took me 3 hours to patiently do this. But the final product was perfect and like pro hair cut. kudos to my Dad who helped me. All the tips in this video helped. This is a perfect video I saw this video 4 times before starting the hair cut. If you are going to try this, make sure you have a lot of patience. I had my experience of fading from shapping my beard and that helped. Well, you need to have a back up plan if you are trying to do the same. My BACKUP plan was a military cut. This same fade technique will help. But in the top you can trim with highest settings of your trimmer. Also someone to help you if you are stuck. Cutting your Hair in your back would require help. And fear is good, but target it through patience. Also, dont let your hair grow a lot. Try this while your hair is medium. It will give you more confidence. Now I can do this again.
Jefferson e Yasmin: Olhando você fazer parece tão fácil, muito bom, parabéns
John Allen: Hi Alex, I just did my second haircut with my new clippers. Had never cut my own hair until now. Your video gave me a lot of confidence that I could do it my self! The first hair cut I said to my self, this is a better haircut than I get at a salon. The second time, I realized that it's best to go slow, go steady, stay calm. It's another great haircut. I'm not getting my hair cut done by anyone else again.
Buff Buffer: One of the best tutorial of DIY haircut I have seen so far. You covered all base from fade, cut, and trim. Easy to follow. Thank you! ✨
JinkxSoldga: Been cutting my own hair for 20 years. Really great vid. Was curious about technique and see if I could learn any new tricks. I do my fade all at once with zero guard, and sometimes due to dips or rushing my fades arent always perfect. Once you create a straight line it takes a while blend out, not sure I have the patience for that lol. 5 things are vital: 1. A good pair of Clippers (Oster Model 10 is what I have) 2. Must have 2 mirrors.. I use vanity mirror and hand mirror. 3. Coordination and patience to deal with mirror image double bounce. Takes a little practice. 4. Keep your clippers oiled and excess hair away from the blades 5. Realize you are pretty much guaranteed 1 head shave once you start practicing, but after that it gets easier. This is assuming you have not had any formal training.
Lucifer Morningstar: Dude, this is awesome, well done. I’ll be trying to do mine tonight, wish me luck bro! UPDATE - it actually went ok although I could not do the top bit like you did so I left it. It took ages to grab the hair between my fingers and then I could see what I was doing due to my hand being in the way All in all the haircut took me 3 hours but it looks good
Érturûl Ghází: I have been cutting my own hair for around 8 months now and this video has helped me in managing my middle and back hair cutting. You're good :)
Mister V: Hand eye coordination on point, take the W. You're either blessed with that skill or you're not. I've tried many times and failed I know others trying daily and having to go bold as a result. Excellent vid man, you made it look effortless and easy. Well done.
Roby G: Great selfie Alex ! Clippers are fairly easy to deal with ! Its the top sectional with scissors that can be a Covid Bust for many attempts ! Good tutorial study here @12 min in, with top head hair sectional and cross section X-Y-Z, replay replay replay ! Hut Hut Go Long - Muppet hair be gone !
Gabriel P: I did it. Followed each step and the result was quite great for the first time. Great video. Must be trusted. Thanks dude!
passingmongoose: Cheers, and good job! Solid. I do a skin fade pompadour with a hard part and have been watching my barber for a while now and even got them to teach me. Did my first fade on myself last week and my wife helped with the rear part of my head just to be sure. Came out on point and this video definitely helps out big time. Thank you for taking the time to not only make the video, but also to produce it.
Kunwar J: Hey great video! Followed it almost exactly(except the fading bit, I just went for an even 5mm trimmer tone throughout the back and sides), and to great results! Was expecting it to go like most of the comment section(with hats and scarfs and sunglasses), but was surprised haha! Good quarantine cut
Savvy Millennial🪙: I been cutting my own hair since the quarantine (early March) I been doing a mid high fade. It really isnt that hard honestly. Ppl tell me that it looks decent for me thats good enough. I been saving 40$ for every cut
missdc321: Awesome! You make it look so easy! Great cut
Z H: Dude cut his own hair better than I’ve ever gotten my hair cut at any barbershop
ay yo whassup Brotendo: Bro!! Been doing my own hair for the last year and finally seem to be getting the hang of a fade but it still takes so much time compared to how you did in this video unless you've tried to cut your own hair I don't think you can appreciate this video as much!
AngryBear: Okay, that's one thing I'm never gonna try again. Now I'm rocking that Buzz-cut style.
Pyost Malone: Thanks dude. I used the clipper for the first time in my life, but I finally make it. Without an inch of error. After eight hours..!! It's exactly the same as the barber did..!!!
Aiman: This man is really good at it. To whoever that want to try this, please make sure you're ready to be bald or wear a cap every time you go out. My experience doing this is not so good. The side part is ok but it turns out a disaster at the back part. For me who had experience cutting hair for people, it's really hard and maybe it will be hard even for pro barber because of the unnatural hand position. This man did this many times before he did this video. So, don't expect you will get the same result as him for your first time but we learn from experience, don't be afraid to try if you don't mind if it go wrong a little bit.
Muralidharan Kandasamy: Thx for your video. I just tried the same for my two little boys. It came really well.
Eh065: He clearly did a wonderful job. One thing to point out: its a lot easier to cut/trim hair when you already have defined lines from a previous cut.
Dusty 254: I'm over in the UK, followed your video and it turned out great!! Thanks alot mate. Was just going to do no.1 all over. Great video - subbed
Daniel Hernandez: I faded my hair nicer than my local barbershop thanks to this guy! Definitely recommend his videos.!!
Melissa: Great job!, You make it look so easy!
Myth Buster: You do it better than my hairs dresser! Thank for the video. Your mom will love it , because you have saved $25 bucks!
Eli: Gotta be honest used this tutorial today and with a tiny bit of help in the back top I got this down by just taking my time and following the steps
Chris Klein: I actually did this, turned out very well. It can be done, bit of patience and taking your time it’s not too difficult - as long as you have used clippers before !
Amarikita: Wow, excellent job ! It's much more difficult than it looks.
Jonas Pereira dos Santos: Eu não entendo os joinhas ou ok negativos, eu achei top de + e me incentivou mais ainda eu continuar no meu curso online e depois vou passar para a prática e vou ser ótimo no que irei fazer. Abraços e obrigado pela força.que Deus te abençoe sempre.
Marcos garcia: I've been messing up my hair for about a month now, did ok last time. This video gave me the details i was missing to fine tune my skills.
Brian Cui: Use of the thinning sheers are very impressive. Time to practice. Great video
Iron Tongue: Great instructions! You convinced me that there is NO WAY I would be able to cut my own hair. I doubt I could look at the mirror and not accidentally cut in the opposite direction. Before watching this, I was ready to order some clippers but you've reminded me it takes experience and skill to cut hair. I will have to wait until the lockdown is over!
LV: Good content! In terms of point cutting, do you have to do it in all sections?
Saqib Ali: After being inspired by you I do cut ✂️ my own hairs, and everybody's appreciate my doings and styles❤️☺️
Sadia Ahmad: Absolutely fantastic!!! That’s talent right there!!!
Ricardo Silva: You make it look easy. Well done. I will try. Thank you
Julie Ann Taggart: Absolutely loved this. It was exactly what I was looking for I'm going to try it on my son's hair. Not sure it's going to look this good though
Hafizullah: Clean man , I cut my bros hair the other day and it looks real good. Thanks
John Dank: Thanks for the tutorial. Managed to cut it pretty well, except the fade isn't as clean and the back is kinda meh. But practice makes perfect and hair grows back. Thx!
Prabh Sandhu: I tried this and it turned out really well!
Abandon: 11:00 max respect to you, that's pure magic on the shear work
Sy Mondo: Thanks mate, your 45 degree angle away method helped me out massive when using scissors
a Botello: Honestly pne of the best self cut tutorials I have seen in a long time, Great job!
Frank Post: Okay I have so much respect for my barber now, never realized how difficult this is
Денис Успешный Синхронный Переводчик: Actually, I have been cutting my own har for many years, and I highly recommend getting this skill. Its easier than you think, but you need good tools, respect for the process, focus and patience. and get your self pro tools, i.e. pro clipper.... like moser T-cut for example and pro level scissors, and watch some youtube tutorials on how to cut \ sculpture your hair, its actually very therapeutic and fun, better than yoga for shure.
jesus marias: I’ve been cutting my hair since I was 13 I’m 34 .. and I think this guy did a pretty good job explaining to anyone who has never cut their own hair
Pacific Blue: Great video! Can you cut the top with clippers instead of shears and get a similar result?
Luis Alvarado: Finally someone who gets to the point
Mostafa Azadegan ꪜ: A way to not mess up is to start with a higher guard.
Mr Bev: Never cut my own or anyone elses hair before, followed this tutorial and it turned out pretty decent. I did work a higher guard into a lower one though so i could quit without it being a total disaster if it went wrong. Might cheat on my barber with myself from now on.
maura mora: I also cut my own hair. I always have a pixie cut and I only use scissors. Same way as what you've done at the top, mine is just done all the way till the sides and the back.
John Jr: You did a great job! Sucks, I definitely couldn't get it right and just went #1 ALL AROUND
Jing Binay: imagine the tension buildup when you're about to start with the no guard clipper.
Facundo A: This cut is kinda risky if its your first, i would recommend do a low fade on your first take, so if you mess up the fade you have more more space to work with
Joshua Espinoza: I cut my hair today after watching you video a few times, it came out pretty good for my first quarantine fade .
DEXTER941: Master technician, better than any barber I've been to. Obviously some tools needed first but it can be done and some mistakes will probably happen but if you are confident and are determined you might achieve this result, excellent work.
edd saw: You make it look so easy
Israk official: THANKS MATE REALLY HELPFUL DURING THIS TIME....
Ruhollah Motaharinejad: Today I tried hair cut by myself , I used 5 guards for sides and then 4 and 3 for fading towards the necks with about one inch separation, then I wanted to use scissors ✂️ but I couldn’t give it a try( was hard to manage for first time). I ended up with guard number 6 for remaining on top of my head. That works and I am happy with what I’ve done today. P.S.: I bought Conair Custom Cut 18-piece Haircut Kit; Home Hair Cutting Kit with No Slip Grip https://www.amazon.com/dp/B002CUK9S4/ref=cm_sw_r_cp_api_i_cE8MFbM7EF33M at Walmart as clearance only for 5$. I am gonna save 20 bucks every month
Conzsmith: Been cutting my own hair for months and always struggle with the top but this vid helps so much! Thanks
Ashok Pradhan: Very practical.You developed confidence in me .Thanks
Justin D: Fair play! Wish I could do that to my own hair... I'd save a fortune
Sanjeev Gopal: The perimeter guideline technique worked like a gem!
robert vezina: Outstanding! You are a talented Teacher, Thank You very much Brother.
neveral0n3: Gave myself a fade using these instructions...ended up going outside wearing a hat + a hoodie + N95 Mask + Sunglasses. Cheers.
Aryuu Kou: will try it tomorrow for sure, thanks for this tutorial
soflogator: Holy shit...I actually gave this a go and my hair turned out half-decent! I'm honestly surprised that I didn't completely fuck my shit up. Thanks for the inspiration....looking forward to getting better at this!
Tony Nicholson: Amazing haircut! I’ll try to do it by myself.
Yishai J: Great job bro! I’m impressed.
Anton Klejmenov: My brain: no problem My eyes: easy My hand: NO WAY
Adam 228133: Great video, Alex. I noticed you use your dominant hand (right hand) to cut on the left side of your head. I’m also a righty, but would you recommend using your left hand to cut the left side of your head?
Geraldo Pinheiro: Sensacional
Logan Ngo-Wang: how much hair do you need on top to be able to separate it from the fade on the side?
MARWIN YAGO: Sending love from Philippines dude,,, it's really interesting video and a helpful one for those man like us who don't have money for them to send their self on a salon for a haircut , but a lesson one also for all to take charge in such cutting their own hairs to look good and become a handsome one.
JC C: This guy can cut his own hair better then barbers cutting clients hair. Well done mate
FEHMİ ÖZŞAHİN: I've been cutting my own hair for years, but I don't go into too much detail. Because I don't have as much hair as you. You have a very professional technique. I like the video and I subscribe.
Arkadia: the first time I want to do it myself ^^ nice job ! Thanks
Lil Gunzz: I can confirm this works with beard trimmers it’s coming out really good
Chill & and keep Chillin: Think Im gonna try this out good tutorial, really liked the straight forward nature of this video.
Joseph Rinaldo: Great video! From a first responder desperately needing to keep my hair short to fit under protective equipment but nobody around willing to cut my hair. Thank you!
banquo60615: Watch this video to see what’s involved and pick up on methods and techniques, but know that it takes practice to gain competency and that your first tries will be less than perfect.
Dunder Mifflin Paper LLC: I'm nasty cutting my own hair and haven't paid for one in 10 years. Only thing is I can't cut anyone else's hair for shit. But then I haven't had much practice. I find it super therapiting and know exactly how I like to fade it and cut it. I learned from fixing Jack's up hair cuts awhile ago. Just practice like anything else.
FARHAD J: this is the definition of “do not try this at home”
Mr. MAC: I have never seen a self hair cutting video. I’m a do it my selffer too. I have been cutting my own hair for a couple of years now. My first time was okay except for the back. My fade has gotten better every time. I don’t care what people say or think, which gave me the confidence to start cutting my own hair. Just gave myself a fade yesterday. I have to say it is my best work yet. I will definitely use techniques from this video. Now I will upgrade my style by purchasing a set of shears. I’m also in the market for two new mirrors. I’m thinking of a zoomed in one for the side mirror. Oh, yeah some of the comments are very funny.
Erik Lundström: Been doing this for the past 6 years. Remember: You will probably mess up if you are just starting out, but its usually fine because youre hair will grow out again. Dont overdo it
T B: Nice m8 , I've been cutting my hair for 10 years and no longer even need a mirror , ive mastered the self cut